
Your cart is currently empty.
Think of your storefront windows as your silent salesperson, working for you 24/7. Window decals for your NZ business are so much more than just stickers; they’re one of the smartest marketing moves you can make to pull in more foot traffic, share key info, and sharpen up your professional look. This guide will walk you through everything you need to know to make a great decision.
Turn Your Windows into Powerful Brand Assets
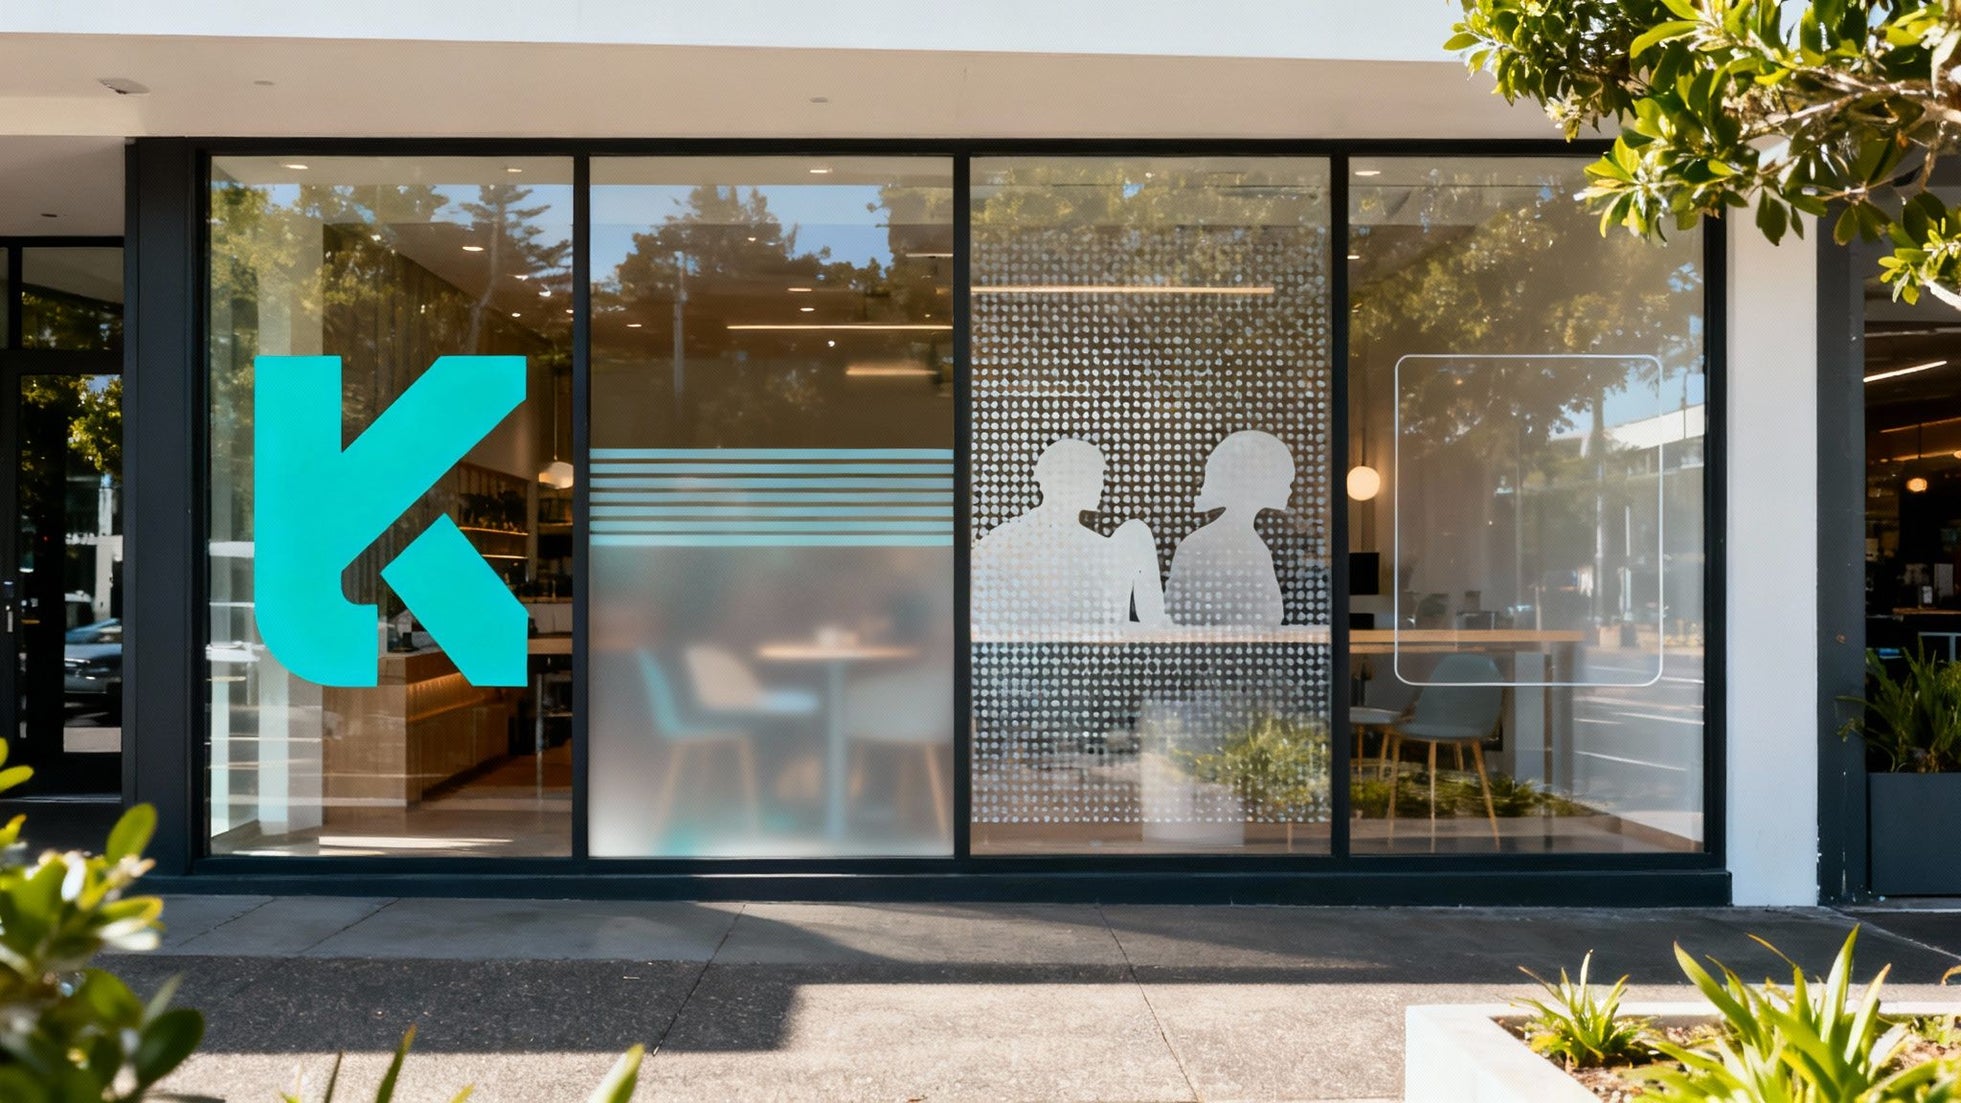
For any Kiwi business, those street-facing windows are prime real estate. Too often, they're just left empty. You should see them as a blank canvas, just waiting to tell your brand’s story to every single person who walks past. Custom window decals change that passive space into an active, attention-grabbing marketing channel that works for you without any ongoing costs. It's like a constant, visible invitation to your local community.
This is a game-changer in a competitive local market. A plain window just blends in, but a well-designed decal makes your business pop. It's the difference between being another shop on the street and becoming a local landmark people remember.
The Real-World Impact of Window Graphics
The return you get from window decals is huge, especially when you think about the alternative—leaving valuable advertising space completely blank. From boosting brand recognition to directly increasing the number of people walking through your door, the benefits are clear and easy to see.
This infographic breaks down the key advantages of using window decals versus having none at all, focusing on foot traffic, brand visibility, and how cost-effective they are.
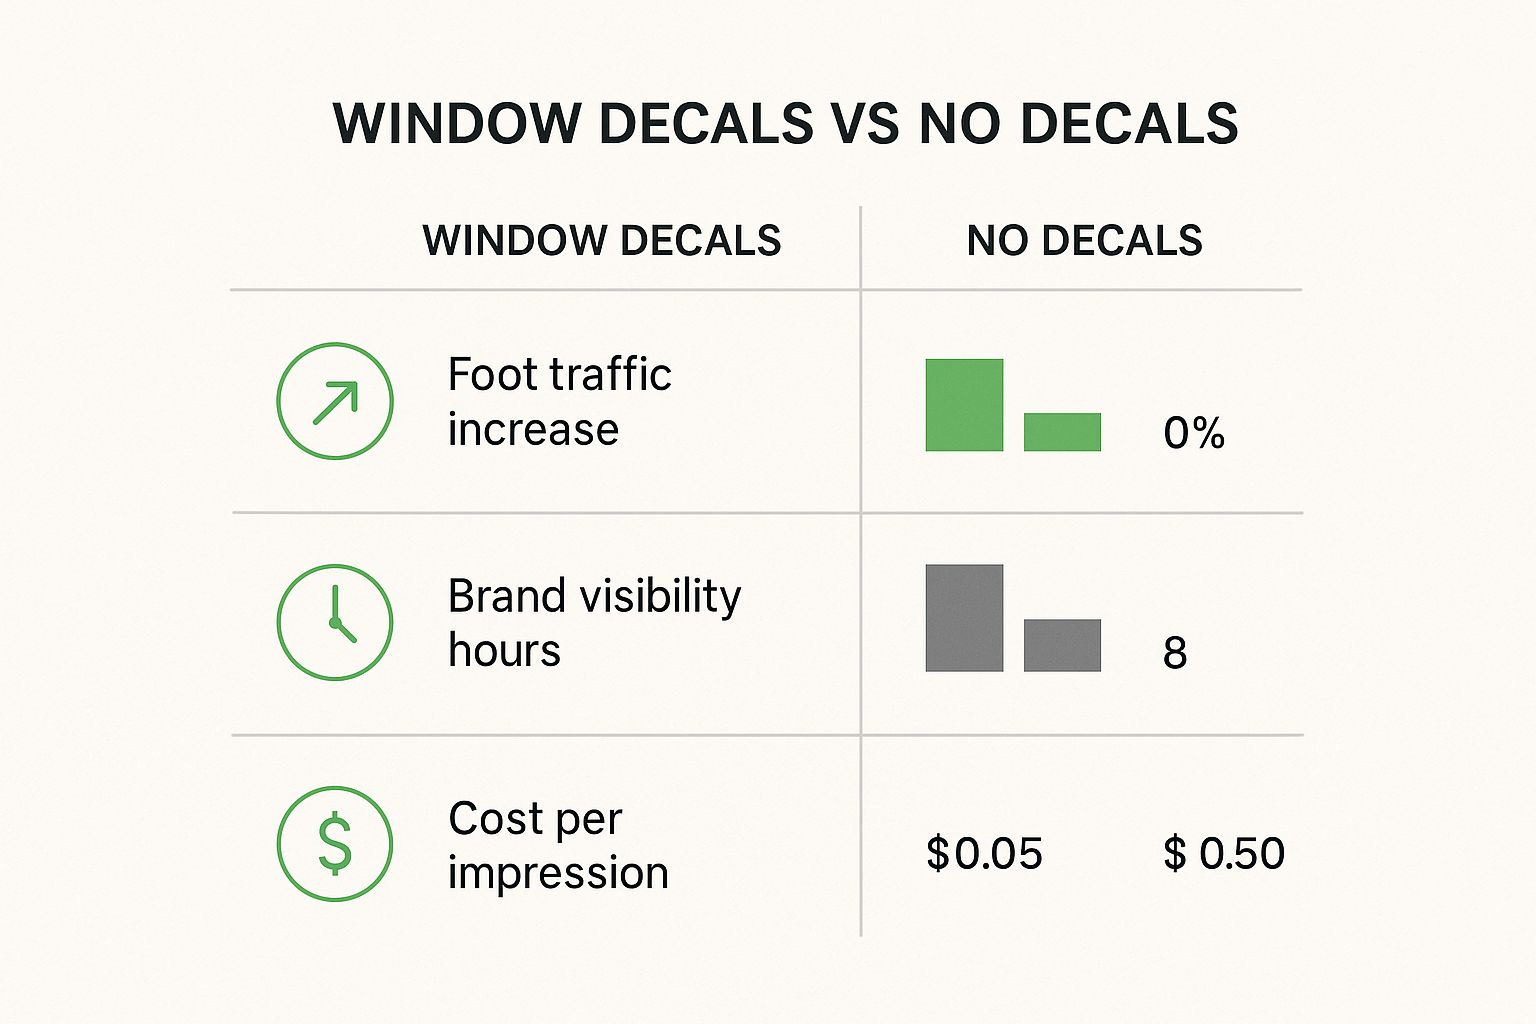
As you can see, choosing to install window graphics can lead to a serious jump in customer traffic while giving you round-the-clock brand exposure at a tiny fraction of the cost of traditional advertising.
More Than Just a Sticker
Good window decals do a lot more than just look pretty. For New Zealand businesses, they’re a versatile tool that can be used for all sorts of business needs and marketing campaigns.
Think about all the ways you can use them:
- Promotional Advertising: Got a sale on? A new product arriving? A bold "50% Off" decal will literally stop people in their tracks.
- Essential Information: Clearly display your opening hours, contact details, or what payment methods you take. It makes life easier for customers before they even step inside.
- Brand Reinforcement: Your logo, your brand colours, your key message—get it all out there to build a strong, memorable identity.
- Privacy and Ambience: Frosted or etched decals are perfect for creating a bit of privacy for clients or staff. They still let all that lovely natural light filter through, making the inside feel great.
Choosing the Right Type of Window Decal
Picking the right material for your window decal is a bit like choosing the right tyres for your car. You wouldn't put racing slicks on a farm ute, would you? The material you go with is the foundation of your message, and it has a huge say in how your decal looks, how long it lasts, and what it actually does for your NZ business.
Getting your head around the different types means you're putting your money in the right place. Whether you're after something that screams "look at me!", a touch of class, or just a bit of privacy, there’s a material made for the job. Let’s break down the most popular options we see here in New Zealand.
Comparing Window Decal Materials for NZ Businesses
To make the choice a little easier, here’s a side-by-side look at popular decal materials. This should help you pick the best fit for your specific needs, whether you're after privacy screening or a big, bold promo.
| Material Type | Ideal Use Case | Visibility Effect | Average Lifespan |
|---|---|---|---|
| Opaque Vinyl | Bold branding, major sales promotions, hiding construction or storage areas. | Completely blocks the view from both sides. Maximum impact and colour. | 3-5 years+ |
| Perforated Vinyl | Full-window advertising on vehicles or storefronts where interior view is needed. | Solid graphic from the outside, see-through from the inside. | 1-3 years |
| Frosted/Etched Vinyl | Office partitions, clinic windows, upscale retail branding, creating privacy. | Translucent, obscures the view while letting soft light through. | 5-7 years+ |
Each of these has its own strengths. The right one for you really comes down to balancing your brand's aesthetic with the practical needs of your space.
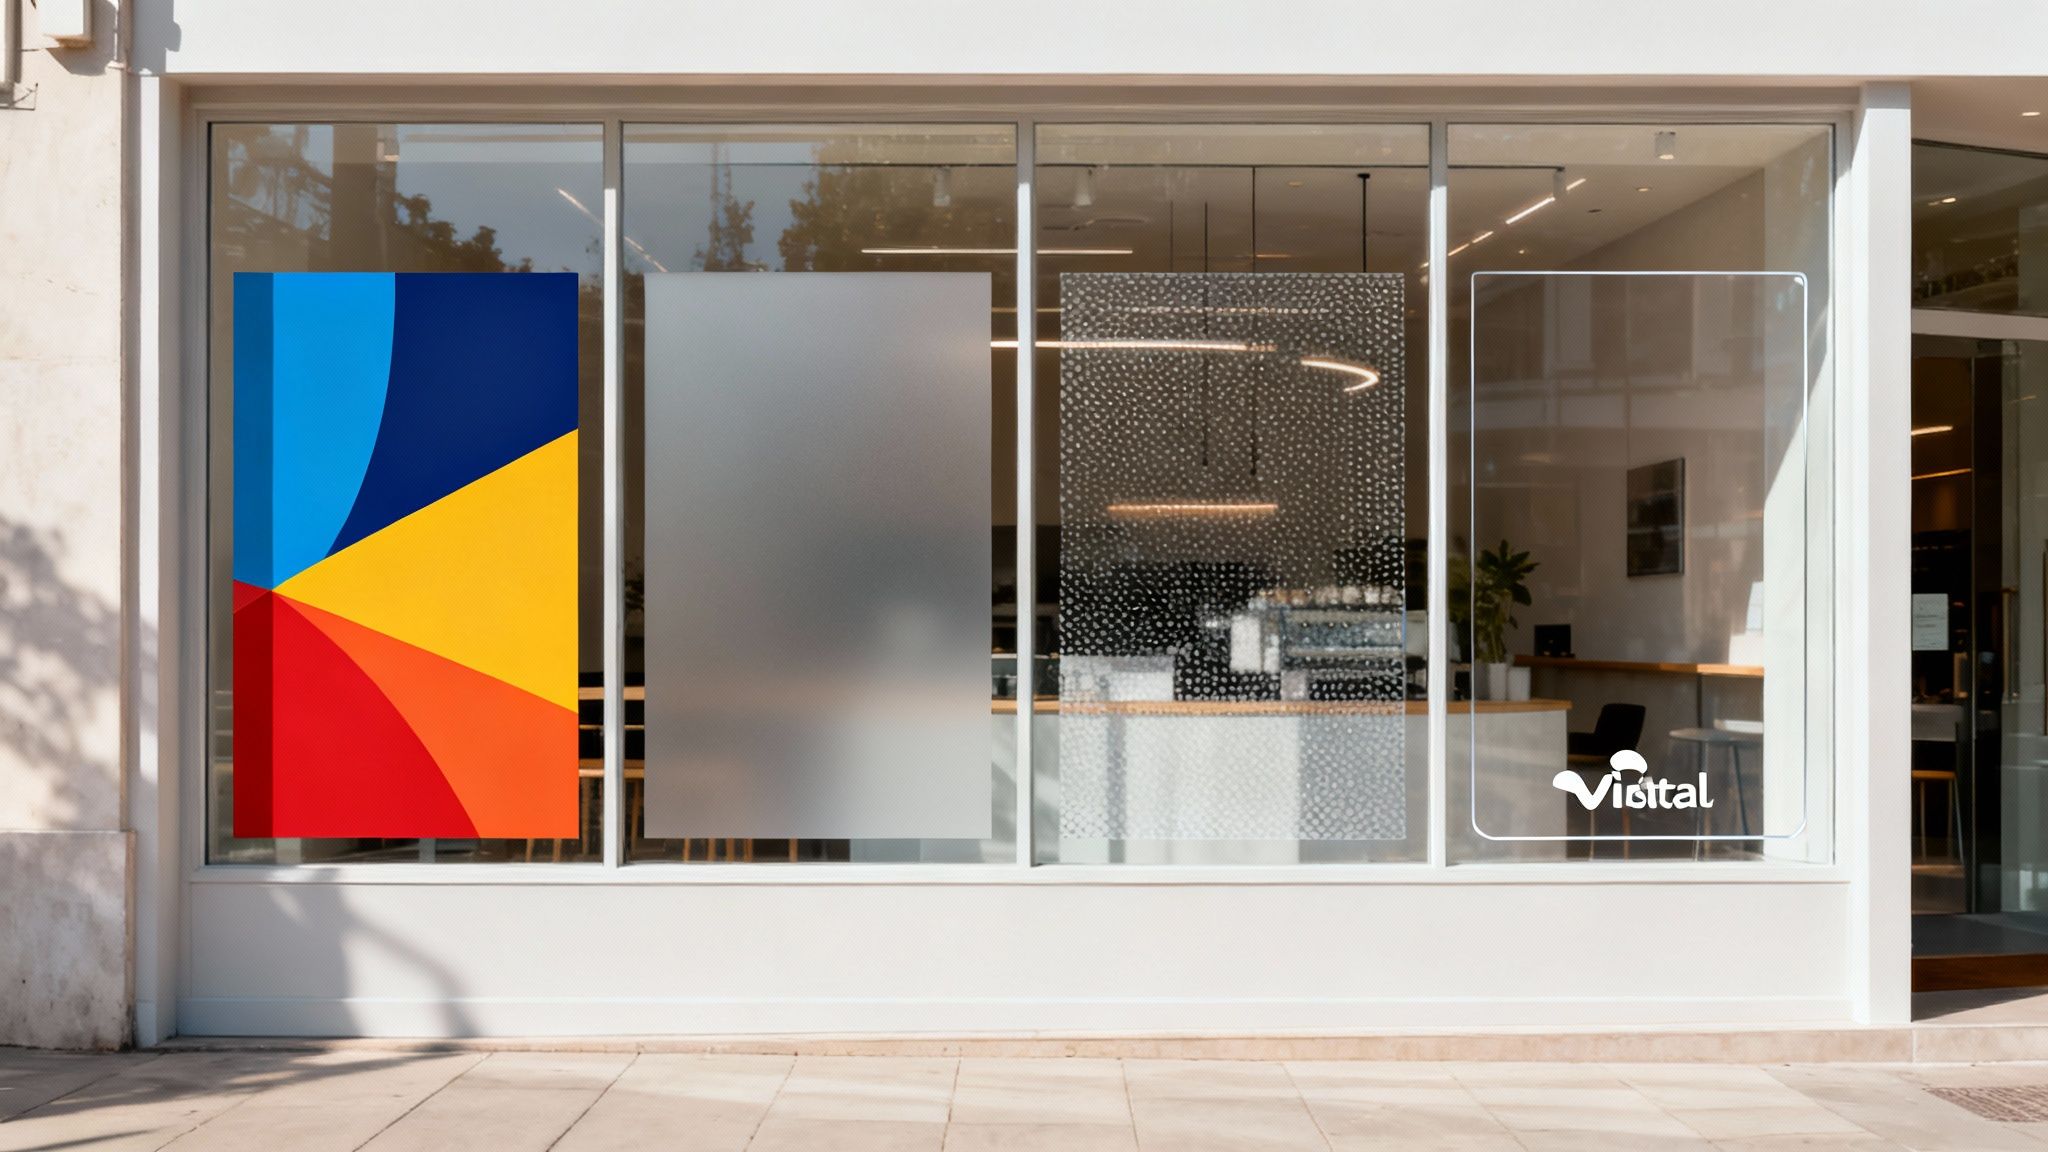
Opaque Vinyl for Maximum Impact
Think of opaque vinyl as a solid wall of colour. It’s completely non-transparent, designed to deliver punchy, vibrant graphics that are impossible to miss. This is your go-to when your message needs to be the star of the show, completely blocking the view from both inside and out.
It’s perfect for:
- Bold Branding: Making your logo and brand colours pop in their truest, most saturated form.
- Major Promotions: Announcing a grand opening or a massive sale with graphics that shout from the street.
- Covering Unsightly Views: Hiding a messy storage area or construction work behind a professional, branded surface.
If your main goal is to make a statement that people can't ignore, opaque vinyl is your best bet. It offers unmatched colour and presence.
Your choice of decal material fundamentally changes how customers interact with your physical space. Opaque vinyl creates a full stop, demanding attention, while options like perforated vinyl invite curiosity by offering a glimpse inside.
Perforated Vinyl for One-Way Vision
Perforated vinyl, often known as One-Way Vision, is a genuinely clever bit of tech. It’s basically a pair of sunglasses for your window. From the outside, people see a solid, vibrant graphic, but from the inside, you can still see out perfectly clearly. It works by having thousands of tiny holes, or perforations, across the vinyl that our eyes blend together from a distance.
This stuff is ideal when you want to use your entire window for advertising without losing all your natural light or your view of the street. For a busy Kiwi café, this means you can show off a massive photo of your award-winning flat white while your staff can still see customers coming. It’s the best of both worlds—full-on advertising and functional visibility.
Frosted and Etched Vinyl for Elegance and Privacy
Frosted vinyl is the master of subtlety and sophistication. It gives you the beautiful look of sandblasted or acid-etched glass, creating a translucent finish that blurs the view while still letting soft, diffused light filter through. This makes it an amazing choice for businesses that need to create privacy without making a space feel like a cave.
Consider frosted vinyl for:
- Office Partitions: Creating private meeting rooms or separating desks in an open-plan office.
- Clinic and Spa Windows: Ensuring client confidentiality while creating a calm, serene atmosphere.
- Restaurant and Bar Ambiance: Adding a touch of class to entryways or separating dining areas.
You can even have logos or intricate patterns cut out of the frosted film, creating a refined, high-end look that really elevates your brand’s image. It’s less about shouting a message and more about whispering quality. With the right design, these window decals NZ businesses use can completely change the feel of a space.
Designing Window Decals That Actually Work
A great idea can fall flat with a poor design. When it comes to window decals, you’re not just putting up a sticker; you're creating a powerful piece of visual communication that has to work hard for your business. To get it right, you need to think like a designer from the get-go, focusing on clarity, impact, and how it represents your brand.
The real test isn't how it looks on a computer screen. It's about stopping someone in their tracks from across a busy Kiwi street. You have to consider how your design will stand up to the bright New Zealand sun and cut through the visual noise of a bustling town centre. Smart design choices are what turn a simple decal into an investment that actively brings people through your door.
Mastering the Visual Essentials
Before you start playing with logos and slogans, you need to nail the fundamentals. These core design principles are what separate a professional, effective decal from something that just looks cluttered and amateur. Get these right, and you've built a solid foundation.
-
Colour and Contrast: New Zealand’s bright, often harsh sunlight can completely wash out weak colour schemes. Go for bold, high-contrast pairings that pop, like a dark colour on a light background or vice versa. Your brand colours are key, of course, but you have to make sure they’ll be visible against glass in all kinds of light.
-
Font Readability: That fancy script font might look incredible on your business card, but from ten metres away, it’s just a meaningless squiggle. Stick to clean, bold fonts that are easy to read at a distance. Sans-serif options like Helvetica or Arial are popular for a reason—they work.
-
Visual Hierarchy: What’s the single most important thing you want people to know? Your design needs to guide their eyes straight to it. Use size, colour, and positioning to make your main message—whether it's "50% Off Sale" or "Grand Opening"—the undeniable star of the show.
Keeping Your Message Sharp and Simple
In the world of window graphics, less is almost always more. A potential customer walking by only has a few seconds to take in your message. If you overload your decal with text and images, you’ll just confuse them, and the opportunity is lost.
Think of it like a billboard. You need one clear headline, a strong visual, and maybe a simple call to action or your website. Don’t try to cram in long sentences, multiple phone numbers, or a laundry list of every service you offer. Focus on the one thing you want that person to remember or do.
A crowded design creates a confused message. A simple, focused design creates a confident brand. Aim for instant comprehension to make a lasting impression.
This minimalist approach makes your brand look focused and professional. If you need to share more detailed info, pop a QR code on the decal. It’s a simple way to direct people to your website, where they can browse at their own pace.
Preparing Your Files for a Perfect Print
Once you're happy with the design, getting the artwork ready for the printer is the final, crucial step. Sending over a low-quality file will result in a blurry, pixelated decal that completely undermines all your design effort. It’s a common mistake, but thankfully, an easy one to avoid.
To make sure your decals come out looking crisp and professional, here’s what you need to do:
- Use Vector Graphics: Whenever possible, create your designs in vector software like Adobe Illustrator. Vector files (like .AI, .EPS, or .SVG) can be scaled up to any size without losing a drop of quality, which is absolutely essential for large window graphics.
- Provide High-Resolution Images: If you have to use photos or other raster images (JPGs or PNGs), they need to be high-resolution. The industry standard is 300 DPI (dots per inch) at the final print size.
- Specify Cut Lines: If you’re after a custom shape (a die-cut decal), you’ll need to include a clear vector path—often called a cut line—on a separate layer in your file. This tells the printer's machine exactly where to cut.
- Embed Fonts or Outline Text: To prevent any font-related glitches, either convert all your text to outlines (which turns the letters into shapes) or embed the font files into your final PDF.
Chatting with a professional designer or your chosen NZ print shop can help you sort through these technical bits and pieces, ensuring the final product looks flawless. It’s worth taking these extra steps to make sure your vision is translated perfectly onto the glass.
The demand for this kind of custom work is a major driver in the market, reflecting what’s happening globally. The vinyl decals market is projected to hit around $7 billion worldwide by 2033, and this growth is definitely shaping how Kiwi businesses approach their branding. You can learn more about these global market trends and their projections for growth.
Navigating Costs and Finding NZ Suppliers
Figuring out the cost of custom window decals NZ businesses need is the first step towards making a smart investment. The price you're quoted isn't arbitrary; it’s a direct reflection of the materials, complexity, and work involved in creating a quality, durable, and eye-catching final product.
Think of it like getting a custom piece of furniture built. The final price depends on the size, the type of timber used, the intricacy of the design, and how many you order. Getting a handle on these variables helps you set a realistic budget and ensures you’re getting real value for your money.
Breaking Down the Key Cost Factors
Four main things will shape the quote you receive from any New Zealand supplier. When you understand how they work together, you can compare different options properly and avoid any surprises.
- Size and Dimensions: This one’s pretty straightforward. Bigger decals need more material and more ink, which naturally pushes the price up. Always measure your window space accurately before you start asking for quotes.
- Material Type: As we've covered, different materials come with different price tags. A simple opaque vinyl will almost always be a more budget-friendly choice than a specialised perforated or frosted film.
- Design Complexity: A simple, square-cut logo is a lot quicker to produce than an intricate, die-cut design with fine details and multiple colours. The more complex the shape and printing process, the more it will cost.
- Order Quantity: Most suppliers will give you a better per-unit price on larger orders. If you've got a few locations or want to run the same promo across several windows, ordering in bulk is usually the way to go.
How to Find and Vet Local NZ Suppliers
Finding the right partner to bring your vision to life is just as critical as the design itself. A good supplier does more than just print; they bring expertise, quality control, and reliable service to the table.
Start by looking for local printers and sign writers in your area who specialise in large-format printing. Once you have a shortlist, it's time to do your homework. Check out their online portfolio or gallery to get a feel for their work quality. Reading customer reviews can also give you a great insight into their reliability and how they treat their clients. Exploring options like Onsite Media's visual branding services can also give you a good sense of the professional solutions available locally.
Choosing a supplier is about building a partnership. Look for someone who is happy to answer your questions, offer solid advice on materials, and give you a clear, itemised quote. Transparency is the hallmark of a true professional.
Asking the Right Questions Before You Commit
Before signing off on anything, make sure you've got all the information you need. A quick chat upfront can save you a world of headaches down the line.
Here’s a quick checklist of questions to run through:
- Can you provide a sample of the material you're recommending?
- What’s your standard turnaround time from artwork approval to delivery?
- Do you offer installation services, and what does that cost?
- What are your specific artwork file requirements (e.g., file type, resolution)?
- Is the quote all-inclusive, or are there potential extra charges for setup or delivery?
Getting these answers helps you compare apples with apples. For example, pricing for custom window decals NZ can vary, but to give you a ballpark, costs for 100 stickers might start from around $178 and go up to $609 for 1,000 larger ones. This makes it a really accessible branding tool for Kiwi businesses. You can always discover more about these pricing examples for window stickers to get a clearer picture of the market rates.
Proper Installation and Maintenance Tips
You’ve invested in a brilliant design and picked out the perfect material. Now for the make-or-break moment: the installation. This is the final, crucial step that determines whether your decal looks sharp and professional or sloppy and bubbled.
A flawless application is what unlocks the full potential of your window graphics, making sure they last for years and represent your brand beautifully. It’s not just about slapping vinyl onto glass; it’s a process.
Likewise, a simple maintenance routine will keep your colours vibrant and your message clear, protecting your investment from the wear and tear of New Zealand's unique weather. Let's walk through the essential steps to get it right.
Preparing for a Perfect Application
Before you even think about peeling the backing paper off, you need to prep the surface. This part is non-negotiable.
Think of it like painting a wall—you wouldn't apply a fresh coat over dust and grime, right? The glass has to be perfectly clean for the decal's adhesive to form a strong, lasting bond.
Start by cleaning the window thoroughly with a simple solution of water and a few drops of dish soap. You can also use a dedicated glass cleaner, just make sure it doesn't leave any residue behind. Avoid ammonia-based cleaners, as they can mess with the adhesive.
Wipe it all down with a lint-free cloth, then use a squeegee to get every last bit of moisture off. For a perfect finish, a final wipe-down with isopropyl alcohol will zap any remaining oils, leaving you with a pristine surface ready for application.
Choosing Your Installation Method: Wet vs. Dry
There are two main ways to apply window decals, and each has its place. The best choice often comes down to the size of the decal and how confident you feel.
-
Dry Application: This is the go-to for smaller, simpler decals like cut lettering or little logos. It’s faster because there's no drying time, but it's also much less forgiving. Once the adhesive touches the glass, it’s stuck, making it tough to fix positioning or get rid of trapped air bubbles.
-
Wet Application: This method is highly recommended for larger decals or for anyone new to the game. It involves spraying both the glass and the sticky side of the decal with a light soap-and-water solution. This creates a slippery surface, letting you slide the decal into the perfect spot and use a squeegee to easily push out bubbles and water.
The wet application method is your safety net. It gives you a crucial window of time to adjust positioning and smooth out imperfections, turning a potentially stressful job into a manageable one.
For most Kiwi business applications, especially on large storefront windows, the wet method delivers a much more professional, bubble-free result.
A Step-by-Step Guide to Installation
Ready to go? First, gather your tools: a spray bottle with your water/soap mix, a squeegee (a credit card wrapped in a soft cloth will do in a pinch), masking tape, and a measuring tape.
- Positioning: Carefully measure and position your decal on the window. Use masking tape to create a hinge along the top edge—this ensures it hangs straight and exactly where you want it.
- Application: Flip the decal up on its hinge and carefully peel the backing paper away. While holding the decal off the glass, lightly spray both the window and the adhesive side of the vinyl with your soap solution.
- Squeegee: Let the decal fall back into place. Starting from the centre and working your way out, use your squeegee to firmly press the vinyl against the glass. Overlap your strokes to push all the water and air bubbles out towards the edges.
- Finishing Touches: Once the decal is flat and smooth, carefully peel off the top layer of application tape. If you spot any tiny bubbles, you can often prick them with a fine pin and smooth the area down.
Keeping Your Decals Looking Great
Looking after your window decals NZ is incredibly easy and just needs a little care to keep them looking brand new. The key is to be gentle.
Avoid using abrasive cleaners, harsh chemicals, or rough scrubbing pads. These can scratch the vinyl or cause the edges to start lifting. A soft cloth or sponge with some mild, soapy water is all you'll ever need.
Simply wipe the decal gently and let it air dry, or pat it dry with another soft cloth. One more tip: if you're using a pressure washer on your windows, keep the nozzle a safe distance away. The high-pressure water can easily peel the decal right off the glass. With just this minimal effort, your decals will continue to be a powerful, vibrant asset for your business.
More Than Just Marketing: Functional Window Films
While splashing your brand across your windows is a brilliant marketing move, the world of window decals in NZ goes much deeper than logos and sale signs. Think of modern window films less as a sticker and more as a high-performance upgrade for your glass.
These films work quietly behind the scenes to solve genuine business problems. From boosting energy efficiency to enhancing security, they offer practical benefits that make your commercial space more comfortable, private, and cost-effective. It's a smart investment in your building that pays you back in tangible ways.
Tame the Sun for Better Comfort and Lower Bills
Let's be honest, the New Zealand sun can be relentless. It can turn a beautiful, light-filled office or shop into a stuffy, glaring hotbox in no time. This is where solar control films really shine.
These films are engineered to reject a huge chunk of the sun's heat before it even gets through the glass. The impact is immediate:
- Slash the Glare: Staff and customers can finally see their screens or browse products without squinting. It just makes the whole environment more pleasant and productive.
- Cut Cooling Costs: With less heat pouring in, your air conditioning system doesn't have to work nearly as hard. That translates directly to welcome savings on your power bill.
On top of that, functional films are one of the most effective ways to block sunlight from windows, offering a sleek alternative to clunky blinds.
Smart Solutions for Privacy and Security
Beyond controlling the climate inside, specialised films can give you elegant privacy and a serious security boost. For businesses like medical clinics, law offices, or even just creating quiet zones in an open-plan workspace, decorative privacy films are perfect.
Frosted, etched, or patterned films create visual separation and obscure the view with a touch of class. The best part? They do it all while letting the natural light flow through, so you keep that bright, airy feeling without the mess and expense of construction.
Then there are safety and security films. These are tougher, thicker films designed to do one critical job: hold shattered glass together. Whether it's from an accident, wild weather, or an attempted break-in, the film prevents dangerous shards from flying, massively reducing the risk of injury and making it much harder for someone to force their way in.
The demand for these films is growing fast. Top-tier solar and safety films can now filter up to 85% of solar radiation and trim HVAC energy consumption by as much as 20%. It’s a testament to how effective these simple upgrades can be.
Got Questions? We've Got Answers
Even after going through all the details, you probably still have a few questions rolling around. That’s perfectly normal. We find that business owners across New Zealand often ask about the same things, especially how decals hold up in our wild weather and what happens when it’s time to take them down.
Let's tackle the most common queries so you can feel completely confident in your decision.
How Long Do Window Decals Last in NZ Weather?
This is the big one, and for good reason. The Kiwi sun can be brutal, and our weather is nothing if not unpredictable. The lifespan of your window decals really boils down to two key things: the quality of the vinyl used and how well it was installed in the first place.
When you invest in a professionally installed, high-quality decal, you can expect it to look great for 3 to 7 years on an exterior window. Go for a cheaper option, and you might see fading or peeling in under a year. This is where choosing a reputable local supplier really pays off. If your decal is on the inside of the glass, it's protected from the elements and will last even longer.
Are Window Decals Easy to Remove?
They sure are. One of the best things about vinyl decals is their temporary nature. This makes them ideal for seasonal promotions, special offers, or if you ever decide to move your shop to a new location.
When it's time for a change, most decals come off without a fight. A bit of gentle heat from a hairdryer on a low setting will soften the adhesive, letting you peel it away cleanly from a corner. If any sticky stuff gets left behind, a quick wipe with some isopropyl alcohol or a proper adhesive remover will sort it out.
Pro Tip: Try removing your decal on a warm, sunny day. The sun does half the work for you by naturally softening the adhesive, making the job much easier.
Can I Reuse My Window Decals After Removing Them?
For most standard decals, the answer is no. They’re designed for a one-and-done application. The adhesive loses its grip once it's been peeled off, and the vinyl itself can easily stretch or tear during removal, so getting a clean, bubble-free finish a second time is pretty much impossible.
There are non-adhesive options called 'static clings' that are reusable, but they don't have the same staying power. For a durable, professional look that holds strong, a traditional vinyl decal is almost always the better choice for Kiwi businesses. It gives you a much stronger bond and a sharper appearance for as long as you need it.
Leave a Comment
Stay home & get your daily
needs from our shop
Start You'r Daily Shopping with Nest Mart