
Your cart is currently empty.

For any New Zealand business, getting your brand out there is crucial, and high-quality vinyl stickers are an incredibly powerful—and budget-friendly—way to do it. Whether it's for product packaging at an Auckland startup or branding a tradie's ute in Christchurch, they're a versatile tool that makes a real impression. Plus, their durability means they're built to handle New Zealand's famously unpredictable weather.
Why Vinyl Stickers Are a Smart Move for Your NZ Business
In a crowded market, visibility is everything. While big-budget advertising campaigns have their place, many Kiwi businesses are finding just how much marketing punch is packed into a small, sticky square. Custom vinyl stickers aren't just for decoration; think of them as mini-billboards that go wherever your customers go, turning everyday items into brand advocates.
Imagine a sticker with your logo on a laptop, a reusable coffee cup, or a car bumper. It’s a quiet endorsement that sparks curiosity and builds brand recognition naturally. Unlike a digital ad that vanishes in a split second, a well-designed sticker is a constant, physical reminder of who you are. This makes them a fantastically efficient way to build loyalty and awareness right across Aotearoa.
More Than Just a Label
What really sets vinyl stickers apart is their resilience and polished look. Paper labels? They fade, tear, and fall apart at the first sign of moisture. Vinyl, on the other hand, is made to last. That toughness ensures your branding stays sharp and vibrant, whether it's on a builder's toolkit out in the elements or on a gourmet food product sitting in a busy cafe. It’s that professional finish that screams quality and attention to detail, building a stronger image for your brand.
To see how these adaptable little tools fit into the wider world of visual marketing, it’s worth looking at the key types of signage for businesses. You’ll quickly see just how flexible they can be.
For a small business, every dollar has to work hard. Vinyl stickers deliver one of the best returns on investment in marketing, giving you non-stop brand exposure for a tiny upfront cost.
Here’s why they’re a winner for any NZ business:
- Cost-Effective Branding: You can reach a massive audience without the never-ending costs of digital ads.
- Enhanced Durability: They’ll stand up to sun, rain, and daily scuffs, keeping your brand looking its best.
- Creative Versatility: From complex die-cut logos to bright, bold promotional designs, your imagination is the only limit.
Getting to Grips with Vinyl Materials and Finishes
Picking the right vinyl sticker is about so much more than a sharp design. To get a result that truly works, you need to understand the foundation: the material itself. Not all vinyl is made equal, and getting your head around the different materials, adhesives, and finishes is the secret to making your project a success.
Here in NZ, the options available are designed for specific jobs, ensuring your brand looks its best and holds up to the task, whether that's on a chilly bin at the beach or a ute on a construction site.
Think of the vinyl as your canvas. The adhesive, on the other hand, is what dictates where and how that canvas can be used. Nailing this choice is the difference between a sticker that peels off your heavy-duty gear after a week and one that leaves a sticky, frustrating mess on a delicate product package. It's all about matching the sticker to its environment.
The Science of Stickiness: A Guide to Adhesives
The adhesive is the unsung hero of your sticker. It’s the invisible force doing all the heavy lifting. You’ll generally come across three main types, each with a very specific job to do.
-
Permanent Adhesive: This is the super glue of the sticker world. Once it's on, it’s on for good, forming a powerful bond that's built to last. It’s the perfect choice for things like safety warnings, asset tags on equipment, or vehicle branding that needs to withstand years of harsh Kiwi weather.
-
Removable Adhesive: Think of this as a high-quality Post-it note. It holds firm but can be peeled away cleanly without leaving that awful gunk behind, usually for up to a year. This makes it brilliant for temporary promotions, seasonal window displays, or labels on products where you want the customer to be able to remove it easily.
-
Repositionable Adhesive: This option gives you the most wiggle room. It lets you apply, peel off, and re-apply your sticker a few times without losing its stick. It's fantastic for things like wall decals, trade show graphics, or any time you need to get the placement just right and might need a do-over.
The right adhesive ensures your message sticks—both literally and figuratively. A permanent sticker conveys longevity and trust, while a removable one offers flexibility and a customer-friendly experience.
Finishes That Give Your Design an Edge
The finish, or laminate, is the protective top coat that seals the deal. It not only shields your sticker from the elements but also sets its final look and feel. This choice can completely change the visual impact and durability of your design.
A gloss finish is punchy and eye-catching, making colours pop with a vibrant, saturated look. It's a fantastic choice for product labels that need to jump off a crowded shelf or for promotional stickers designed to grab immediate attention. Its slick surface also adds a great layer of protection against moisture and scuffs.
On the flip side, a matte finish offers a more subtle, non-reflective appearance. This elegant, modern option is perfect for high-end packaging, cafe window signs where you want to avoid glare, or any design where you're aiming for a premium, understated vibe. As a practical bonus, you can easily write on it with a permanent marker.
Choosing the Right Vinyl Sticker Type for Your Needs
To make it even clearer, here’s a quick breakdown of common vinyl types and where they shine for New Zealand businesses.
| Sticker Type | Key Characteristic | Best For (NZ Examples) |
|---|---|---|
| Gloss Vinyl | High-shine, vibrant colour | Product labels, promotional giveaways, bumper stickers. |
| Matte Vinyl | Non-reflective, subtle finish | High-end packaging, indoor signage, wine bottle labels. |
| Clear Vinyl | Transparent background | Window decals for cafes, product labels on glass jars. |
| Heavy-Duty Vinyl | Extra thick and durable | Asset tags on tools, safety warnings on machinery. |
| Repositionable Wall Vinyl | Low-tack, easy to move | Office wall branding, kids' room decorations, event signage. |
Each of these options serves a distinct purpose. By matching the material and finish to your specific application, you ensure your sticker not only looks great but also performs perfectly for its entire lifespan.
This simple infographic sums up the key benefits a well-chosen vinyl sticker can bring to your business.
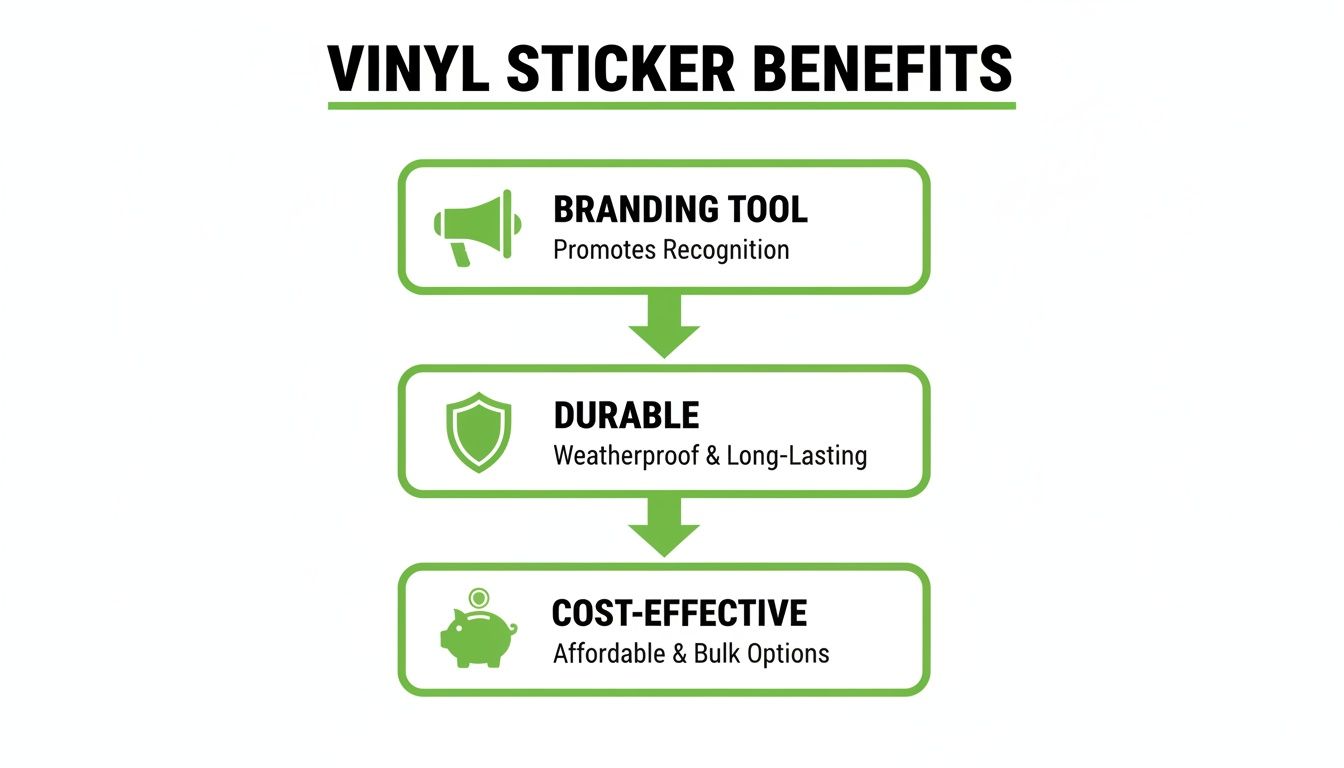
As you can see, the right sticker is a powerful branding tool that delivers impressive durability and is surprisingly cost-effective.
The demand for these specialised materials is booming right here in New Zealand. To keep up with the need for everything from custom vehicle wraps to retail signage, specialist suppliers are stepping up their game. We're even seeing major global manufacturers like ORAFOL opening a dedicated NZ sales office in April 2024—a sure sign that the local market is strong and growing.
While vinyl is often the best bet, it’s always good to know what else is out there. For instance, exploring a guide on the best printable sticker paper can give you a broader perspective on different adhesive materials. Understanding the alternatives often just confirms why high-quality vinyl is the superior choice for jobs that demand real durability and a professional look.
How to Prepare Your Artwork for Flawless Sticker Printing
A brilliant design deserves a brilliant print to match. To make sure your final vinyl stickers look just as sharp and vibrant as they do on your screen, getting the artwork prep right is non-negotiable. Nailing these details from the get-go saves you time, money, and the headache of a print job that just doesn’t hit the mark.
Think of it this way: giving your artwork to a printer is like handing a recipe to a baker. If you give them a blurry photo of a cake (a low-resolution image), you can’t expect them to create a masterpiece. But if you provide a clear, detailed recipe (a vector file), they have everything they need to bake exactly what you had in mind. Let’s walk through the essential ingredients for that perfect recipe.
Vector vs. Raster: The Blueprint and the Photograph
If there's one thing to get your head around in sticker design, it's the difference between vector and raster files. It’s the single biggest factor that determines how sharp and professional your finished stickers will look, no matter their size.
A raster image (think JPG or PNG) is basically a photograph. It's built from a grid of tiny coloured squares called pixels. It looks great at its original size, but the moment you try to enlarge it, things get blurry and "pixelated"—just like zooming in too far on a photo on your phone.
A vector file (like an AI, EPS, or SVG) is entirely different. It’s not made of pixels at all. Instead, it’s a blueprint constructed from mathematical equations that define points, lines, and curves. Because of this, you can scale a vector design to any size imaginable—from a tiny label to a massive vehicle wrap—and it will stay perfectly crisp and clear. Every single time.
For professional vinyl stickers in NZ, vector is always the way to go.
Getting Your Colours and Sharpness Spot-On
Once you’ve got the right file type, a couple of other technical settings are crucial. These ensure the colours and clarity of your design translate perfectly from your screen to the final sticker.
Colour Mode (CMYK vs. RGB) Your computer screen uses light to create colour (RGB: Red, Green, Blue). Printers, on the other hand, use ink (CMYK: Cyan, Magenta, Yellow, Black). If you send an RGB file to a printer, it has to convert the colours, which often leads to dull or unexpected results.
To make sure your colours print exactly as you see them, always design and save your artwork in the CMYK colour mode. This simple step is your best defence against disappointing colour shifts.
Resolution (DPI) Resolution, measured in DPI (dots per inch), dictates how sharp any raster elements in your design will be. For a clean, high-quality print, the industry standard is 300 DPI. Anything less will likely look soft, blurry, or pixelated, which can really cheapen the final product.
Setting Up Bleed and Trim Lines
To get that clean, edge-to-edge print finish, you need to account for the physical cutting process. This is where bleed and trim lines come in.
- Trim Line: This is the line where we'll cut your sticker to its final size. Think of it as the finished border.
- Bleed Area: This is a small safety margin—usually about 3mm—where your background colour or pattern extends beyond the trim line.
Why is this so important? The bleed ensures that even if there’s a tiny, microscopic shift when the machine cuts the sticker, you won’t get any unsightly white slivers along the edge. It’s the secret to a flawless, full-colour finish right to the very edge.
Creative Ways NZ Businesses Are Using Vinyl Stickers
It’s one thing to talk about materials and artwork, but the real magic of vinyl stickers happens when you see them out in the wild. All across New Zealand, clever businesses are using them for so much more than just a logo. They’re using them to connect with people, make life easier for their staff, and create moments that stick. Forget simple labels; think of them as tiny, portable storytellers.
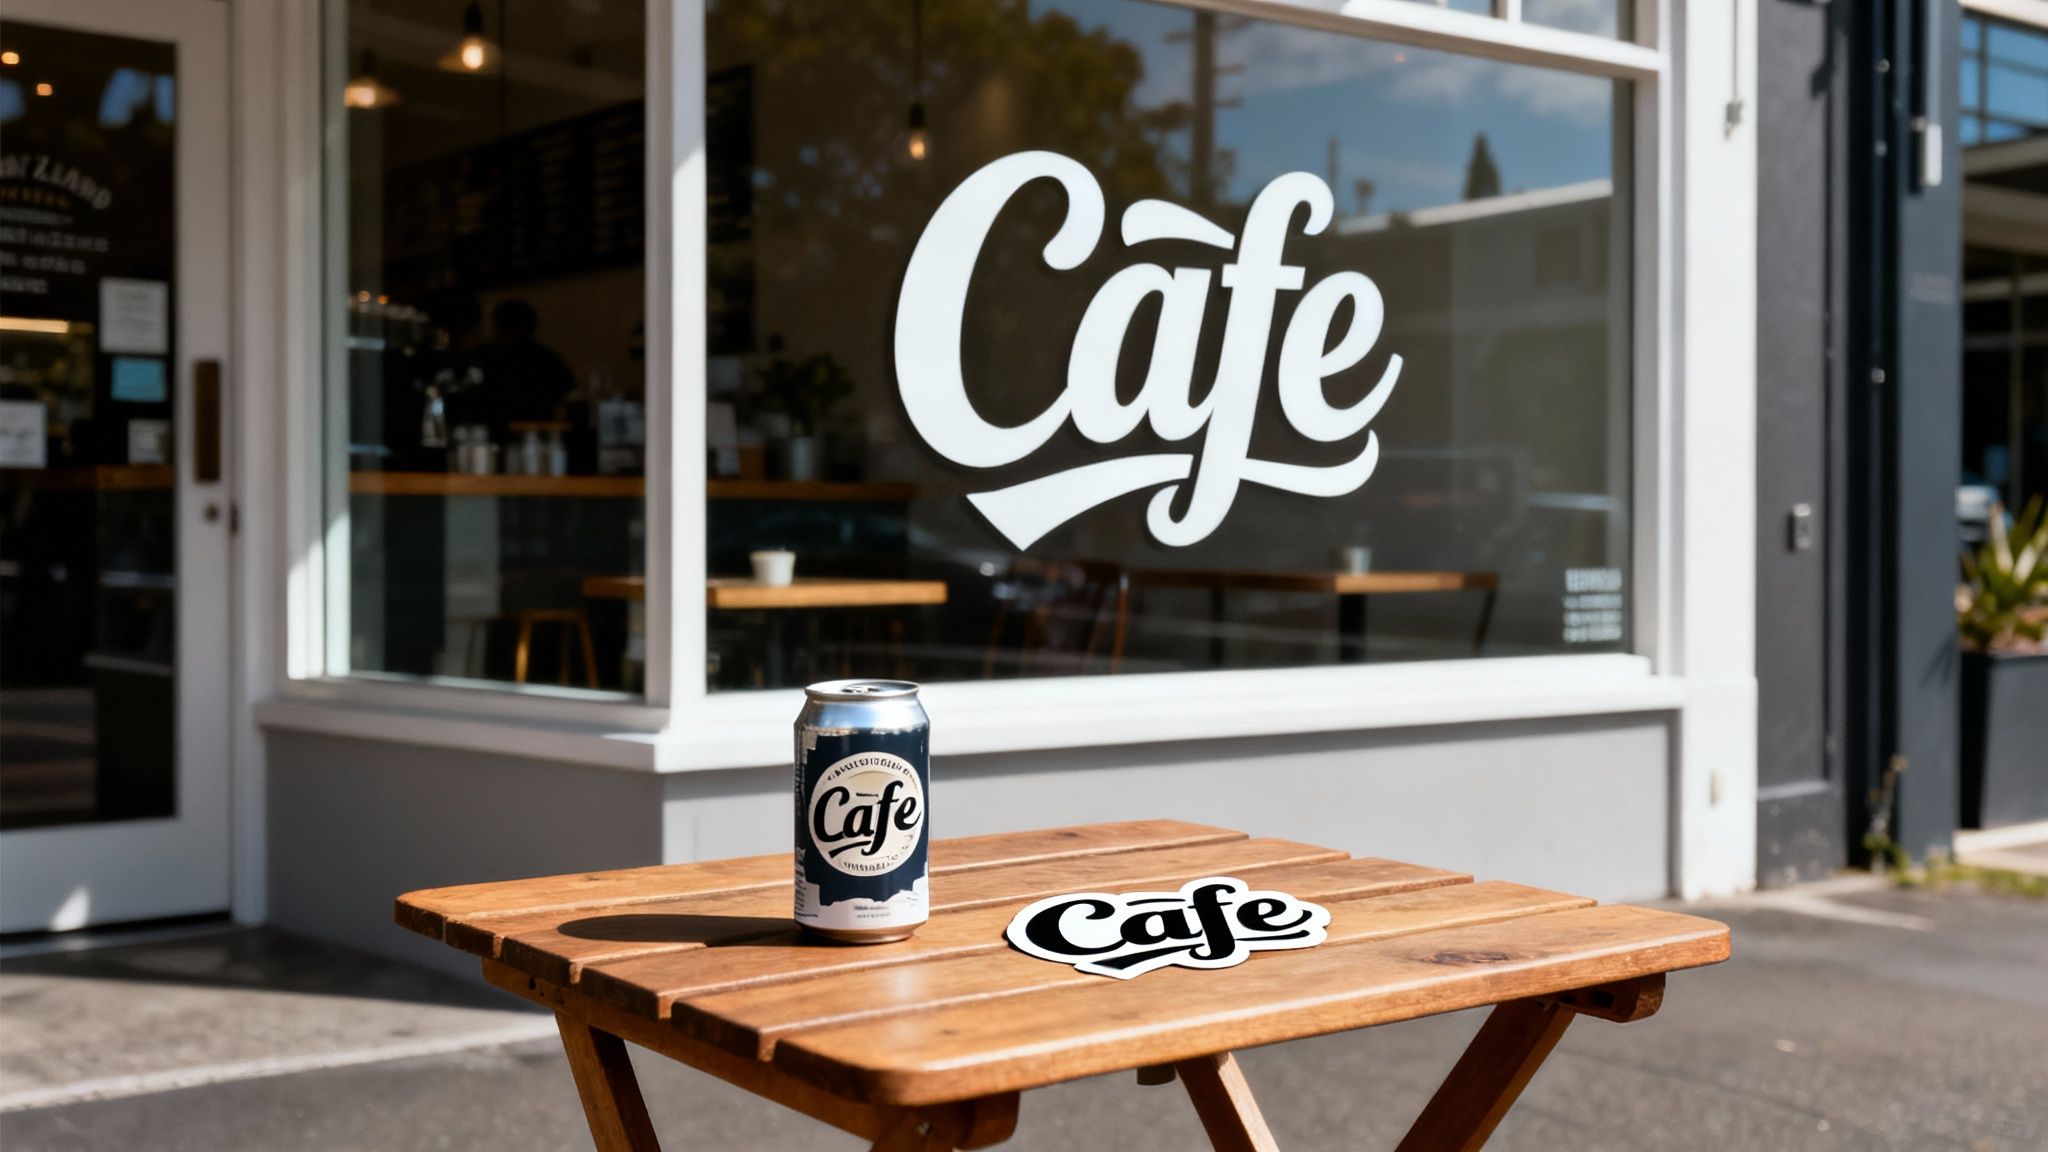
You see it everywhere. Picture walking down Wellington’s Cuba Street and noticing an elegant window decal on a café – it instantly tells you about the modern, welcoming vibe inside. Or think of a Canterbury construction firm’s heavy machinery, branded with weatherproof vinyl that shrugs off mud, rain, and sun, acting as a constant, moving billboard. These real-world examples show just how versatile vinyl stickers in NZ really are.
Branding That Travels
One of the smartest ways to use vinyl stickers is to turn your products and packaging into brand ambassadors. This is especially true for Aotearoa’s booming food, beverage, and e-commerce businesses.
A craft brewery in Nelson, for example, can use custom die-cut stickers on its cans. This lets them create stunning, unique designs for limited-edition runs without sinking a fortune into printing a whole new batch of cans. It’s a fast, flexible approach that helps them stand out in a crowded market.
In the same way, an online boutique based in Auckland can take a plain cardboard mailer and turn it into a fantastic unboxing experience. Sealing the tissue paper with a beautifully designed kiss-cut sticker adds a touch of class and personality that customers really notice.
A sticker isn't just a piece of marketing; it's a tangible interaction. It’s that final touch that says, "we care about the details," strengthening the bond between a brand and its customer.
This isn't just a local trend. Globally, the demand for personalised stickers is massive, with the market valued in the multi-billions. Here in New Zealand, with around 767 printing businesses operating in 2025, a huge chunk of their work is feeding this growing appetite for custom branding. It’s clear that Kiwi businesses are all in on making their mark. You can read more about the growth of the global vinyl sticker market on reportsandinsights.com.
Functional and Informative Applications
Beyond the branding, vinyl stickers also play a crucial role in the day-to-day running of a business. Their durability makes them the perfect choice for sharing important information in tough environments, helping things run more smoothly and safely.
Just look at these practical examples:
- Operational Efficiency: A Queenstown tour operator uses brightly coloured, numbered vinyl stickers on their rental kayaks and mountain bikes. This simple system makes keeping track of inventory a total breeze, even on the busiest days.
- Safety and Compliance: A manufacturing plant in Hamilton might use heavy-duty, laminated vinyl decals for safety warnings and instructions right on its machinery. These stickers are built to resist oil, heat, and scuffs, ensuring vital info stays put for years.
- Customer Guidance: A winery in the Hawke's Bay could use subtle, elegant floor decals to guide visitors through their tasting rooms. It creates a seamless, self-directed tour that makes the whole experience feel more polished.
Creating Community and Buzz
Finally, never underestimate the power of a sticker to build a community. It can be a badge of honour, a fun giveaway that turns a casual customer into a die-hard fan who’s proud to show their support.
Think of a local surf shop in Raglan that pops a free, artist-designed sticker in with every purchase. Before you know it, those stickers are on car bumpers, drink bottles, and laptops all over town. It’s grassroots marketing at its best, spreading brand awareness while making people feel like they’re part of the local surf scene.
From promoting a music festival in Gisborne to using QR code stickers on a Dunedin restaurant table that link straight to the menu, the possibilities are endless. With a bit of creative thinking, any New Zealand business can use the humble vinyl sticker to make a big, lasting impression.
Finding the Right NZ Sticker Printing Partner
Choosing the right supplier for your vinyl stickers in NZ is just as important as the design itself. Let's be honest, even the most incredible artwork will fall flat if it’s printed on cheap material by a company that doesn't care. The key is finding a true partner—someone who gets your vision and has the local know-how to bring it to life properly.
This means looking past the price per sticker. You need to weigh up the things that really matter for Kiwi businesses: the quality of the print, the durability of the materials, how they communicate, and how fast they can get the job done.
What to Look for in a Kiwi Supplier
It’s easy to get lost in the technical jargon when comparing sticker printers. Instead of getting bogged down, just focus on these key things to find a partner who will deliver great results without the headaches.
- Print Quality and Tech: Always ask for samples. A good printer is proud of their work and will happily send you some. This way, you can actually feel the material and see how vibrant the colours are in person.
- Material Sourcing: Do they use vinyl that can handle the New Zealand climate? A switched-on supplier will point you towards materials with strong UV resistance and proper waterproofing to stand up to our harsh sun and four-seasons-in-one-day weather.
- Customer Support: When you have a question, you want to speak to a real person who actually understands your project. Good support from a local team makes everything smoother, from sorting out your artwork to the final delivery.
- Turnaround Times: This one’s a biggie. Working with a printer here in NZ means faster shipping and no nasty surprises with customs delays. That’s crucial when you’ve got a product launch or an event deadline breathing down your neck.
The Advantage of Choosing a Local Partner
Working with a local Kiwi supplier gives you an edge that overseas companies just can't offer. It’s not just about faster shipping; you’re getting a partner who understands the local market and is genuinely invested in seeing other New Zealand businesses succeed. That local connection means clearer communication and a much more personal service.
The commercial printing industry here, which is where vinyl stickers are made, has had to adapt quite a bit. With industry revenue expected to be around NZ$1.4 billion in 2025, many local printers have shifted their focus to high-quality, custom jobs for businesses like yours. This move means you get specialised attention, not just treated like another number in a massive offshore production line. You can read more about the NZ printing industry's evolution on ibisworld.com.
Why Soni Design is Your Ideal Choice
Here at SONI DESIGN, we mix a real passion for great design with a solid understanding of what New Zealand businesses actually need. We're not just another print shop; we're your local partner, dedicated to turning your vision into stunning, durable vinyl stickers.
We believe the best results come from working together. Our team will sit down with you to really get to grips with your goals, making sure the final sticker not only looks amazing but does its job perfectly.
Our whole approach is built on local expertise. We hand-pick materials that we know can handle the NZ climate, ensuring your brand looks sharp and professional for years. Whether you're a startup in Dunedin or an established brand in Tauranga, we give you the personal service and expert advice needed to create stickers that reflect the quality of your business.
Ready to get your sticker idea off the ground? Let's have a chat about your project. Contact the SONI DESIGN team today for a custom quote and see how we can help your brand make a lasting impression.
Your Guide to Sticker Application and Long-Term Care
Even the best vinyl stickers nz will look a bit average if they’re put on poorly. That flawless, bubble-free finish you see on professional vehicles and shop windows? It all comes down to a bit of prep work and a steady hand. Following a few simple steps makes all the difference, ensuring your sticker looks fantastic and lasts for years.
Think of it like painting a wall. You'd never just slap a coat of paint over a dusty, greasy surface and hope for the best. The same logic applies here. A perfect application starts with a perfectly clean surface, which is the secret to a strong, lasting bond.
Preparing Your Surface for Application
First things first: the surface needs to be spotlessly clean and completely dry. Any lingering dust, oil, or grime will get in the way of the adhesive, leading to peeling corners and annoying air bubbles down the track.
- Clean Thoroughly: Grab a mild cleaner (a mix of isopropyl alcohol and water is ideal) and a lint-free cloth. Wipe down the entire area to get rid of any residue that could stop the sticker from sticking properly.
- Dry Completely: Make sure the surface is 100% dry before you even pick up the sticker. Any trapped moisture is a recipe for bubbles and a weak bond.
- Check the Temperature: It’s best to apply stickers in a mild, dry environment. If it’s too cold, the vinyl can become stiff and brittle. If it’s too hot, the adhesive can get extra sticky and become difficult to position correctly.
A clean surface is the one thing you can't skip. Taking just two minutes to properly clean and dry the area is the single most important step for a professional, long-lasting finish.
Flawless Application Techniques
Okay, surface prepped? Time for the fun part. The best technique really depends on the size of your sticker. Smaller decals are pretty straightforward, but larger graphics need a bit more finesse to avoid wrinkles.
For Small Stickers: This is the easy bit. Just peel the sticker from its backing paper, trying not to touch the sticky side with your fingers. Line up one edge on the surface and then smoothly press it down, working from one side to the other to push out any air.
For Large Decals (The Hinge Method): For big graphics, this technique is an absolute game-changer. It’s how the pros get it right every time.
- Position the decal where you want it, with the backing paper still on. Use a strip of masking tape along one edge to hold it in place – this creates a hinge.
- Lift the un-taped side of the sticker and carefully peel the backing paper away until you reach the tape hinge.
- Using a squeegee (or a credit card wrapped in a soft cloth), slowly and firmly press the exposed sticker onto the surface. Always start from the centre hinge and work your way outwards.
- Once that half is down, you can remove the hinge tape and the rest of the backing paper.
- Continue applying the second half with the squeegee, again, always working from the middle outwards to force any air out to the edges.
Once it's on, give the entire sticker one last firm press to make sure the adhesive has a solid grip. Following these steps will keep your branding looking sharp and make sure you get the most out of your investment.
Got Questions About Vinyl Stickers? We've Got Answers
We get a lot of questions from Kiwi businesses looking to get their sticker game just right. To save you some time, we've put together answers to the most common queries we hear. It's all about making sure you know exactly what you're getting before you order.
How Long Will Vinyl Stickers Actually Last in New Zealand's Weather?
This is a big one, especially with our harsh sun. A good quality, UV-laminated vinyl sticker is built tough for New Zealand conditions. You can realistically expect it to hold up for 3 to 5 years outdoors before you see any major fading, cracking, or peeling.
Of course, its exact lifespan comes down to the materials used and how much direct sunlight it gets. If you're putting stickers on a vehicle or creating permanent outdoor signage, you absolutely need a product specifically rated for exterior use. That's how you get the best bang for your buck.
What's the Real Difference: Die-Cut vs. Kiss-Cut?
It all comes down to the backing paper and how it’s cut. Imagine you're using a cookie cutter.
- A die-cut sticker is cut right through both the vinyl and the backing paper. The whole thing—sticker and backing—is in the exact shape of your design.
- A kiss-cut sticker, on the other hand, is only cut through the vinyl layer itself. The backing paper is left as a standard square or rectangle, making the sticker easy to peel off.
Kiss-cut stickers can be a bit easier to peel and the backing paper helps protect delicate edges, which makes them a great choice for handing out at events or selling in a shop.
When you peel it off, the sticker itself is custom-shaped with both methods. So, the choice is really about presentation and function. Kiss-cuts are generally more user-friendly, especially for people who might bend a pointy bit on a die-cut sticker trying to get it off the backing.
Can I Actually Write on These Stickers?
You sure can, but the finish you choose is crucial. A matte or satin finish is perfect for writing on with a permanent marker. The ink soaks in nicely and won't smudge all over the place.
Trying to write on a high-gloss sticker is a different story. The ink just sits on top of that slick surface and can be wiped off with a swipe of your finger. So, if you need to add dates, names, or notes to your stickers, we always point people towards a matte finish for a clean, permanent result.
What's the Smallest Order I Can Place?
Minimum order quantities (MOQs) can differ between printers, but thanks to modern digital printing, getting small batches of vinyl stickers in NZ is easier and more affordable than ever.
Most local printers, including us here at SONI DESIGN, can get you started with as few as 25 or 50 stickers for a single design. This is a game-changer for small businesses, artists, and startups who want a professional look without a huge upfront cost. Just remember, the price per sticker nearly always drops as you order more, so bigger runs offer better value.
At SONI DESIGN, our specialty is crafting top-quality, long-lasting vinyl stickers that help Kiwi businesses make their mark. Get a personalised quote and let's bring your vision to life.
Leave a Comment
Stay home & get your daily
needs from our shop
Start You'r Daily Shopping with Nest Mart