
Your cart is currently empty.

On the hunt for the kind of vinyl sticker NZ businesses swear by? You've come to the right place. We're not just talking about fun decorations here; we're talking about one of the most versatile and budget-friendly tools in any Kiwi marketing arsenal. Think of them as your own portable brand ambassadors.
Why Vinyl Stickers Are Such a Smart Move for NZ Businesses
Forget thinking of them as throwaway novelties. Custom vinyl stickers are a seriously clever part of any branding strategy. Picture them as tiny, mobile billboards that travel wherever your brand needs to be seen. In a world drowning in digital ads, they create a real, physical connection with your audience.
A vibrant sticker on a shop window in Auckland, some heavy-duty branding on a work van cruising through Christchurch, or a surprise freebie tucked into an online order—these are the things that make a lasting impression. Their magic is in their simplicity. They can turn just about any surface into a little promo for your business.
The Hidden Power of a Simple Sticker
A sticker is so much more than just vinyl and glue; it’s a direct link to your customer. It’s a tiny package that holds your brand’s personality, its promise of quality, and its message. For businesses here in New Zealand, that adds up to some big wins:
- Big Impact, Small Cost: When you stack them up against other types of advertising, stickers give you an incredible return. You get continuous brand exposure for a very small one-off cost.
- Boosts Brand Recognition: Every time a customer slaps your sticker on their laptop, drink bottle, or car, they’re giving you a personal endorsement. Your brand's visibility grows naturally, one sticker at a time.
- Makes Customers Smile: Popping a free sticker into a package is a small touch that creates a memorable unboxing moment. It builds loyalty and gets people talking about you on social media.
A single, well-placed sticker can rack up thousands of views over its lifetime. It’s a silent salesperson working 24/7, turning your customers into a mobile marketing team all across New Zealand.
This guide is your complete rundown on creating the perfect vinyl sticker NZ brands use to get noticed. We'll get into the nitty-gritty of materials, the secrets to a killer design, and the practical steps to make it all happen. Let's pull back the curtain and show you how to turn a humble sticker into one of your most powerful assets.
Choosing the Right Vinyl Materials and Finishes
Picking the right material for your vinyl sticker is a bit like choosing the right tyres for your car. You wouldn't put city tyres on a farm ute, and you definitely shouldn't use a short-term sticker for permanent vehicle branding. Getting this choice right is absolutely critical to making sure your stickers look sharp and last as long as you need them to, especially with our unique New Zealand climate.
The material itself is what determines the sticker's lifespan, how flexible it is, and where you can stick it. Let's break down the main types of vinyl so you can make a smart investment for your brand.
The Three Main Types of Vinyl
Think of vinyl in three tiers of performance, with each one designed for a specific job. Your final choice will come down to your budget, how long you need the sticker to last, and where it’s going to live.
-
Monomeric Vinyl: This is your entry-level, budget-friendly option. It's perfect for short-term, indoor jobs like promotional giveaways, event stickers, or temporary sale signs on a shop window. While it’s easy on the wallet, it has a shorter lifespan (1-3 years) and can shrink a little over time. This makes it a poor choice for long-term outdoor use where it’s exposed to the elements.
-
Polymeric Vinyl: Meet the versatile all-rounder. Polymeric vinyl is more stable and durable than its monomeric cousin, hitting that sweet spot between cost and performance. It's a fantastic choice for medium-term applications (3-5 years) like shopfront graphics, general signage, and any graphics going on flat vehicle surfaces. It resists shrinkage much better, making it a reliable workhorse for many Kiwi businesses.
-
Cast Vinyl: This is the absolute premium, top-of-the-line material. Cast vinyl starts as a liquid that’s poured and cast into a super-thin sheet, a process that makes it incredibly flexible and easy to mould. It’s the go-to for full vehicle wraps and applying graphics over complex curves, rivets, and corrugated surfaces. With the longest lifespan (5-10+ years), it’s built to withstand the harshest conditions, including New Zealand's tough UV rays.
It’s also worth noting how different printing methods compare when you’re looking at customisation. For instance, understanding the differences between DTF and heat transfer vinyl gives you a wider view of what’s possible in the world of custom printing.
The choice between monomeric, polymeric, and cast vinyl directly impacts how long your sticker will last and how good it looks. For any sticker going outdoors in NZ, I’d always recommend investing in at least a polymeric grade to handle our unpredictable weather.
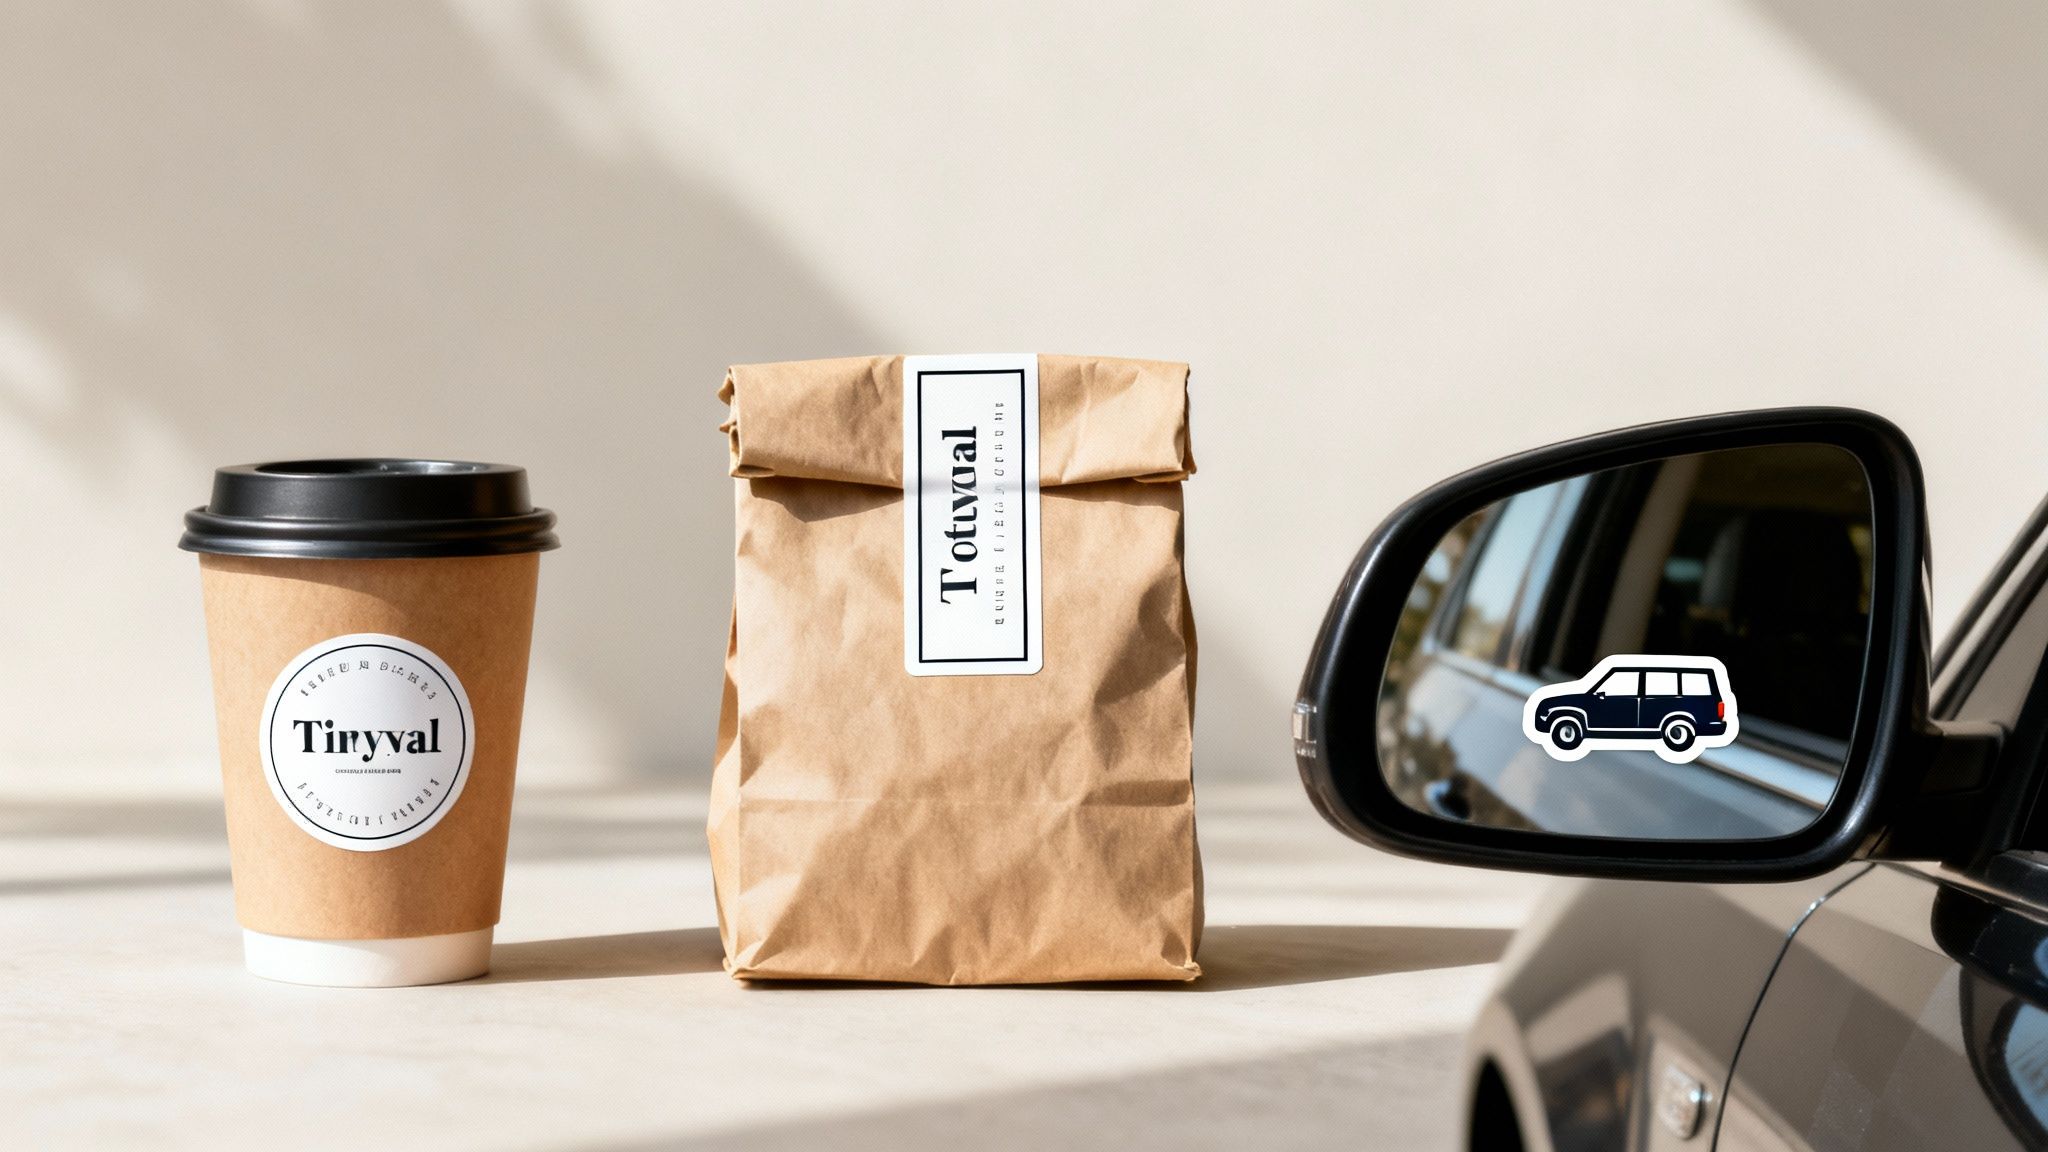
This graphic shows how vinyl stickers can be a powerful and adaptable marketing tool across different parts of your business.

As you can see, a simple vinyl sticker can be used for high-impact marketing on everything from windows and vehicles to product packaging, getting your brand in front of customers at multiple touchpoints.
Selecting the Perfect Finish for Your Design
Once you've locked in your material, the next step is choosing a finish. This is the protective top layer, also called a laminate, and it does a lot more than just change the look. It's a crucial shield that protects the printed ink from UV rays, scratches, and moisture.
To help you decide, here’s a quick rundown of the most common finishes and what they’re best suited for.
How to Choose Your Vinyl Sticker Finish
A comparison of common vinyl sticker finishes to help you select the best option for your project's aesthetic and functional needs.
| Finish Type | Best For | Appearance | Durability Notes (NZ Context) |
|---|---|---|---|
| Gloss | Vibrant, eye-catching designs and photos | Shiny, reflective, high-contrast | Excellent UV protection, but can show fingerprints and glare in direct sunlight. |
| Matte | Sophisticated, elegant, or text-heavy designs | Non-reflective, smooth, muted look | Hides scuffs and fingerprints well. Great for a subtle, premium feel on indoor/outdoor items. |
| Satin | A balance between gloss and matte | Soft sheen, low-lustre finish | Offers good durability and hides minor imperfections while providing a touch of vibrancy. |
Choosing the right finish is the final touch that ensures your sticker not only looks professional but also stands up to the job you've designed it for.
While the wider New Zealand printing industry, which generated $1.4 billion in revenue, has seen a general decline, speciality areas are actually booming. The demand for high-quality advertising materials like vinyl stickers remains strong. In fact, major suppliers are investing heavily to meet the growing need for premium vinyl films right here in NZ. This shows a very healthy future for specialised vinyl sticker services across the country.
By carefully matching the right vinyl material with the ideal finish, you ensure every vinyl sticker your customers see is a professional and lasting representation of your brand.
How to Prepare Your Artwork for Flawless Printing
Getting your artwork print-ready is arguably the most crucial step in creating a professional vinyl sticker NZ businesses would be proud to display. A brilliant design concept can easily fall flat if the file isn't prepared correctly, leading to headaches like blurry images, unexpected colour shifts, or wonky cut shapes.
Think of it like giving a chef a detailed recipe versus just showing them a picture of the final dish. The recipe gives them the exact ingredients and steps to guarantee a perfect result. The picture? It only shows what it should look like, leaving all the important details to guesswork. In the world of sticker printing, a vector file is your recipe.
Vector vs Raster: The Recipe and the Photo
The single most important decision you'll make is choosing the right file type. It really all boils down to two types of graphics: vector and raster.
-
Vector Files (The Recipe): These are your AI, EPS, or PDF files, typically created in software like Adobe Illustrator. They're built using mathematical equations to draw lines and curves. This means they can be scaled to any size—from a tiny product sticker to a massive van wrap—without a single ounce of quality loss. This is the undisputed gold standard for professional printing.
-
Raster Files (The Photo): These are your everyday, pixel-based images like JPG, PNG, or GIF. They're made from a fixed grid of tiny squares (pixels). While they look great on a screen, they start to look blurry and "pixelated" the moment you try to enlarge them. Submitting a low-resolution raster file is the number one cause of a disappointing print job.
For the absolute sharpest, cleanest vinyl sticker possible, always supply your artwork as a vector file. You’re giving the printer the exact 'recipe' they need to get it right every time.
Your Pre-Print Checklist
Before you hit 'send' on that email to your printer, just run through this quick checklist. Nailing these three things will solve 90% of common printing issues and make the whole process a lot smoother and faster.
-
Set Your Colour Mode to CMYK
Your computer screen uses an RGB (Red, Green, Blue) light-based model to show colour, which is why things look so bright and vibrant. Professional printers, on the other hand, work with a CMYK (Cyan, Magenta, Yellow, Black) ink-based model. If you design in RGB, the colours will shift when printed—often looking a bit duller than you expected. To avoid any surprises, always set your design software’s colour mode to CMYK right from the start. -
Add Bleed and a Cut Line
To make sure your design goes right to the very edge of the sticker without any weird white borders, you need to add "bleed." This is simply an extra margin of your background—usually 3mm—that extends past the final cut edge. You also need to provide a clear vector "cut line" (usually on its own layer) that tells the printer the exact shape to cut. -
Ensure High Resolution for Any Raster Elements
Sometimes, you just have to include a photo or another raster element in your design. If you do, it must be high resolution. The industry benchmark is 300 DPI (dots per inch) at the final print size. Anything less than that will almost certainly look fuzzy and unprofessional. For more general advice on this, a comprehensive label printing guide can offer some great technical insights that apply just as well to sticker production.
Pro Tip: Always double-check your printer’s specific artwork guidelines. While these are universal best practices, some NZ print shops might have their own unique requirements for file setup.
Taking a few minutes to prepare your files properly saves you time, money, and the frustration of needing a reprint. You’re not just sending over a picture; you’re providing the clear, precise instructions needed to bring your vision to life perfectly.
Getting a Handle on Sticker Pricing and Ordering in New Zealand
Ever wondered how a vinyl sticker NZ supplier works out the cost of your job? It’s not just a number pulled out of thin air. The final price is a direct result of the materials chosen, how tricky the design is, and, of course, how many you need. Understanding these moving parts is the key to making your budget work for you and getting the best bang for your buck.
Think of sticker pricing as a puzzle with four main pieces. Each one plays a part in the final quote, so if you have a clear idea of what you need beforehand, you and your printer can find that sweet spot between your creative vision and what you want to spend.
The Four Pillars of Sticker Pricing
Knowing what influences the cost means you can make smarter decisions. Sometimes, a tiny change in size or a bump in quantity can lead to some pretty serious savings, all without watering down the impact of your finished sticker.
Here’s what your NZ printer is looking at when they draw up your quote:
- Material and Finish: As we touched on earlier, high-performance materials like cast vinyl will always cost more than a short-term monomeric vinyl. In the same way, adding a protective laminate—like a gloss or matte finish—adds a bit to the price but gives your sticker a much longer life.
- Size and Shape: This one’s pretty straightforward. Bigger stickers simply use more material and ink, which pushes the price up. A complex, custom die-cut shape also takes more setup and precision than a standard circle or square, and that can nudge the cost up too.
- Quantity (The Magic of Scale): Here’s where the real savings are made. The initial setup cost—loading your file, setting up the machines—is the same whether you’re printing 50 stickers or 5,000. When you spread that setup cost over a bigger run, the price-per-sticker drops dramatically.
- Design Complexity: A simple, one-colour logo is a breeze to print compared to a full-colour photo with loads of fine detail. Modern digital printers are incredible, but really intricate designs can sometimes demand a little more time and ink.
Your best friend for managing costs is quantity. Ordering 500 stickers might only be slightly more expensive than ordering 250, but your cost-per-sticker will be significantly lower. It’s all about getting better value in the long run.
What to Expect from the Ordering Process
Right, so you’re ready to go. Ordering custom vinyl stickers in New Zealand is usually a smooth and simple process. While every print shop has its own way of doing things, most will guide you along a similar path from your first enquiry to the final delivery. It’s a team effort, really.
- Getting a Quote: You’ll kick things off by sending over your specs – that’s the size, shape, quantity, and material you’re after, along with your print-ready artwork. Your supplier will come back with a detailed quote breaking down all the costs.
- The All-Important Proof: Before a single drop of ink hits the vinyl, you’ll get a digital proof. This is your moment to be picky. Check it carefully for any mistakes in spelling, colours, layout, or the cut lines. Once you approve it, there’s no going back!
- Into Production: With your final sign-off, your stickers join the production queue. This is where the magic happens and your digital design becomes a real, tangible thing you can hold.
- Finishing Touches and Delivery: After printing, your stickers get laminated (if you asked for it), cut to shape, and then carefully packaged for shipping. Lead times can vary here in New Zealand, but your supplier will give you an estimated completion date when you approve the proof.
The demand for stickers is only getting bigger, mirroring what’s happening globally. The worldwide vinyl sticker market is expected to grow to US$7.1 billion by 2033, a trend that fits right in with New Zealand's own thriving online retail scene, which saw Kiwis spend $5.8 billion in 2023. You can dive deeper into these trends in this report on the vinyl sticker market's growth. It just goes to show how essential stickers have become for branding and marketing for businesses all over Aotearoa.
Creative Sticker Ideas for New Zealand Industries
We've covered the technical side of things, but now let's get into the fun stuff: how Kiwi businesses are actually using custom vinyl stickers to get noticed. A well-placed sticker is more than just a bit of fun; it’s a tiny ambassador for your brand, working for you in places you’d least expect.
Think about it. From a real estate agent’s slick window decal in Queenstown to a Wellington café’s branded coffee cups, these small but mighty marketing tools are everywhere. The real magic happens when you use them smartly within your own industry. Let's look at a few examples from around New Zealand.
For Cafés and Food Trucks
In the bustling hospitality scene, standing out is everything. Stickers are a fantastic, budget-friendly way to turn every single takeaway order into a branding moment.
- Coffee Cup Branding: Slapping a high-quality vinyl sticker on a plain coffee cup instantly makes your brand look more professional. It becomes a walking advertisement that travels with your customers long after they've left your counter.
- Food Truck Menus: A die-cut sticker with a QR code is a game-changer. It can link straight to your online menu or Instagram, letting customers browse on their phones while they wait. For a busy food truck, this simple trick can seriously speed up the queue.
- Loyalty Stickers: Small, branded stickers for loyalty cards or even just as a cool freebie with an order help build a community vibe and keep people coming back.
For E-Commerce and Retail Brands
If you run an online store, the "unboxing experience" is one of your only physical chances to wow your customers. Stickers are perfect for making that moment count.
A custom-shaped sticker that matches your brand’s personality, tucked inside the package, feels like a genuine gift. It’s the kind of small detail that gets people excited to share their purchase on social media, giving you fantastic organic exposure.
A well-designed sticker transforms standard packaging into a unique brand statement. It shows attention to detail and a commitment to customer delight, which is crucial for building loyalty in the competitive e-commerce space.
This isn’t just a local trend. The global personalised stickers market was valued at USD $4.84 billion, and the vinyl segment is poised for major growth. This is all driven by the demand for customisation in advertising. For Kiwi businesses, stickers are a proven way to lift your brand's game. You can learn more about how custom stickers build unforgettable brands in NZ to get the full picture.
For Trades and Service-Based Businesses
If your office is on the road, then your vehicle is your number one advertising asset. For any tradie—from plumbers to sparkies—durable, weather-resistant vinyl stickers are an absolute must.
Your work van or ute is a mobile billboard seen by thousands of Kiwis every single day. Clear, professional vehicle graphics with your logo, phone number, and services are non-negotiable. They build trust and make you look like the real deal.
Here are a few ways service businesses are putting them to work:
- Vehicle Graphics: Cast vinyl is the gold standard for vehicle wraps. It ensures your branding looks sharp and lasts for years, even under the harsh New Zealand sun.
- Toolbox and Equipment Labels: Small, tough vinyl stickers on your tools not only brand your gear but also help stop it from walking off on a busy job site.
- Service Reminder Stickers: A simple branded sticker left on a boiler or fuse box, showing the date of service and your contact details, is a genius move for securing repeat business.
Applying and Removing Vinyl Stickers Like a Pro
A brilliant sticker design is only half the battle. If you rush the application, you'll end up with frustrating bubbles, a crooked finish, and a look that just doesn't hit the mark. The good news is that taking a few extra minutes to do it right makes all the difference, ensuring your sticker looks sharp and sticks around for its full lifespan.
Think of it this way: the surface is your canvas. It has to be perfectly clean for the adhesive to grab hold properly. Any speck of dust, grease, or grime will create a weak spot, and that’s what leads to annoying peeling or bubbling down the track.
Getting that flawless, painted-on look is actually pretty straightforward with the right technique. The same goes for removal—a bit of care ensures you won’t damage the surface or leave behind a sticky mess.
Prepping Your Surface for Application
Honestly, this is the most important step. Before you even think about peeling off the backing paper, that surface needs to be absolutely pristine.
-
Give it a Good Clean: Start with a simple soap and water solution to get rid of any obvious dirt. For glass or other smooth, non-porous surfaces, follow up with an isopropyl alcohol wipe. This is the secret weapon for cutting through any lingering grease or oils.
-
Make Sure It’s Bone Dry: The surface needs to be 100% dry. Use a clean, lint-free microfibre cloth, as paper towels can leave behind tiny fibres that you'll never get out from under the sticker.
-
Position and Tack in Place: If you’re working with a larger decal, grab some masking tape. Lightly tape the sticker into position so you can step back and eyeball the alignment before you commit.
The Hinge Method: Your Secret to Perfect Placement
Wrangling a big vinyl sticker NZ businesses use for window graphics can feel a bit daunting, but the ‘hinge method’ is a game-changer. It’s a nearly foolproof way to avoid bubbles and get your sticker on straight every single time.
First, with your sticker taped in position, run a strip of masking tape vertically down the centre of it, sticking it to both the decal and the surface below. This creates your ‘hinge’.
Now, pick a side. Lift that half of the sticker up, peel the backing paper away right up to the centre hinge, and snip it off.
Using a squeegee (a credit card works in a pinch), start from the hinge and work your way out. Apply firm, overlapping strokes to smooth the sticker down. Once that side is done, you can remove the hinge tape and the rest of the positioning tape. Then, just repeat the process for the other side, carefully peeling away the backing paper as you smooth it down with the squeegee.
Pro Tip: The hinge method gives you total control. By tackling the sticker in two manageable sections, you stop it from sticking to itself and trapping those massive, impossible-to-remove air bubbles.
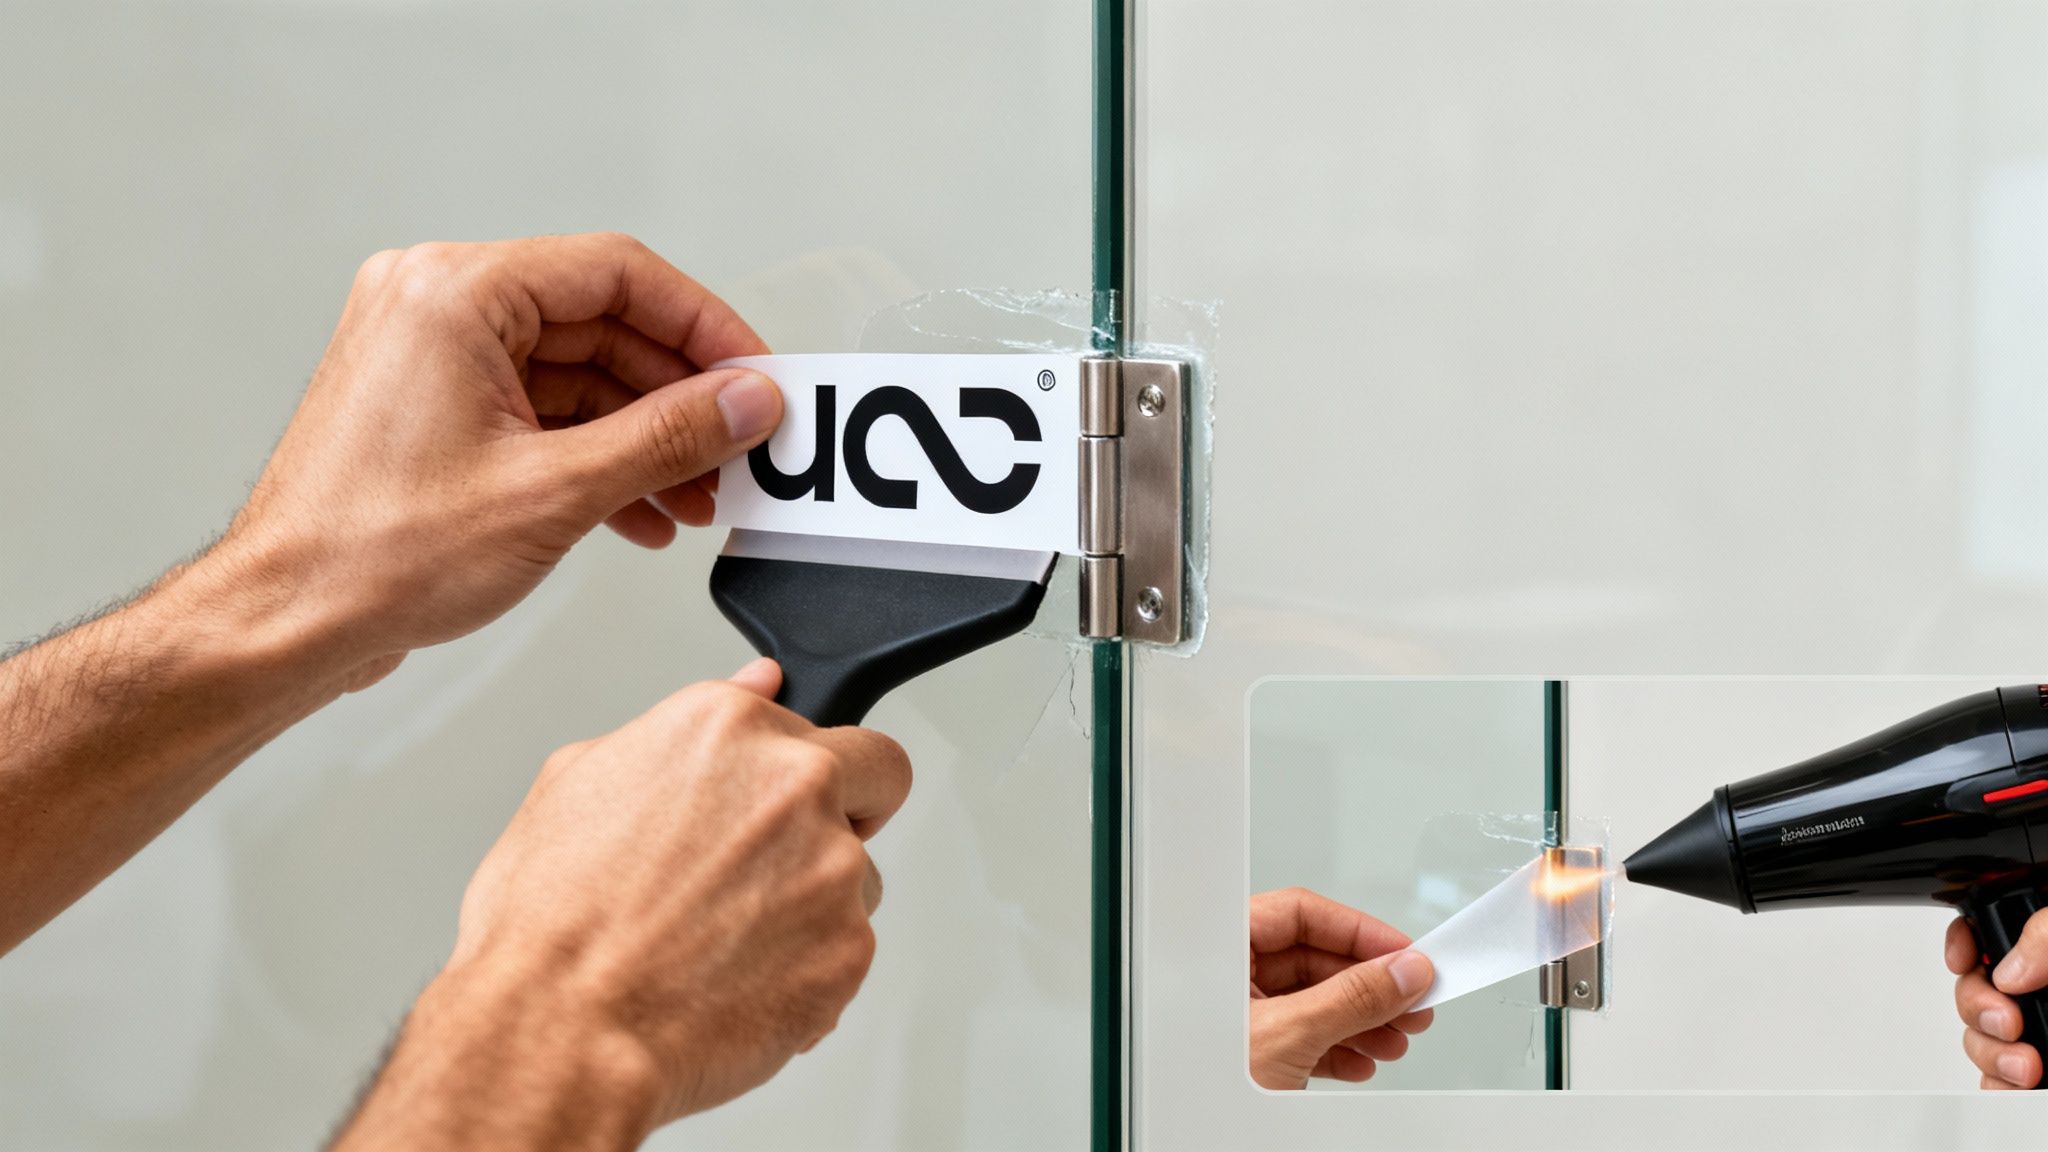
How to Get Stickers Off Cleanly
When it’s time for a rebrand or a new promotion, getting old vinyl off doesn’t have to be a nightmare. The trick is to gently soften the adhesive first, so the sticker practically peels itself off.
Your best tool for this is a standard hairdryer. Gently warm up the sticker, moving the hairdryer back and forth so you don't overheat one spot. After a minute or so, you'll notice the vinyl becoming softer and more flexible—that means the adhesive is loosening its grip.
Start at a corner and use your fingernail or a plastic scraper to lift an edge. Then, pull the sticker back on itself at a low, sharp angle. If you feel it fighting you, just give it another quick blast of heat. Any little bits of sticky residue left behind can usually be wiped away with a cloth and a bit of isopropyl alcohol.
Got Questions? Your NZ Sticker FAQs Answered
Alright, let's wrap things up by tackling some of the most common questions we hear from Kiwi businesses. Getting straight answers to these practical queries is the final step in making sure you order the right stickers for the job and get a great return on your investment.
Think of this as the final checklist to clear up any lingering doubts before you hit 'print'.
How Long Do Vinyl Stickers Really Last in NZ Weather?
This is a big one, especially with our harsh Kiwi sun and four-seasons-in-a-day weather. The honest answer? It all comes down to the material and finish you pick.
A top-shelf polymeric or cast vinyl sticker with a UV-protective laminate will stand up to the elements for a good 3 to 7+ years. If you're just after something for a short-term campaign, a basic monomeric vinyl will do the trick for 1-2 years. Always chat with your printer about where the sticker will live – they’ll point you to the right material for our unique conditions.
What’s the Smallest Sticker Order I Can Place?
This used to be a real barrier for small businesses, but thankfully, digital printing has changed the game. You no longer need to order thousands to get started.
Most printers in New Zealand can now handle small batches, sometimes as few as 25 or 50 stickers. This is brilliant for trying out a new design or for a one-off event. Just keep in mind that the price per sticker gets much better with larger quantities. If you think you'll need more down the track, ordering a slightly bigger run from the get-go is often the most cost-effective move.
One of the best things about vinyl is the ability to cut stickers into any shape you can imagine. This is called 'die-cutting,' and it means your sticker can perfectly match the outline of your logo. It’s a small detail that makes a world of difference, looking far more professional than a generic square or circle.
Are Vinyl Stickers Genuinely Waterproof?
Absolutely. A well-made vinyl sticker is naturally water-resistant, but the real magic happens when you add a protective laminate over the top.
That clear coating, whether it's gloss or matte, seals the deal, making the sticker completely waterproof and tough enough to resist scuffs and scratches. This is why they're perfect for slapping on things that get handled a lot—think water bottles, laptops, toolboxes, and outdoor gear. They’re built to last.
Ready to turn your brand's vision into a sticker that sticks? At SONI DESIGN, we're passionate about creating designs that tell your story. Let's work together and make something amazing. Start your project with us today!
Leave a Comment
Stay home & get your daily
needs from our shop
Start You'r Daily Shopping with Nest Mart