
Your cart is currently empty.

Planning Your Science Fair Board Journey
Launching your project with a solid plan sets the tone for everything that follows. Emma, for instance, sketched her hypothesis display three weeks before print day, leaving plenty of breathing room for peer feedback and tweaks.
Key tasks to tackle early:
- Draft your hypothesis and outline core goals.
- Schedule two or more design reviews well before printing.
- Break the work into milestones for research, rough layouts, and final proofs.
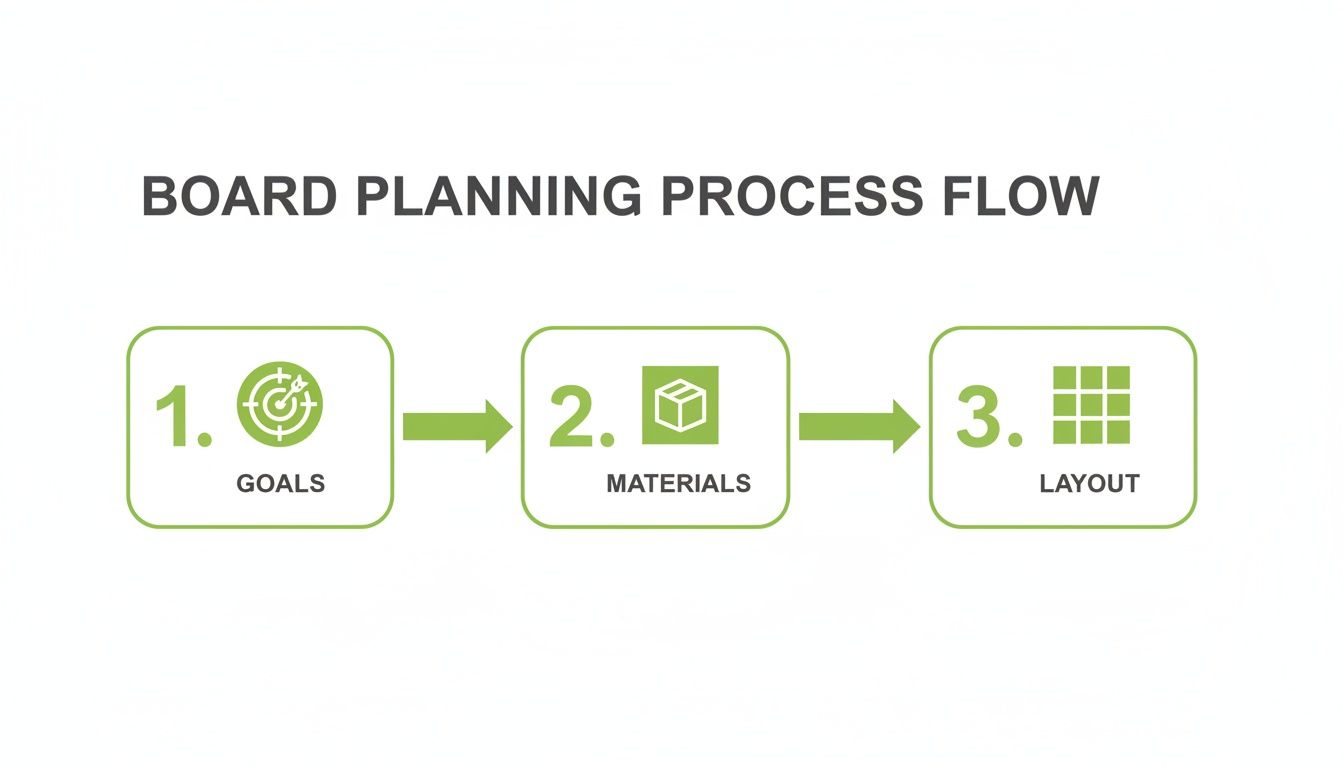
This visual roadmap highlights how nailing down objectives, materials choices, and layout direction from the start makes assembly and presentation far smoother.
Defining Project Goals And Milestones
Clear, time-bound targets keep you on track and ward off last-minute panic. Applying SMART criteria helps you turn broad ideas into measurable steps:
- Specific Aim: “Measure soil pH change,” not just “check dirt.”
- Measurable Metric: Record pH shifts over four trials.
- Achievable Scope: Limit variables to a single soil type.
- Relevant Angle: Link your experiment to local environmental concerns.
- Time-Bound Checkpoints: Weekly reviews to spot issues early.
In Otago’s 2014 science fair, 233 projects hit the boards—intermediate learners accounted for over 95% of entries, with balanced gender participation. Learn more about 2014 Otago Science Fair findings
“Mapping deadlines early transformed our workflow and cut stress by half,” reflected Megan, a seasoned fair participant.
Selecting Materials And Dimensions
Your board’s backbone comes down to stock type and size. Foam core feels sturdy but can be heavy, while corrugated plastic bends less and travels better on public transport.
- Bend-test small offcuts to check thickness.
- Weigh a full-size sheet if you’ll be cycling or bussing in gear.
- Hunt for eco-friendly art-store options to trim costs and landfill waste.
Crafting Visual Layout And Print Prep
A crisp grid system makes information easy to follow—and pleasing to judges’ eyes. Free tools like Canva or GIMP let you set precise margins and snap elements into place.
- Switch files to CMYK for accurate printing.
- Embed fonts and include a 3 mm bleed to avoid unwanted white borders.
- Export PDFs at high resolution and double-check colour profiles before you hit “print.”
Ahead of moving into assembly, take a moment to see all your steps at once:
Phases of Board Preparation
This table brings together the main stages and the essential tasks you’ll complete in each phase.
| Phase | Key Activities |
|---|---|
| Planning | Define objectives, sketch layout concepts |
| Sourcing | Select board stock, test durability and weight |
| Design | Finalise grid, align graphics and text levels |
| Print Prep | Convert colours, embed fonts, add bleed |
| Assembly | Attach panels, refine edges, plan transport |
Use this concise overview as a checkpoint whenever you need to adjust timing or revisit a previous step.
Review And Finalise Your Schedule
Lock in your print deadlines and rehearsal slots on a shared calendar or Gantt chart.
- Highlight school rubric due dates in bold.
- Book printing services at least two weeks before your fair.
- Arrange mock presentations with teachers or friends.
Regular check-ins create space for fresh feedback and last-minute discoveries. Keep tweaking until your board tells its story with confidence and clarity. Good luck—and enjoy bringing your experiment to life!
Choosing Board Materials And Dimensions
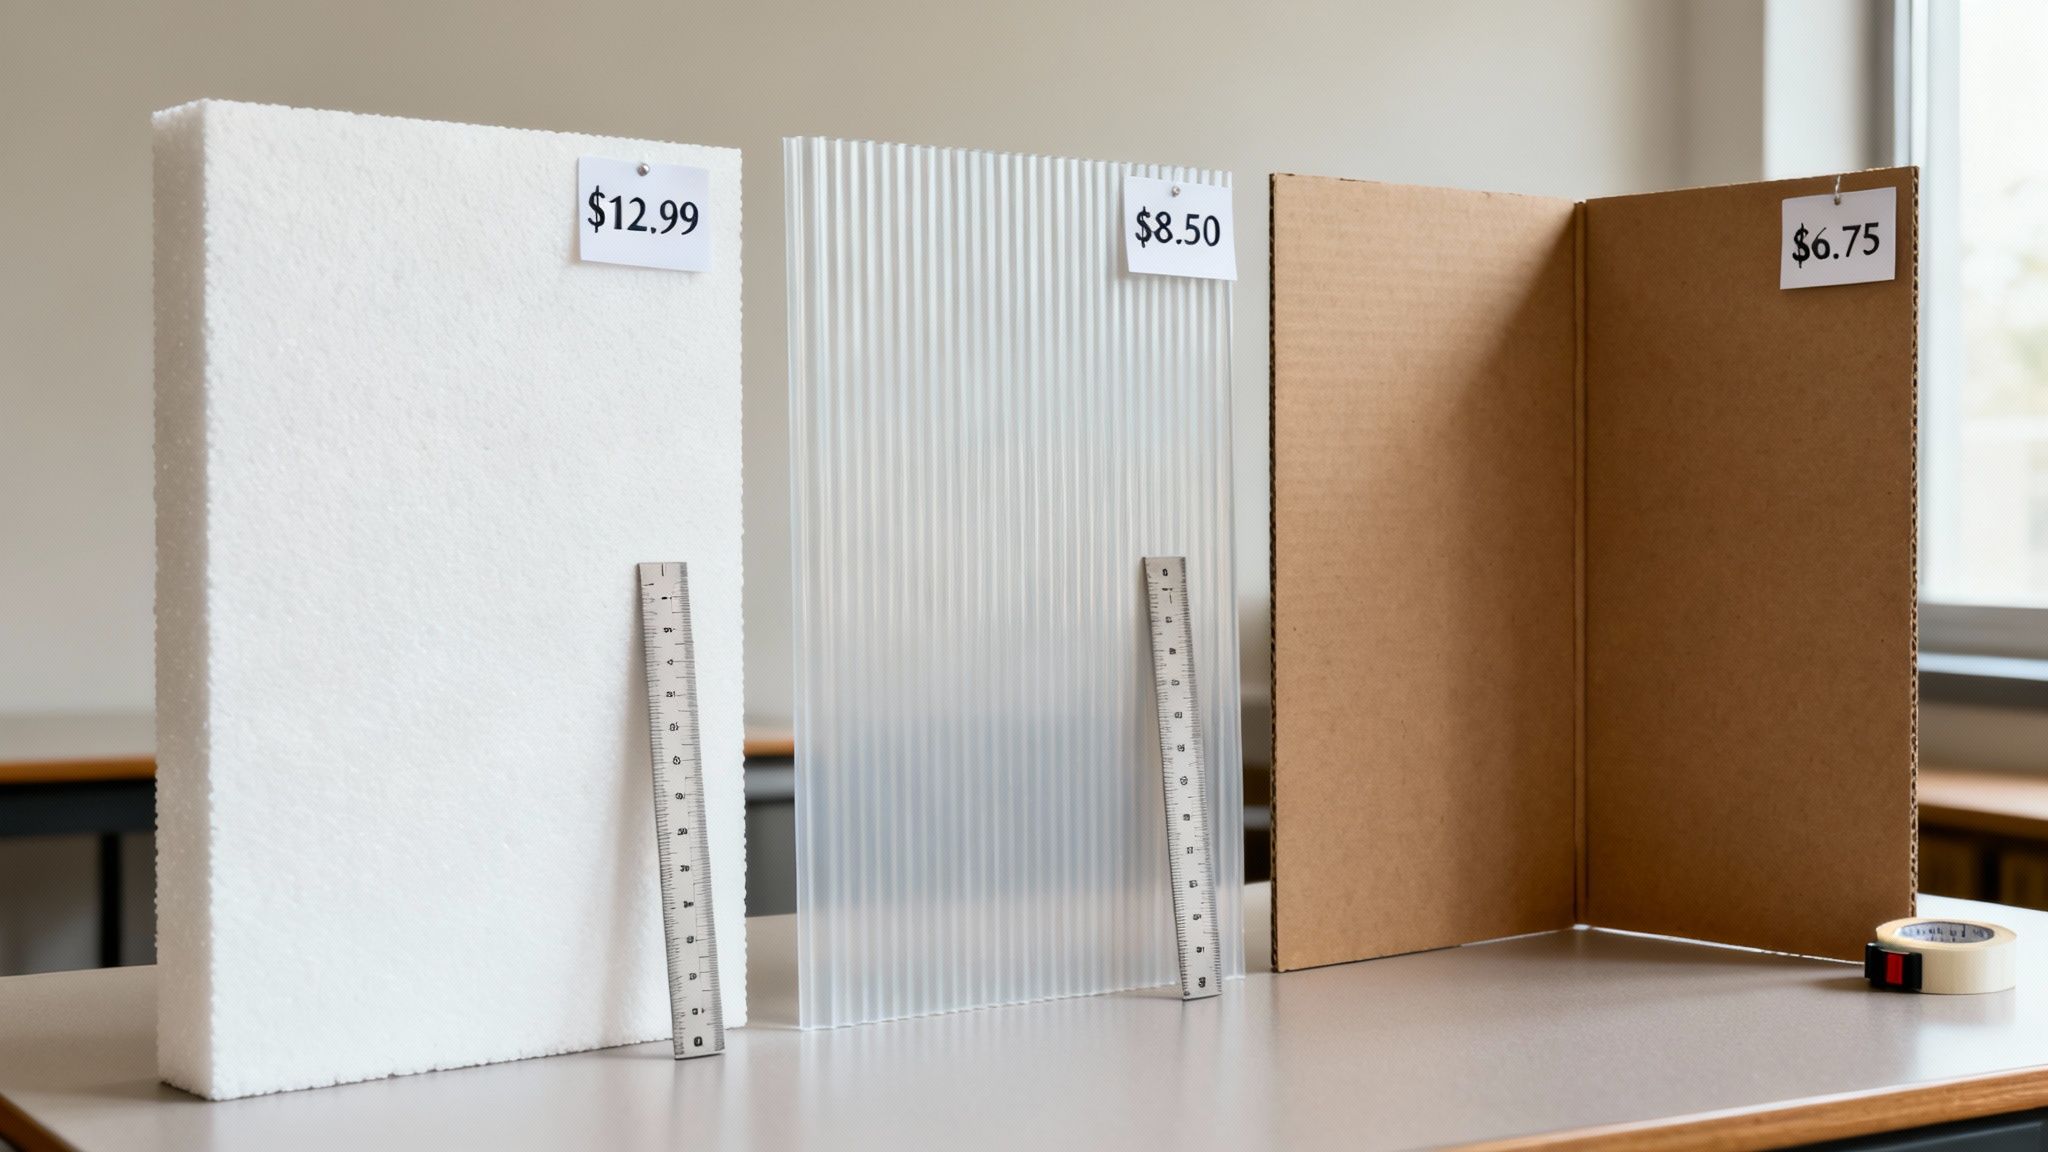
Selecting the right board sets you up for success. When students Emma and Jacob put three popular options to the test, they uncovered clear differences in weight and stiffness.
Thicker stock will resist sag, but it also means heavier loads if you’re cycling or catching the bus. The trick is finding enough support without turning your project into a workout.
Material Options And Tradeoffs
- Foam Board: Offers a clean finish and excellent rigidity. Best when you can drive to the fair and aren’t worried about extra grams.
- Corrugated Plastic: Light as a feather and water-resistant. A smart choice for NZ’s unpredictable weather.
- Tri-Fold Cardboard: Budget-friendly and eco-safe. Hinges may droop unless you reinforce them with tape or extra card.
In Auckland, about 65% of local foam boards come in 5 mm thickness—sturdy enough to handle layered graphics.
"Corrugated plastic saved my daughter’s board when a sudden downpour hit," notes teacher Mrs Singh.
Sheets generally cost between $8 and $15. Snagging off-cuts can cut that price by roughly 30%. Remember: a full-size foam core can weigh 2.5 kg, while a plastic panel stays around 1.2 kg.
Dimensions Guidelines For Your Board
Most school rubrics call for a tri-fold board at 36×48 inches (920×1220 mm). Lock in those measurements early to avoid a frantic resizing session.
| Dimension | Metric Equivalent | Notes |
|---|---|---|
| 36×48 inches | 920×1220 mm | Standard tri-fold size |
| 24×36 inches | 610×920 mm | Half-size option for tight transport |
| Custom Cut Sheets | Variable | Check pre-cut availability at suppliers |
If you bike to the venue, a half-size board slips into a pannier and beats wind resistance. For full-size panels, fold them flat and secure with rubber bands.
Tip: Sketch your layout at full scale on butcher’s paper. It’s the best way to see how text and visuals will balance.
Cost Saving And Eco-Friendly Tips
Wellington stores stock eco-foam boards made from 70% recycled content, usually priced around $12 each.
- Off-Cut Bundles: Ask for leftover sheets to score mixed sizes at a discount.
- Bulk Orders: Pool resources with classmates for wholesale rates and free delivery.
- Recycled Cardboard: Upcycle sturdy boxes, laminate them, and build a board for under $5.
"Using recycled materials taught resourcefulness and environmental stewardship," says Mr Patel of GreenTech.
Some suppliers even hire out reusable panels you can return post-event. Always inspect edges and surfaces—tiny dents or creases can throw off alignment.
Smooth transport is crucial. A rigid carry tube or custom-sized box lined with backing sheets prevents warping. Even a 0.5 mm variation across panels can shift your folds.
Where To Source Board Materials
Local suppliers like SONI Design in Auckland and Wellington offer custom cuts, eco options and student discounts. Online shops widen your choices but watch out for hefty shipping on bulky items.
- SONI Design: Custom dimensions, eco-friendly lines, student pricing.
- OfficeMax: Standard sizes with click-and-collect convenience.
- The Warehouse: Affordable bundles—inspect for surface blemishes.
Compare prices and delivery timelines to nail your budget and schedule. If you’re cutting things fine, always ask for express turnaround.
Good luck!
Designing Engaging Board Layouts
A clean, well-arranged board grabs attention from across the room and leads judges smoothly through your research narrative. Think of it as setting the stage: every element needs breathing space.
Grids are your best friend here. They keep margins uniform and help key findings leap off the board, even from three metres away.
- Guides the eye with consistent spacing
- Establishes hierarchy through headline and subhead sizing
- Maintains 10 mm or greater margins for clarity
- Aligns text blocks and visuals so nothing overlaps
Compare a three-column grid with a more open two-column layout when you want extra white space. One student placed a central infographic that upped result recall by 75% among judges. The outcome? A board that felt balanced yet punchy at first glance.
Headlines should shout hierarchy. Use 24 pt for main titles and 18 pt for subheads. Keeping text columns narrow cuts eye fatigue and boosts scanning speed.
Grid Systems And Hierarchy
Open your design tool of choice—Canva or GIMP—and switch on the guides. Set 6 to 8 columns based on how much content you have, then lock in 20 mm margins so nothing creeps too close to the edge.
- Snap elements into place for pixel-perfect alignment
- Group related charts and images under shared guide blocks
- Hide guides before saving or exporting to PDF
Experiment freely: GIMP’s Custom Guides let you mark thirds, fifths or any fraction you need. Always run a full-scale print preview to spot text overload. Aim for a 60/40 ratio of visuals to text for a crisp, engaging presentation.
Balancing Text And Visuals
Map out your headings, paragraphs and image zones on the grid first. Keep each paragraph under 50 words. When you need to break down steps, switch to a numbered list—it’s far easier to digest.
“Well-balanced text and visuals made my board stand out in the crowd.”
– Past Science Fair Finalist
Icons can encapsulate your methods at a glance, while charts should sport clear legends and no more than 5 data series. One student even attached a fold-out timeline with caption callouts to guide viewers through each phase.
Photos look best when cropped consistently and surrounded by white space. A simple dark-on-light or light-on-dark contrast prevents visuals from disappearing into the background.
Below is a side-by-side look at popular display formats, their advantages and best use cases.
Comparison of Board Layout Styles
| Layout Type | Advantages | Ideal Use |
|---|---|---|
| Multi-Column | Guides eye evenly and boosts readability | Data-heavy projects |
| Single Column | Focuses attention on narrative flow | Story-based displays |
| Modular Blocks | Offers flexibility and dynamic spacing | Interactive or infographic boards |
Use this guide to match your project with the layout that suits its strengths.
Colour Palettes And Alignment Tools
Stick to 3 main colours plus 1 accent. For water chemistry experiments, cooler hues like teal and navy work wonders. Heat transfer studies call for reds and oranges to signal energy flow. Reserve colour for headings and key graphics, then use transparency to layer charts without obscuring data.
Limit yourself to 2 fonts for a polished look. Here’s how alignment guides appear in Canva when the grid is active:

You’ll see guides every 15 mm, making it easy to line up panels without guesswork.
- Keep margins consistent across all sections
- Print a small sample before committing to the full board
- Use images at 300 dpi for crisp, high-quality prints
A thoughtfully arranged board not only tells your story clearly but also leaves a lasting impression.
Optimizing Files For Printing
Getting your PDFs print-ready early on prevents those frantic, last-minute tweaks. Remember the student whose vibrant on-screen chart turned muddy when printed? These guidelines will keep your science fair board looking sharp and true to your vision.
Choosing The Right PDF Format
Most professional print shops ask for PDF/X-1a. It locks in images, fonts and colour profiles so you won’t face surprise shifts. Transparencies get flattened, which means fewer hiccups when the printer handles your file.
Converting RGB To CMYK
Design applications default to RGB, but printers work in CMYK. Swap your artwork over before you export.
- Open your file in Illustrator or InDesign
- Go to Edit > Convert To Profile and pick a CMYK preset
- Double-check each placed PNG or JPEG to confirm the change
Expert Tip Converting early can save hours of hair-pulling later.
Also, aim for 300 dpi on all photos and graphs. Anything less risks pixelation or soft edges, and nobody wants fuzzy labels on project results.
Embedding Fonts To Prevent Substitutions
Nothing derails a polished layout faster than font swaps. Embedding locks your type in place.
- In Acrobat Pro, head to File > Properties > Fonts
- Ensure every font listed shows as embedded
- If you spot any missing faces, reopen the original design file and embed before exporting
“Embedding was the difference between my board looking DIY or professional,” remembers Alyssa, a past science fair finalist.
You’ll also need bleed margins to avoid stray white lines. A 3 mm bleed on every edge gives the cutter room for slight shifts.
| Bleed Setting | Value | Reason |
|---|---|---|
| Top/Bottom | 3 mm | Accommodates trimming tolerance |
| Left/Right | 3 mm | Prevents unintended white edges |
Running A Digital Proof
A full-size mock-up on screen is your best ally. Upload your PDF to FlightCheck or your printer’s portal and review at 100% zoom.
Watch for:
- Consistent colours from page to page
- A complete list of embedded fonts
- Correct bleed and trim marks
Local NZ print shops like SONI DESIGN and OfficeMax usually quote 3–5 business days for a tri-fold board. Some online services promise 48-hour turnaround, but don’t forget to add shipping time.
“I saved two days by choosing a local print centre with in-store pick-up,” says Liam, a Wellington student.
Final Checks Before Sending
Before you hit ‘send’, run through these final inspections together with a teacher or teammate:
- Print test strips of your key colours
- Compare the digital proof side-by-side with what you see on screen
- Reopen the exported PDF to confirm file integrity
These last steps catch typos, colour shifts and missing elements before they become a headache.
Planning Your Submission Timeline
Aim to submit your print job at least two weeks before the fair. Align your schedule with the printer’s availability—this buffer helps absorb any unexpected delays.
Use a shared calendar or a tool like Trello to mark proof deadlines, pick-up slots and review meetings. Assign clear responsibilities so everyone knows who’s checking what.
Finally, adopt a straightforward naming convention—something like “ProjectName_Final_v3_20231115.pdf”—and back up every version to both cloud storage and a USB drive. Accidents happen, and having that extra copy can be a lifesaver.
- Check fonts aren’t set to “subset” only
- Verify ink limits stay within printer specs (generally under 300%)
Assembling And Protecting Your Board
When you bring every panel together, a little planning makes all the difference. Choose adhesives that let you reposition graphics or lock them down, depending on how final your layout is.
Here’s a quick comparison of popular options:
- Double-sided tape: No mess, wrinkle-free, easy to adjust.
- Spray mount: Even bond in well-ventilated areas, but mask off surfaces.
- Glue sticks: Works on light paper, though thin poster stock may ripple.
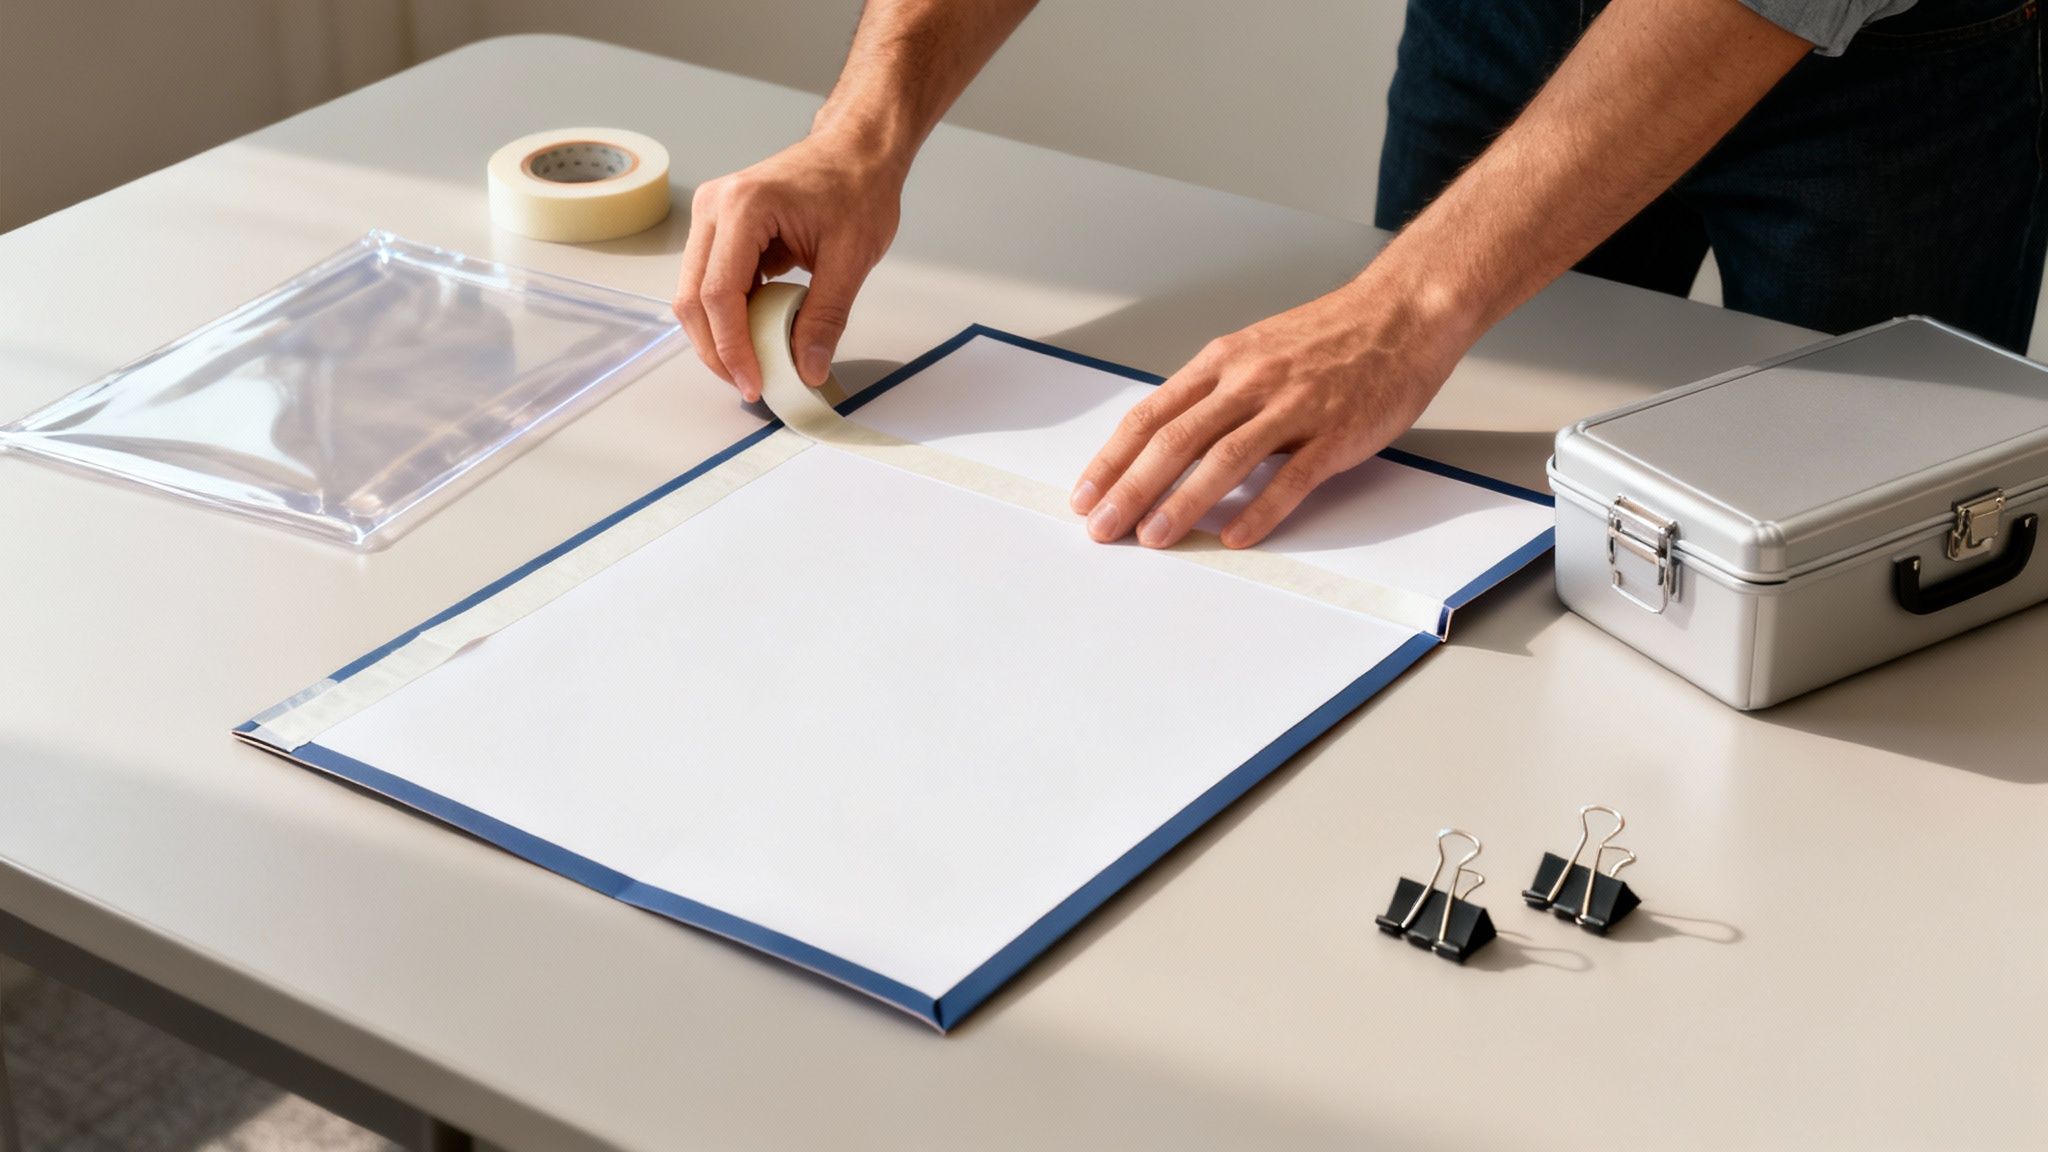
Choosing The Right Adhesive
In Wellington, Emma tested combinations on heavy cardstock. She found that pairing tape with a light spray gave her smooth edges that never lifted. Binder clips held everything tight until the adhesive cured completely.
“Binder clips held panels until glue cured fully,” Emma recalls after a last-minute repair.
Keep a small kit—tape, glue stick, scissors and a handful of binder clips—ready for emergency fixes. That way, stray curls or lifting corners won’t throw you off on event day.
Securing Folds And Edges
A gentle score along fold lines prevents the board’s core from cracking. Run a dull blade at 2 mm depth and you’ll get crisp bends every time. Then, reinforce the inner joint with a scrap card tab.
Coloured washi tape marks your vulnerable corners and doubles as a bright visual cue when you’re packing. In a Christchurch trial, evenly spacing heavy charts reduced sag by 85 %, so balance your visuals across all three panels.
Proper scoring slashes stress on the centre panel, helping your board stay upright.
Protective Sleeves And Covers
A clear poly sleeve guards against scuffs and accidental spills. Most stationery stores stock protective sleeves sized for 36 × 48 inch boards—snug but breathable. If it feels too tight, wrap each panel in kraft paper before boxing up.
Lily from Dunedin discovered that adding a wooden dowel along the spine stopped laminated charts from drooping. It’s a lightweight reinforcement that keeps everything straight without dragging you down.
- Rigid cardboard tube with foam inserts
- Padded backpack designed for art-tube boards
- PVC or wooden dowel for spine support
- Washi tape for marking fragile edges
- Binder clips for urgent repairs
| Gear Type | Advantage | Example Supplier |
|---|---|---|
| Rigid Tube | Prevents bending | SONI DESIGN |
| Padded Pack | Hands-free carry | OfficeMax NZ |
| Spine Rod | Lightweight reinforcement | The Warehouse NZ |
Pro Tip For Edge Protection
A strip of neon tape along each corner alerts anyone handling your board—and it looks sharp. Fold small tabs of clear card over fragile angles, then secure them with tape for extra shock absorption.
“Marking my board edges saved it from dozens of scratches on the bus ride,” says Jacob, a Hawke’s Bay finalist.
Quick Repair Under Pressure
Maria’s centre fold sprang open at a Southland fair just minutes before judging. She popped in a binder clip, layered on tape, and bought herself time until she could reapply a stronger adhesive.
Carry binder clips and tape in your pocket for emergencies.
Before you set off, load and unload your board once or twice. That practice run will reveal any tight spots or catches so you can adjust padding or trim stray corners.
Putting It All Together
Before you leave home, tick off every item on this assembly checklist:
- Attach all printed panels neatly.
- Score and fold along guide lines.
- Secure edges with clips and tape.
- Add corner guards and spine rod.
- Slide board into sleeve or box.
- Label the package with your project title.
- Pack repair kit within easy reach.
- Mark fragile zones visibly with neon tape.
- Confirm transport gear is loaded.
- Stand the board upright before moving.
A well-prepared board arrives intact and ready to impress judges without last-minute stress.
Organising these details ensures your science fair board travels safely and looks professional. With actionable tips and real-world hacks, you’ll avoid mishaps and showcase your hard work to its fullest. Good luck!
Presenting Your Project With Impact
A compelling board layout draws viewers in before you even say a word. Think of your visuals as the opening handshake—they should communicate your main idea in a flash. Aim to hook judges within the first 30 seconds.
Guide their eyes with bold callouts that frame your hypothesis and results. For instance, Sarah surrounded her pH-shift graph with bright teal borders so it jumped off the board.
Crafting Your Narrative
A clear story arc keeps judges intrigued from start to finish. Use concise takeaways and visual cues to map out each transition.
- Keep bullet points under two lines for quick scanning.
- Label every chart with crisp titles and legends.
- Add icons or contrasting colour blocks to spotlight methods.
Embedding a QR code can invite judges to explore interactive demos. One student linked to a live data dashboard—and judges spent extra time digging in.
Discover more insights: 60% of projects tackled water quality and 40% of winners worked in teams. Read more about 2025 fair findings.
Rehearsal Techniques
Mock pitch sessions build confidence and polish your delivery. Run through your talk alone, then invite peers for feedback.
- Polish your opening pitch to fit under 45 seconds.
- Quiz yourself on common questions without glancing at notes.
- Time a full run-through and tweak your pacing.
Handling Questions With Poise
Treat the Q&A as a chance to reinforce your visuals. Start by repeating each question aloud—that clarity helps both you and the judges.
- Maintain steady eye contact and nod to show you’re listening.
- Link answers back to specific sections of your board.
- Share short, personal anecdotes from your experiments.
- Thank judges after each question to end on a positive note.
“Engaging storytelling and eye contact helped me connect with every judge.”
– Alex, Science Fair Finalist
Practise these techniques so your presentation feels as sharp as your research. Confidence and clarity linger long after the judging wraps up.
Advanced Storytelling Tips
Everyday analogies make technical details click. Comparing the water cycle to your morning coffee routine turns data into something everyone recognises.
- Relate testing pond samples to common kitchen tasks, like brewing tea.
- Highlight obstacles you faced and the creative fixes you devised.
- Cite past finalist case studies to show real-world impact.
“Storytelling transformed complex data into a compelling journey.”
– Judge Feedback
Keep refining until these stories flow naturally. Let your enthusiasm shine through every detail.
Frequently Asked Questions
Tackling a science fair board often sparks questions around dimensions, materials and transport. This quick-fire FAQ covers four real-world solutions that smooth out design, movement and final prints.
-
What Size Should My Science Fair Board Be? Most schools ask for a 36×48 inches tri-fold display. Always double-check your event’s rules before you shop.
-
Can I Use Recycled Materials? Corrugated cardboard and old foam-core sheets can hold up well. Press on any wobbly areas and tape edges firmly to avoid soggy corners.
-
How Can I Transport a Large Board Safely? Stand it upright in a rigid tube or custom-made box. A few foam strips and spring clips stop it sliding around on the move.
-
How Do I Proof My Files Before Printing? Export your layout as a high-res PDF and open it at 100%. Print a single panel on your home printer to catch blurry graphics or alignment slip-ups.
These pointers come straight from students racing against deadlines. Try them early and skip the panic.
Additional Proofing Advice
A quick home proof run can be a real lifesaver. Print colour swatches next to your digital mock-up and compare them under natural light.
Sketch out a simple checklist covering bleed margins, embedded fonts and image resolution.
“That handheld proof stopped a washed-out chart slipping into my final board.”
Wrapping these checks into your routine reduces the chaos before print-out day.
-
Test Colour Consistency: Add small swatches of each primary hue so mismatches jump out immediately.
-
Verify Font Legibility: Print labels at the full display size to catch any text that’s too tiny.
-
Check Image Cropping: Make sure every graphic lives inside the safe zone and none vanish at the trimming stage.
These final steps lock in a crisp, error-free finish for your science fair board. You’ll walk in knowing your display is picture-perfect.
Achieve flawless prints for your science fair board with our experts.
SONI DESIGN brings your vision to life!
Leave a Comment
Stay home & get your daily
needs from our shop
Start You'r Daily Shopping with Nest Mart