
Your cart is currently empty.

Imagine you had a silent, powerful salesperson working for you 24/7, ready to represent your brand anywhere in the country. For countless Kiwi businesses, pull up banners in New Zealand are exactly that—a portable, high-impact marketing tool that delivers real results without breaking the bank. They're a staple for everything from trade shows to retail spaces and corporate events.
Why Pull Up Banners Are a Kiwi Marketing Essential
Think of a pull up banner as the Swiss Army knife of your marketing kit. It's compact enough to toss in the boot of your car, but it pops open in seconds to create a big, professional brand statement. For businesses all over New Zealand—from an Auckland startup at their first expo to a Queenstown tourism operator greeting new arrivals—that kind of versatility is gold.
This is where your marketing comes to life. It creates a tangible connection with customers that a digital ad simply can't match. While a social media campaign is great for grabbing initial attention, a well-placed pull up banner reinforces your message in the real world, building genuine brand recognition and trust.
The Power of Portability and Presence
The real magic of a pull up banner is how it manages to be both incredibly portable and visually commanding. One person can easily carry it to a last-minute networking event, set it up in under a minute, and instantly create a branded backdrop. This makes them perfect for just about any situation.
- Trade Shows and Exhibitions: Cut through the noise and make sure your stand gets noticed in a busy hall.
- Retail Environments: Announce a sale, highlight a new product, or promote your loyalty programme right where customers are making decisions.
- Corporate Events: Add a polished, professional touch to presentations, AGMs, or your reception area.
- Community Markets: Grab the attention of passers-by at local fairs and events.
Cost-Effective and Reusable Marketing
Unlike the ongoing cost of a digital ad campaign, a pull up banner is a one-off investment that keeps on giving. A single, quality banner can be used over and over again at dozens of events for years, giving you an incredible return. This makes pull up banners in New Zealand one of the smartest, most budget-friendly marketing tools available, especially for small and medium-sized businesses.
A well-cared-for pull up banner is like a tireless brand ambassador. Because you can reuse it endlessly, your marketing budget goes so much further, delivering your message time and time again without any extra spend.
At the end of the day, these banners are much more than just printed signs; they’re dynamic assets for your business. They give Kiwi brands a professional edge, making sure their story is told clearly and confidently, no matter where they are. Their simplicity, impact, and affordability make them a non-negotiable part of any solid marketing plan.
How to Choose the Right Pull Up Banner
Picking the right pull up banner is a bit like choosing the right tool for a job. You wouldn't use a sledgehammer to hang a picture frame, would you? In the same way, the banner you need for a one-off community fair is a world away from the one you’d take to a dozen trade shows across New Zealand. Making a smart choice right from the start means your investment will actually pay off.
The trick is to match the banner's features—the material, the stand, the size—to what you’re trying to achieve. A cheap and cheerful model might be perfect for a single event, but if you're building your brand for the long haul, a more durable option will give you a far better return.
Let's break down what you really need to think about.
This simple decision tree shows how a pull up banner can be your "portable salesperson" on the road or a "silent salesperson" in your store.
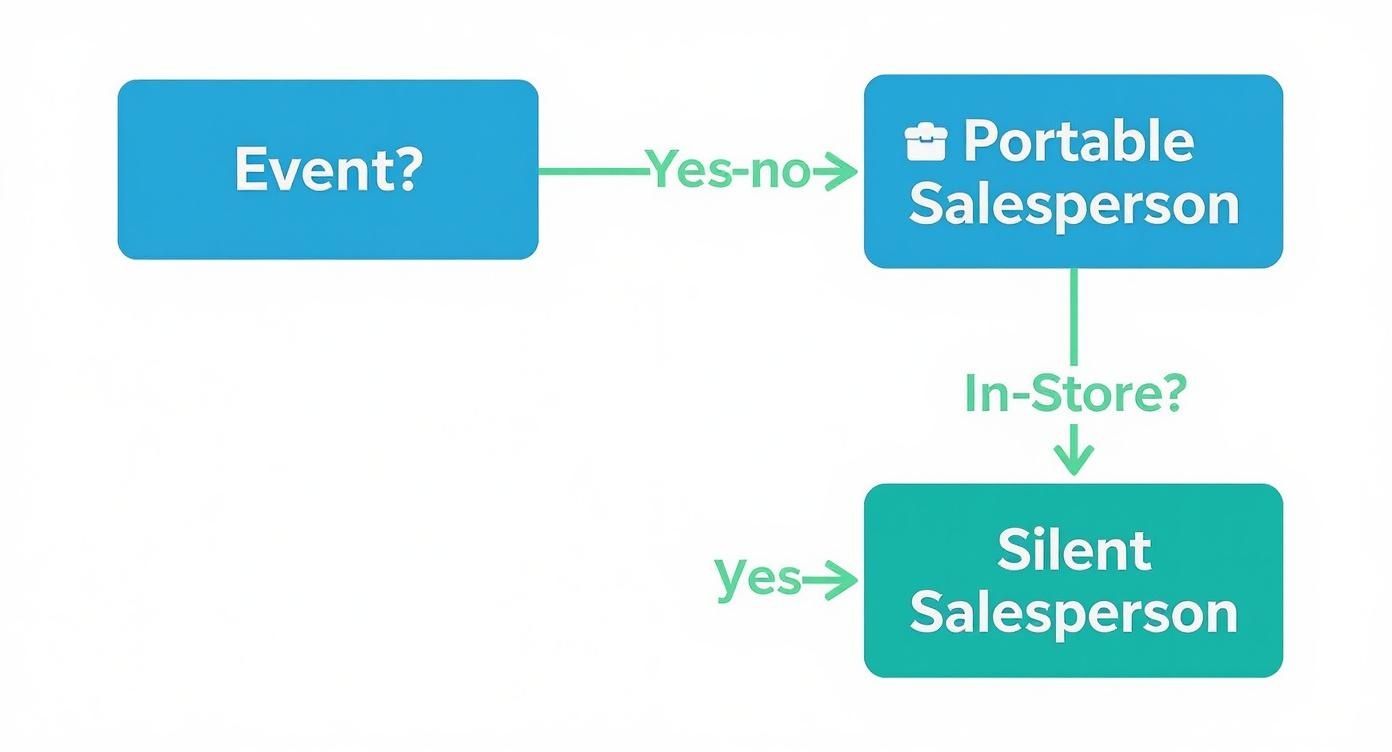
As you can see, the first question is always about the environment—will it be travelling to events or staying put? That one decision helps define its role in your marketing.
Define Your Banner's Mission
Before you even start browsing options, ask yourself one simple question: "What is this banner's main job?" Your answer will steer every other decision you make. Is it for a single, high-stakes conference, or is it going to be a permanent fixture in your office reception for the next few years?
Think about these common scenarios for pull up banners New Zealand businesses use all the time:
- One-Time Event: For a single conference or a market day, a budget-friendly banner will probably do the trick.
- Frequent Travel: If you’re constantly on the road for sales meetings or expos, you'll want a lightweight stand and a solid carry case that can handle being thrown in the car.
- In-Store Promotion: A banner that’s staying in one place can have a heavier, more stable base to stop it from getting knocked over by customers.
- Long-Term Branding: If this banner needs to look sharp for years to come, investing in premium materials and a heavy-duty stand is a no-brainer.
By getting clear on its purpose, you avoid paying for features you don't need or, worse, buying a banner that just isn't up to the task.
Material and Stand: The Dynamic Duo
The printed graphic and the stand mechanism are the two parts that really determine your banner’s overall quality, look, and lifespan. They’re a team—one can't perform well if the other is letting the side down.
When it comes to materials, most Kiwi suppliers will offer a choice between standard vinyl and a more premium fabric. Vinyl is a hugely popular, cost-effective option known for its vibrant colours and toughness. It’s also easy to wipe clean, which is great for busy areas. Fabric, on the other hand, gives you a classier, non-glare finish that looks fantastic under bright event lighting.
The stand is just as critical. Budget aluminium stands are light and perfect for occasional use. For something more solid, a heavy-duty stand with a wider, sturdier base will prevent that annoying wobble and ensure your banner stands tall and proud, even in a bustling environment.
A quality stand is the foundation of a reliable banner. While the graphic grabs the attention, the stand ensures it stays upright, professional, and presentable throughout its lifespan.
To help you weigh up the options, here’s a quick comparison of the common materials and stands you'll find here in New Zealand.
Comparing Pull Up Banner Materials and Stands
| Feature | Standard Vinyl Banner | Premium Fabric Banner | Budget Aluminium Stand | Heavy-Duty Aluminium Stand |
|---|---|---|---|---|
| Best For | High-traffic areas, short-term promotions, vibrant graphics. | Premium branding, indoor events with bright lights, long-term use. | One-off events, infrequent use, tight budgets. | Frequent travel, trade shows, long-term display. |
| Finish | Slight sheen, very durable and wipeable. | Matte, non-glare, elegant appearance. | Lightweight, basic construction. | Wider, stable base, more robust mechanism. |
| Durability | High - resists tears and water. | Good - can crease if not stored carefully. | Lower - can be damaged if handled roughly. | High - built to withstand repeated use. |
| Portability | Rolls up easily into the stand. | Rolls up easily, lighter than vinyl. | Very lightweight and easy to carry. | Heavier but provides excellent stability. |
| Price Point | $ | $$ | $ | $$ |
This table should give you a clearer picture of how each component affects the final product. A budget vinyl print on a heavy-duty stand might be perfect for a multi-year retail promotion, while a premium fabric banner on a lightweight stand is ideal for an executive on the road.
Even as digital advertising grows, the physical impact of a pull up banner remains a crucial part of a balanced marketing strategy for Kiwi businesses. While online spending is set to climb, the reusability of a physical banner makes it a smart investment. The most common sizes used in New Zealand range from 84cm to 150cm wide, usually printed on durable vinyl and paired with aluminium stands that can last for two years or more with a bit of care. Find out more about local pull up banner trends over at sonidesign.co.nz.
Ultimately, the right choice is about balancing your immediate needs with your long-term goals. By thinking carefully about your banner's mission, material, and stand, you can pick a powerful marketing tool that will serve your business well for years.
Designing a Banner That Stops People in Their Tracks
A great pull up banner does more than just show off your logo; it's your silent salesperson, a visual handshake that invites people to find out more. In a crowded expo hall or a busy shop, you’ve got maybe three seconds to catch someone’s eye. Your banner’s design is what makes the difference between being seen and being completely overlooked.
Think of that tall, vertical canvas as a prime piece of real estate. Every centimetre has to earn its keep. The goal isn't to cram every last bit of information on there. It's about creating a clear visual journey that guides the viewer's eye from your brand, to your key message, and finally, to what you want them to do next. It's about starting a conversation from across the room.
Mastering the Visual Hierarchy
Visual hierarchy sounds complex, but it’s really just about arranging things in order of importance. For pull up banners in New Zealand, getting this right is non-negotiable. That unique vertical shape demands a logical flow that people can absorb in a single glance.
The golden rule is to work from top to bottom, putting the most critical info where it’s most likely to be seen first.
- Top Third (The Headliner): This is where your logo and main brand name should live. It’s the first thing people spot from a distance, so make it bold and instantly recognisable.
- Middle Section (The Conversation Starter): This is prime eye-level territory. Use it for your key message or unique value proposition. Think short, snappy headline in a big, easy-to-read font.
- Bottom Third (The Next Step): This area is for your supporting details. Your website, contact info, or a QR code work well here. Just keep it simple, as this part can sometimes get hidden behind tables or passing foot traffic.
By organising your design this way, you create an intuitive path for the eye to follow. A potential customer can absorb your brand, your message, and how to connect with you in a single, quick scan.
Choosing Colours and Fonts That Communicate
The colours and fonts you pick are powerful communication tools. They set the tone for your brand and, just as importantly, decide whether your banner is actually readable from five metres away. Bright, high-contrast colour combos are your best mate here.
Imagine the places your banner will be used. A design with subtle, muted colours might look fantastic on your computer screen, but it’ll wash out completely under the harsh fluorescent lights of an expo centre.
Here are a few quick pointers for getting it right:
- Stick to Your Brand Palette: Consistency is everything. Using your established brand colours helps reinforce who you are.
- Prioritise Contrast: Make sure your text pops against the background. Dark text on a light background (or vice versa) is a classic for a reason—it works.
- Limit Your Fonts: Don't go crazy. Stick to two fonts at most, one for headlines and one for the smaller text. It keeps things looking clean and professional.
- Readability is King: Choose clear, simple sans-serif fonts. Think Helvetica, Arial, or Futura. Their clean lines are much easier to read from a distance.
The Critical Role of High-Resolution Imagery
Nothing makes a banner look cheap and nasty faster than a blurry, pixelated image. Because pull up banners are printed in a large format, any images or logos you use must be high-resolution. That low-quality graphic you grabbed from your website will turn into a fuzzy, unprofessional mess when blown up.
Always start with the original, high-quality source files. For logos, that means vector files (.ai, .eps, .svg). For photos, you'll need images that are at least 300 DPI at the final print size. If you’re not sure, have a chat with your printer about their technical specs, but getting your source files right from the start is absolutely essential for a crisp, polished finish.
Of course, a banner is just one piece of the puzzle. To make sure it fits with your wider promotional strategy, it’s worth thinking about your overall event presence. You can find some effective event branding ideas that will help tie all your marketing materials together, creating a seamless and memorable experience for everyone who stops by.
Using Your Banner for Maximum Impact
So you’ve got a beautifully designed pull up banner. That's a great start, but it's only half the battle. The real magic happens when you use it smartly to grab attention and get people talking. A banner stashed in a forgotten corner is a waste of money. But place it thoughtfully in a high-traffic spot? It becomes your silent, hardworking salesperson.
Think of it like setting the stage for a star performer. You want your banner right where the audience is biggest and most engaged. For a lot of Kiwi businesses, this means getting creative and looking beyond the usual trade show floor to make it work for you every single day.

Beyond the Trade Show Floor
While pull up banners in New Zealand are a familiar sight at big conferences and expos, they're far more versatile than that. By weaving them into your daily business and special events, you can turn just about any space into a branding opportunity. The trick is to figure out where your ideal customers are and meet them there with a sharp, compelling message.
Here are a few practical places to put your banner to work:
- Office Receptions: This is your chance to make a cracking first impression. A professional banner in your reception area instantly tells clients, partners, and new hires who you are and what you're about.
- Retail Spaces: Pop a banner near your entrance to shout about a new product, a seasonal sale, or a special deal. It’s an instant signpost that helps guide customers.
- Local Community Markets: At a busy local fair or market, you need to stand out. Your banner gives your stall a professional backdrop, building trust and drawing people in.
- Professional Video Backdrops: With so many of us on video calls these days, a pull up banner makes for a clean, branded background for virtual meetings or webinars. It keeps you looking polished and on-brand.
Getting the Placement and Lighting Right
Where you put your banner is just as important as the design itself. You’re aiming for a natural line of sight—a place where people will see it without it getting in the way. Think about placing it just to the side of a doorway, at the end of an aisle, or next to a presentation area. Just make sure it isn't hidden behind a pot plant or lost in a sea of clutter.
Lighting is a game-changer, too. A well-lit banner is a noticed banner. For indoor events, try to position it under a direct light source. If the lighting is a bit dim, it's worth bringing a small, portable spotlight you can clip to the top of the stand. It's a simple fix that makes your colours pop and ensures your message can be seen from clear across the room.
Your banner's impact is directly tied to its visibility. Think like a customer: walk through the space and find the 'hot spots' where your eyes naturally land. That’s where your banner belongs.
This focus on a physical presence is a powerful partner to your digital marketing. In New Zealand, spending in the out-of-home (OOH) advertising world—which includes things like banners—is tipped to hit US$117 million by 2025. It just goes to show how much Kiwi businesses still value real-world marketing that connects with customers face-to-face.
Making Your Banner Interactive
Want to really get the most out of your banner? Don't let it just sit there. Turn it into an interactive tool that invites people to connect with your brand. One of the easiest and most effective ways to do this is by adding a QR code to your design.
A QR code is like a bridge connecting your physical banner to your online world. People can scan it with their phones to:
- Visit your website or a specific promotion page.
- Enter a competition or sign up for your newsletter.
- Download a brochure or your latest price list.
- Follow you on your social media channels.
Not only does this give your audience instant access to more info, but it also gives you a measurable way to see how many people are actually engaging with your banner. For some inspiration, check out these creative QR code display ideas for events.
When you combine a stunning design with smart placement and interactive features, your pull up banner becomes much more than a sign—it becomes a dynamic and seriously effective marketing machine.
Finding the Right NZ Printer for Your Project
Choosing who prints your banner is one of the most important decisions you'll make. A great printer does so much more than just run a machine; they’re your trusted advisor, making sure the final product looks every bit as sharp as you imagined. For businesses needing pull up banners New Zealand wide, finding a local supplier who gets what you're trying to achieve is a game-changer.
Think of your printer as the final quality check before your brand goes public. They have the expert eye to spot potential issues with your design file, recommend the right materials for the job, and ensure the colours pop just like they should. A solid relationship with a local printer is an incredibly valuable asset for any Kiwi business.
What to Look for in a Local Supplier
Jumping into the New Zealand printing scene can feel a bit overwhelming, but it gets a lot easier once you know what to look for. It’s not just about chasing the lowest price; it's about finding a partner who delivers quality and service you can count on.
Here are the key things to keep in mind when picking a printer:
- Quality and Past Work: Don't be shy—ask to see samples. A reputable printer will be proud to show off their work. This is your chance to get a feel for their print resolution, colour vibrancy, and the overall finish of their banners.
- Turnaround Times: How quickly do you need it? Find out their standard production times and, if you're up against a tight deadline for an event, ask if they offer a rush service.
- Customer Support: Good communication is everything. You want a team that’s easy to get hold of, happy to answer your questions, and can offer clear advice from start to finish.
A reliable printer is an extension of your marketing team. They should be just as invested in producing a high-quality banner as you are, because your success reflects directly on their craftsmanship.
Understanding the Printer's Language
To get the best result, it really helps to speak a bit of the printer's language. You don’t need to become a design guru overnight, but knowing a couple of key terms will make the whole process smoother.
Here are two of the most important concepts, explained simply:
- CMYK Colour: This stands for Cyan, Magenta, Yellow, and Key (which is Black). It’s the colour system used for all professional printing. Your computer screen uses RGB (Red, Green, Blue), which is why colours can sometimes look a bit different on paper than they do on screen. For the most accurate results, always make sure your design file is set to CMYK.
- Bleed: Ever seen a print with a thin, ugly white line along the edge? Bleed prevents that. If you want your background colour or image to go right to the very edge of the banner, the design needs to extend a little bit past the final trim line. This extra margin is the "bleed," and most printers in New Zealand will ask for a 3-5mm bleed.
Reviewing Quotes and Making a Decision
When the quotes start coming in, resist the urge to just scan for the lowest number. A good quote will break everything down for you: the banner graphic itself, the stand, the carry case, and any extra design or setup fees. Make sure you're comparing apples with apples by checking the materials and stand types being offered.
The printing industry here in New Zealand is always moving. While it's a big industry—projected to hit around NZD 1.4 billion by 2025—the printers who are really thriving are the ones who offer more than just ink on paper. The value you get from a printer who provides design support, helps with logistics, and uses modern tech is often worth paying a little more for. You can learn more about the New Zealand printing industry on ibisworld.com.
In the end, choosing the right printer comes down to confidence. Go with the partner who shows genuine expertise, gives you transparent pricing, and makes you feel completely sure that your project is in safe hands. This partnership is the final, crucial step to creating a pull up banner that does your brand proud.
Got Questions About Pull Up Banners? We've Got Answers
When you're looking to invest in a marketing tool like a pull up banner, it's smart to have a few questions. To help you feel confident in your choice, we’ve put together some straightforward answers to the queries we hear most often from Kiwi business owners.
Think of this as your go-to guide for getting the most out of your banner, covering everything from lifespan and cost to common design blunders.
How Long Will My Pull Up Banner Actually Last?
This really comes down to two main things: the quality of the banner you buy and how you treat it. A basic, budget-friendly model might be perfect for a one-off event, but it's not really built to go the distance.
On the flip side, a premium banner with a high-quality graphic and a solid base can be a trusty part of your marketing kit for years. With a bit of care, it becomes a reliable asset you can pull out for trade shows, presentations, and events time and time again.
To get the most mileage out of it, just follow a few simple rules:
- Roll it up smoothly. When packing it away, guide the graphic carefully back into the base to avoid any snags or creases.
- Always use the bag. Store it in its carry bag to protect it from dust, scratches, and knocks during transport and storage.
- Keep it out of the elements. Long-term exposure to direct sunlight will eventually fade the colours, and moisture is never a friend to printed graphics.
What Should I Expect to Pay for a Banner in NZ?
The price for pull up banners New Zealand suppliers offer can swing quite a bit. The final cost usually depends on the size, the graphic material, and the sturdiness of the stand itself. It’s always worth getting a couple of quotes to see what you’re really getting for your money.
As a general rule of thumb, here’s how the pricing usually breaks down:
- Budget Banners: These will set you back around $100 to $150 NZD. They’re a great starting point for occasional use or a single event where you just need to make a splash.
- Mid-Range Banners: For something with better durability and a more professional look, you’ll be in the $200 to $350 bracket. These are the go-to workhorses for many small businesses.
- Premium Banners: Top-of-the-line models with features like swappable graphics, double-sided printing, or extra-wide formats can cost $400 or more.
Your budget should match how you plan to use the banner. If it’s going to be a regular feature at trade shows and client meetings, investing in a mid-range or premium option almost always pays for itself in the long run.
Can I Just Replace the Graphic on My Old Banner Stand?
Great question! The answer is... it depends entirely on the stand you’ve got. Most entry-level stands are designed as a single-use unit, meaning the graphic is fixed permanently to the retraction mechanism. Trying to change it is often more trouble than it's worth.
However, many mid-range and premium stands are built for this exact purpose. They often use an interchangeable 'cassette' system that lets you easily swap out an old graphic for a new one. If you know you'll be updating your message for seasonal promotions or new product launches, getting a stand that supports this is a very smart, cost-effective move.
Just be sure to ask your supplier about this feature before you buy.
What are the Most Common Design Mistakes I Should Avoid?
A brilliant banner design is simple, clear, and gets your message across in a heartbeat. Unfortunately, it's all too easy to fall into a few common design traps that make your banner work against you.
Here are the top mistakes we see and how you can dodge them:
- Putting key info at the bottom: Anything crucial—like your website or phone number—can easily get lost behind a table or people's feet. Keep the important stuff in the top two-thirds of the banner.
- Using fuzzy, low-res images: A pixelated logo or a blurry photo makes your brand look unprofessional instantly. Always start with high-quality, print-ready files.
- Trying to say too much: A wall of text is overwhelming and impossible to read from a distance. Nail down one key message and use a few bullet points if you need to add more detail.
- Forgetting a call-to-action: Tell people what you want them to do next! A clear, simple instruction like "Visit Our Website" or "Scan to Win" is what turns a passerby into a potential customer.
- Bad colour contrast: A design that looks amazing on your bright computer screen might be a faded, unreadable mess in a poorly lit conference hall. Make sure your text pops against the background.
Keep these pointers in mind, and you'll be well on your way to creating a pull up banner that truly works for your business.
At SONI DESIGN, we specialise in bringing your brand’s story to life with high-quality pull up banners that make a lasting impression. Let's work together to create something extraordinary. Start your project with us today!
Leave a Comment
Stay home & get your daily
needs from our shop
Start You'r Daily Shopping with Nest Mart