
Your cart is currently empty.
A pull up banner is a portable, retractable display stand used for advertising and marketing. It has a printed graphic that cleverly rolls away into a metal base, making it incredibly easy to pack up, transport, and store. Their real strength lies in delivering a huge visual impact with a surprisingly simple and fast setup, which is why you see them everywhere—from trade shows and events to retail promotions.
What Is a Pull Up Banner and Why Use One?
Think of a pull up banner as your brand's most reliable portable ambassador. It’s a completely self-contained marketing tool that goes wherever you go, always ready to make a polished, professional first impression in just a few seconds.
The magic is in the mechanism, which is simple but brilliant. A high-quality printed graphic is spring-loaded into a sturdy base, operating much like a window blind. This clever design is what really separates it from other types of signage. Forget about static posters that need careful mounting or complex displays that require a whole team to assemble; a single person can have a pull up banner ready to go in under a minute. This convenience alone makes it an essential tool for any business on the move.
The Ultimate Marketing Multi-Tool
Imagine having a "business handshake in a box." That's what a pull up banner gives you. When you arrive at a bustling trade show in Auckland or a community event in Christchurch, you can instantly establish a professional presence. The smooth, seamless graphic provides the perfect canvas to showcase your brand with real clarity and punch.
This immediate setup saves you time and stress, freeing you up to focus on what actually matters: connecting with potential customers. Its tall, vertical format naturally draws the eye, ensuring your message gets seen even across a crowded room.
The real value of a pull up banner lies in its combination of high visibility and effortless portability. It’s one of the few marketing tools that offers a significant physical presence without the logistical headache.
Key Advantages for Your Business
The benefits of adding a pull up banner to your promotional toolkit are pretty compelling. They offer a fantastic return on investment because they're durable and can be used over and over for different campaigns and events.
For many Kiwi entrepreneurs, these displays are a core part of their small business marketing strategy. Here’s a quick rundown of the main advantages:
- Exceptional Portability: The whole system packs neatly into a compact carry bag. You can easily pop it in the car or even check it in as luggage.
- Instant Professionalism: A well-designed banner immediately makes your space look more established and trustworthy. It just looks the part.
- Cost-Effectiveness: When you weigh it against other forms of event marketing, a pull up banner is a one-time purchase that pays for itself again and again.
- Versatility: Don't just think of it for events. A pull up banner is just as effective in a corporate lobby, at a retail entrance, during a presentation, or even at a local market stall.
At the end of the day, a pull up banner is more than just a sign; it's a smart investment in your brand's visibility, working hard to get your message seen, understood, and remembered.
Choosing the Right Materials and Mechanics
The durability and visual punch of your pull up banner really come down to its core components. To make a smart investment, you need to look past the printed design and get to know what’s going on with both the banner graphic and the mechanical stand that holds it all together. Think of it like buying a car; the paint colour is what you notice first, but the engine and chassis are what determine how well it drives and how long it’ll last.
At its heart, a pull up banner is a team of two critical parts. First, you have the graphic panel itself—this is where your message lives. Then there's the base mechanism, which is the retractable housing that stores, protects, and supports the graphic. The quality of each part directly impacts how long your banner lasts, how good it looks, and how easy it is to use.
Selecting the Right Banner Graphic Material
The material your design is printed on is a big deal. It dictates the banner’s overall look, feel, and ability to stand up to wear and tear. Going for a cheap option to save a few dollars upfront often leads to headaches later, like curling edges or distracting glare that can make your brand look second-rate.
When you're looking at pull up banners, you'll generally find two main contenders for the graphic material:
- Anti-Curl Vinyl (PVC): This is the workhorse of the industry, and for good reason. It’s a tough, cost-effective material specifically engineered to stop the edges from curling, a common problem with standard vinyl. It provides great print quality and is durable enough for regular use, making it a fantastic all-rounder.
- Polyester Fabric: If you're after a more premium feel, polyester fabric is the way to go. It offers a sophisticated, matte finish that kills any glare from bright event lighting. You'll often find the colours look richer and more vibrant, and the material itself is naturally scratch-resistant and less likely to crease.
For most businesses, a high-quality anti-curl vinyl strikes the perfect balance between cost and performance. But if your brand needs to project a high-end image or you know you’ll be exhibiting under harsh spotlights, the extra investment in polyester fabric is definitely worth it.
The right finish can make all the difference. A matte finish is almost always the better choice as it prevents reflections from overhead lights, ensuring your message is crystal clear from any angle.
Understanding the Base Mechanism
The base is the unsung hero of your pull up banner. A good one gives you stability and a smooth, frustration-free setup. A poor-quality one, on the other hand, can be wobbly, a pain to use, and more likely to break when you can least afford it.
These retractable systems are hugely popular across New Zealand because they’re so portable and easy to use. A typical stand weighs around 3.2 kg, with a sturdy aluminium base holding a durable vinyl graphic that can last for two years or more if you look after it. This mix of a solid base and a quality graphic is perfect for the busy conference and exhibition scene. You can dive deeper into their construction in comprehensive guides on retractable displays.
When you’re comparing banner stands, the real differences come down to these key factors:
Standard vs. Premium Bases
| Feature | Standard Base | Premium Base |
|---|---|---|
| Stability | Lighter with smaller feet; fine for low-traffic spots. | Heavier with a wider footprint for superior stability. |
| Appearance | A more basic, functional look, often with visible feet. | A sleek, modern design, sometimes with chrome details. |
| Durability | The internal spring is built for occasional use. | The retractable spring is engineered for frequent, long-term use. |
| Graphics | The graphic is usually fixed and can’t be replaced. | Often designed to let you easily swap out the graphic. |
Your choice here should come down to how you plan to use the banner. If you just need something for a one-off event or to sit in the corner of your office, a standard base will do the job perfectly. But if you're a travelling salesperson or a regular at trade shows, investing in a premium base with a tough mechanism and the ability to change graphics is a much smarter move for the long haul.
Selecting the Best Pull Up Banner Size
Choosing the right size for your pull up banner isn't just about picking dimensions off a list. It's about strategy. Get it right, and your brand commands attention. Get it wrong, and you risk getting lost in the noise or, just as bad, overpowering a small space. The goal is to perfectly match the banner’s footprint to its purpose and location.
Think of it like choosing a camera lens. You have your versatile, all-purpose lens for everyday shots, a wide-angle for sweeping landscapes, and a compact one for tight, detailed work. Each is the right tool for a specific job. Your pull up banner is no different—you need to pick the right size for the visual task ahead.
The Go-To Standard Size
For most situations, the industry-standard pull up banner is your trusty, all-purpose lens. There's a reason it's the most popular choice: it strikes a fantastic balance between making a statement and being easy to lug around. Its height gets your message up above the crowds and furniture, while its width is just right for making an impact without taking over your entire stand.
Here in New Zealand, a standard pull up banner usually has a visible graphic area of 850mm x 2010mm. This size is a proven workhorse for high-impact advertising in busy places like events, shop entrances, and conference halls. It guarantees your brand gets noticed with excellent readability. To see how these dimensions translate into artwork, you can learn more about standard NZ banner design sizes. It's big enough to be seen but compact enough to fit almost anywhere.
Exploring Alternative Sizes
While the standard size is a reliable all-rounder, sometimes you need a different approach to really nail your objective. This is where alternative sizes come in, each offering a unique advantage for specific scenarios.
Here are a few options you might consider:
- Wide-Format Banners: Think of these as the panoramic lens. Often measuring 1200mm or wider, they create an impressive backdrop for trade show stands or stage presentations. They can almost act as a portable media wall, giving you a huge canvas for bold, ambitious graphics.
- Slim Banners: At around 600mm wide, these are your solution for tight spots. They’re perfect as extra, supporting signage—tucked into a corner or placed by a doorway to guide people without getting in the way.
- Tabletop Banners: These are your most compact option, usually in A3 or A4 size. They’re designed for point-of-sale displays and are brilliant on registration desks, checkout counters, or product tables to deliver key info right where your customers are looking.
This image shows the most common battlegrounds for pull up banners.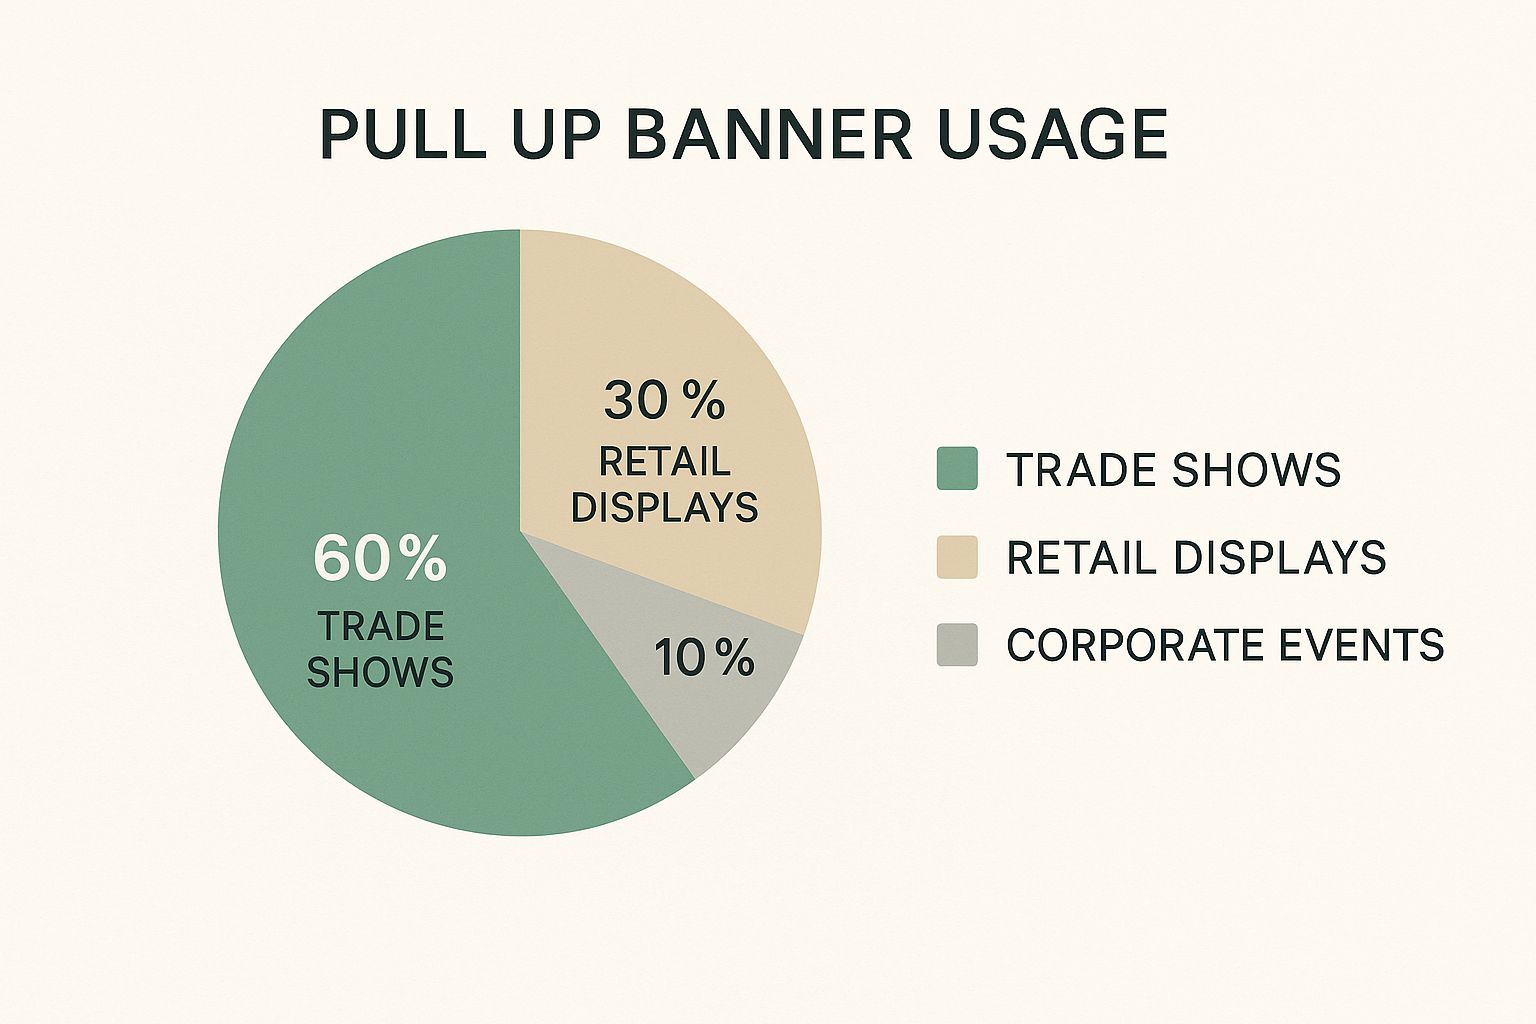
As the data shows, trade shows are by far the most popular venue. This really drives home the need for sizes that pack a punch in crowded exhibition halls.
A banner’s physical size is directly tied to its communication power. The right dimensions ensure your message isn't just seen—it's persuasive and impossible to ignore.
Matching Banner Size to Your Venue
Now, let's put it all together. The final step is choosing the perfect size for your specific venue. A massive exhibition hall has very different needs than a cosy café or a corporate boardroom. By thinking ahead about where your banner will live, you can make a choice that sets you up for success.
This table is a quick guide to help you match common banner sizes with their ideal homes.
Pull Up Banner Size Guide for Different Venues
| Banner Size (W x H in mm) | Common Name | Best Use Case | Key Advantage |
|---|---|---|---|
| 850 x 2010 | Standard Banner | Trade shows, retail entrances, conference halls | The perfect balance of visibility and portability. |
| 1200 x 2010 | Wide Banner | Media backdrops, stage presentations, large stands | Creates a significant visual wall for brand impact. |
| 600 x 1700 | Slim Banner | Tight corners, directional signage, product highlights | Fits into small spaces without disrupting flow. |
| 297 x 420 (A3) | Tabletop Banner | Reception desks, checkout counters, info points | Delivers targeted information at eye level on a table. |
Ultimately, choosing the best pull up banner size comes down to smart, strategic thinking. By considering your goals, venue, and message, you can pick the dimensions that will help your brand stand tall and capture the attention it deserves.
How to Design a Banner That Captures Attention
A truly great pull up banner does more than just show off your logo; it genuinely stops people in their tracks and gets a conversation started. The secret isn't cramming every last detail onto the vinyl. Instead, it's about strategic clarity—guiding a viewer’s eye exactly where you want it to go.
Think of your banner as your 3-second elevator pitch. That's all the time you have to grab someone's attention as they walk past. A cluttered, confusing banner is the visual equivalent of a rambling, unfocused pitch—it’s easily ignored. A clean, powerful design, on the other hand, lands its message with confidence and impact.
Master the Visual Hierarchy
If you learn one design principle, make it visual hierarchy. This is simply the art of arranging everything on your banner to signal its importance. A well-structured design naturally guides the eye from the most critical information down to the less essential details.
The easiest way to approach this is to think of your banner in three zones. The top third is your prime real estate, seen first from across the room. The middle holds your main message, and the bottom is for the "what's next" details.
Here’s a simple structure that I've seen work time and time again:
- Top Zone (Logo & Headline): Your company logo should always sit at the top. It's the first thing people notice, building instant brand recognition. Right below it, place your main headline—a short, punchy statement that grabs attention.
- Middle Zone (Core Message & Imagery): This space is for the heart of your message or a single, compelling image. Use high-resolution photos or bold graphics that reinforce your headline. Keep text here minimal and powerful.
- Bottom Zone (Contact Info & Call to Action): This is where you put your website, social media handles, or a QR code. It’s the last thing someone will read, so it should give interested people a clear next step to take.
By organising your pull up banner this way, you create an effortless flow of information that anyone can absorb in a single glance.
Use High-Resolution Images and Bold Colours
Nothing screams 'unprofessional' faster than a pixelated, blurry image. People will be viewing your banner up close, so every single detail matters. You absolutely must use high-resolution imagery—that means at least 300 DPI (dots per inch) at the final print size—to guarantee your graphics are sharp and crisp.
Colour is your other secret weapon for grabbing attention. Your brand colours should be front and centre, creating an immediate visual link to your business. Research has shown that colour can boost brand recognition by up to 80%, so it's a tool you want to use wisely. Contrasting colours help key information pop, but avoid a chaotic rainbow of clashing shades. A limited, well-chosen colour palette looks far more professional and is much easier on the eye.
A great design uses colour and imagery not just for decoration, but to communicate a feeling and guide the viewer's focus. It's about making a deliberate choice with every element on the banner.
Keep It Simple and Readable
The golden rule of banner design has always been "less is more." A crowded banner is an unreadable banner. Your real goal here is to communicate one clear message, fast. You need to be ruthless and edit your text down to the absolute essentials.
Your font choice is also critical for readability from a distance. Here are a few practical guidelines:
- Font Style: Stick to clean, simple sans-serif fonts like Helvetica, Arial, or Futura for both headlines and body text. They are far easier to read from a few metres away than fancy script or traditional serif fonts.
- Font Size: Headlines need to be big. As a rule of thumb, use at least a 72-point font for your main headline so it's legible from across the room.
- Font Limit: Never use more than two or three different fonts on a single banner. Any more than that creates visual noise and looks amateurish.
Prepare Your File for Flawless Printing
Finally, getting the technical details right is what separates a good design from a great printed banner. Two things are absolutely non-negotiable for getting a professional result.
The first is bleed. This is an extra margin of your design (usually 5mm to 10mm) that extends past the final trim edge of the banner. It’s a safety net that ensures when the banner is cut to size, you don’t end up with an ugly white border if the cut is off by even a millimetre.
The second is the colour mode. Your computer screen uses an RGB (Red, Green, Blue) colour model to display images, but professional printers use CMYK (Cyan, Magenta, Yellow, Black). You must convert your design file to CMYK mode before you send it to your printer. This simple step prevents nasty surprises with colour shifts and ensures your brand colours look exactly as you intended.
Looking After Your Pull Up Banner: Setup, Takedown, and Care
While your pull up banner is built to last, its actual lifespan really comes down to how you handle it. Getting the setup, takedown, and storage right is the key to keeping it looking sharp and professional for every event. Think of it like a good suit – you wouldn't just cram it in a drawer and expect it to look good next time.
A little bit of care goes a long way. It protects your investment and ensures your banner represents your brand in the best possible light, time and time again.
Your Step-by-Step Assembly Guide
Putting up your banner should be a completely straightforward job. Once you’ve done it once or twice, you’ll have it up in under a minute. Most damage happens when people rush or use the wrong technique, which can easily wreck the retractable spring inside the base.
Just follow these simple steps for a perfect setup every time:
- Get the Base Ready: Find a flat, even spot on the floor and place the aluminium base down. Swing out the two stabilizing feet so they sit at a right angle to the base, creating a sturdy footprint.
- Assemble the Pole: The support pole is made of three sections linked by an elastic cord. Simply slot them together to create one long, straight pole.
- Insert the Pole: Pop one end of the assembled pole into the hole in the centre of the base. It should fit snugly and stand upright on its own.
- Raise the Graphic: Now for the important bit. Stand on the stabilizing feet for extra balance, grab the top rail of the graphic with both hands, and pull it straight up. Keep the movement smooth and controlled. Whatever you do, don't let go! Letting it fly back into the base can destroy the internal spring.
- Hook It On: With the graphic fully extended, gently tilt it backwards and hook the top rail over the cap at the very top of the support pole. And that’s it – your banner is ready to go.
Takedown and Maintenance Tips
Packing your banner away properly is just as crucial as setting it up. A careful takedown prevents the graphic from getting creased or scratched and protects the mechanics for its next use.
It’s pretty much the setup process in reverse. Just unhook the graphic, keep a firm grip on the top rail, and guide it slowly and evenly back into the base. Then, take the pole apart, and put both the pole and the base back into the carry bag they came in. That bag is your banner’s best friend, protecting it from scuffs and knocks in transit.
The secret to a long-lasting banner is proper storage. Always keep it in its carry bag and find a cool, dry place away from direct sunlight. This stops the graphic from fading or warping over time.
To keep your banner looking brand new, here are a few simple tips:
- Cleaning the Graphic: For vinyl banners, a soft, damp microfibre cloth is all you need. Gently wipe away any dust or smudges. Steer clear of harsh chemicals or abrasive cleaners, as they can easily ruin the print.
- Safe Transport: Always use the padded carry bag. Try not to drop it or stack heavy items on top of it – this can dent the aluminium casing and damage the internal parts.
- Handle with Respect: Get into the habit of treating your banner like the important piece of marketing gear it is, not just another bit of freight. That little bit of extra care will make a huge difference to its appearance and longevity.
Where Can You Use a Pull Up Banner for Maximum Impact?
Thinking a pull up banner is just for trade shows is like owning a smartphone and only ever using it to make calls. You're missing out on so much potential! To get the best return on your investment, you need to see your banner for what it truly is: a flexible, portable marketing asset that can work for you in dozens of situations all across New Zealand.
When you start deploying it strategically, your banner transforms from a single-use item into a promotional powerhouse. It’s all about putting it in the right place, at the right time, to make the biggest impression on the people you want to reach.
Dominate the Trade Show Floor
This is the natural habitat for a pull up banner, and for very good reason. In the organised chaos of a conference or exhibition centre, your banner acts as your visual anchor. It stakes out your territory, broadcasts your key message over the heads of the crowd, and pulls attendees towards your stand.
If you're trying to make a statement in a smaller area, it pays to look into some creative small trade show booth ideas. A cleverly placed banner can define your space, making even a tiny booth feel professional and commanding.
Pro Tip: Try using two standard banners to frame the entrance of your booth. This creates an obvious, welcoming gateway that naturally encourages people to step into your space.
Boost Your In-Store Presence
In a retail shop, a pull up banner is a fantastically effective and affordable way to shout about special offers, new products, or your loyalty programme. Pop one near the entrance, and it’s the first thing shoppers see. Unlike permanent signage, you can easily shift it around the store to draw attention to different product displays or promotions as they change.
Its portability is its superpower here. You can set it up for a weekend sale and have it packed away by Monday morning, keeping your store looking fresh and dynamic. This agility is crucial for reacting to sales trends or jumping on seasonal opportunities.
Pro Tip: Place your banner right next to the specific product it's promoting. That direct visual link helps shoppers instantly connect the offer with the item, which can drive on-the-spot sales.
A pull up banner's real strength lies in its ability to deliver a professional, high-impact message in any location, instantly. It’s a marketing tool that adapts to your needs—not the other way around.
Enhance Your Corporate Environment
Your office or reception area is another prime spot. A slick, well-designed pull up banner can do wonders for creating a polished, welcoming atmosphere for visitors, clients, and even potential new hires. Use it to display your company’s mission and values, showcase recent awards, or simply reinforce your brand identity.
This adds a subtle layer of professionalism and helps tell your company's story before you even say a word. It’s a quiet but powerful way to build your brand culture and make a brilliant first impression on anyone walking through your doors.
Taking Your Brand on the Road
The true beauty of a pull up banner is its "go-anywhere" nature. Think beyond the obvious places and consider where else you could be capturing an audience.
- Farmers' Markets & Community Fetes: Stand out from the other stalls with a vibrant, professional banner that clearly shows what you sell.
- Recruitment Fairs: Attract the best talent by showcasing your company culture and the perks of working for you.
- Sponsorship Events: If you're sponsoring a local sports team or charity gala, a banner ensures your brand gets the visibility you've paid for.
- Seminars & Presentations: Use it as a professional backdrop while you're speaking, or place it outside the room to guide attendees in.
While digital advertising gets a lot of attention, physical displays are still incredibly important. Even as projections show digital banner ad spending in New Zealand is set to hit around US$357.9 million by 2025, the tangible, immediate impact of a pull up banner offers a vital, complementary role. For B2B and retail businesses where face-to-face interaction is key, this physical presence is indispensable—and it's all supported by dedicated NZ suppliers helping local businesses get their message out there.
Common Questions About Pull Up Banners
It's completely normal to have a few lingering questions before you commit to a new marketing tool, even with a great plan in place. We get asked a lot about the practical side of using pull up banners, so we’ve answered some of the most common queries to help you feel confident in your decision.
How Much Does a Pull Up Banner Cost in NZ?
In New Zealand, what you pay for a pull up banner really comes down to its quality and how you plan to use it. For a one-off event, a basic economy banner will likely set you back between $100 and $150. If you're planning on using it more regularly, a good quality standard banner with a sturdier base and tougher graphic is a smart investment, typically costing $200 to $350.
For those who need the best, premium models can run upwards of $400. These are the workhorses of the events world, boasting superior stability and the ability to swap out graphics. Ultimately, a higher price tag gets you better durability, which is essential if you're constantly packing it up and moving it around.
Can I Use My Pull Up Banner Outdoors?
Think of most pull up banners as indoor creatures. While you might get away with using one outside on a perfectly still, sunny day, wind is their biggest enemy. Even a slight breeze can send a standard banner flying, which is not only embarrassing but can damage the stand or even become a safety risk.
If you know you’ll be displaying outdoors, your best bet is to get a banner stand designed for it. These outdoor-specific models are built tough, with heavy bases you can often fill with water for extra stability. They also use weather-resistant materials, so your message stays sharp, rain or shine.
Can I Replace the Graphic on My Banner Stand?
This really depends on the model you buy. Cheaper, entry-level stands are often a one-and-done deal, with the graphic permanently attached to the base. However, most mid-range and premium systems are designed with flexibility in mind, allowing for easy graphic replacement.
This is a fantastic feature, as it means you can update your marketing message for a new season or promotion without buying a whole new stand. Just be sure to check with your supplier if this is a feature you need before you buy. Swapping the graphic can be a bit fiddly, so we usually recommend having a professional handle it to avoid any mishaps with the spring mechanism inside.
The ability to change the graphic really comes down to the model. While standard pull up banners are mostly for indoor use, many mid-range and premium stands are built with replaceable graphics in mind. This feature lets you update your campaigns without replacing the entire system.
Ready to create a pull up banner that tells your unique story? At SONI DESIGN, we specialise in crafting high-quality, eye-catching displays that make your brand stand out. Let's bring your vision to life together. Explore our signage solutions at sonidesign.co.nz
Leave a Comment
Stay home & get your daily
needs from our shop
Start You'r Daily Shopping with Nest Mart