
Your cart is currently empty.

Printing a photo on canvas is more than just getting an image off your phone and onto the wall. It’s the process of taking a digital file, running it through a specialised inkjet printer, and transferring it directly onto a high-quality woven fabric. This canvas is then typically stretched around a sturdy wooden frame, ready to hang. It's a surprisingly straightforward way to turn your favourite moments into beautiful, textured art for your home.
Why Print Your Photos on Canvas?

There's something special about holding a physical piece of art that you just don't get from swiping through photos on a screen. Printing your images on canvas takes them out of the digital ether and into your everyday life, giving them a real presence and permanence. It’s a way to elevate a simple photograph, giving it the substance and feel of something you’d find in a gallery.
What really sets a canvas print apart is its texture. Unlike a glossy photo tucked behind glass, the woven fabric of the canvas adds a tangible depth and character to the image. This gives it an almost painterly quality, softening the hard digital edges and creating a warmer, more inviting piece. For many, this tactile feel is the biggest draw.
The Enduring Appeal of Canvas Art
Canvas is also incredibly durable, which is a huge plus. When a print is made with high-quality archival inks and sealed with a protective coating, it’s built to last for generations without fading. This makes it a perfect medium for preserving those truly important memories—wedding photos, family portraits, or that once-in-a-lifetime travel shot.
Canvas prints are also wonderfully versatile and can slide right into just about any decor style. They are often frameless, which creates a clean, modern look that keeps all the focus on the image itself. This minimalist approach means you don't have to worry about the glare and reflections that often come with traditionally framed prints.
Photographer Katrin Eismann once said, "The truth is revealed when the ink hits the paper." This really gets to the heart of why printing matters. When you see your work in its final physical form, you notice details and nuances that are easily lost on a backlit screen.
Material and Finish Choices
When you’re ready to print on canvas, you’ll need to make a few decisions that will directly impact the final look and feel of your piece. Knowing what to look for will help you get the exact result you’re imagining.
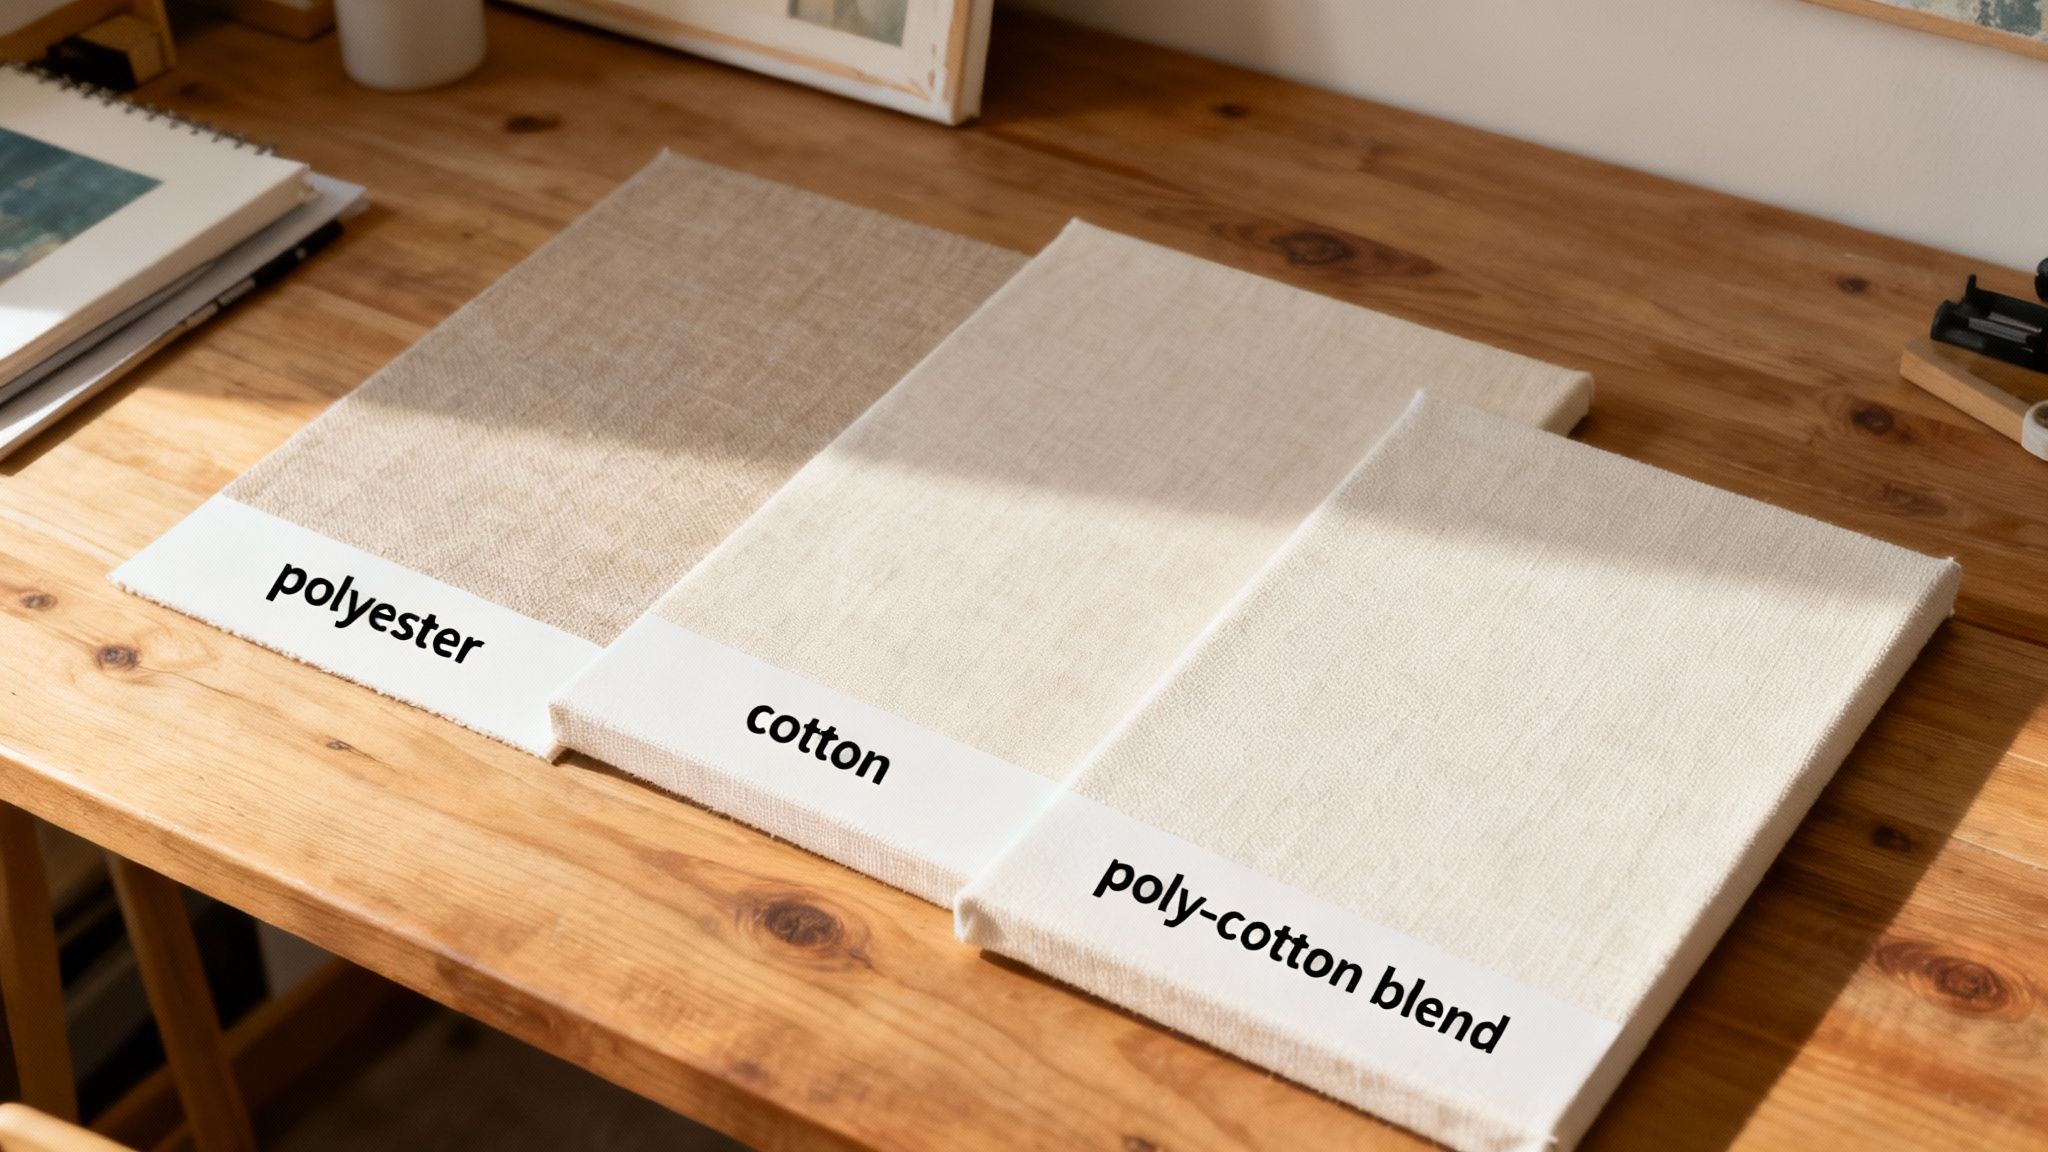
- Canvas Material: Most printers will offer a few options, usually polyester, cotton, or a poly-cotton blend. I find that poly-cotton blends often give the best results; you get the brilliant colour reproduction of polyester combined with the classic feel and strength of cotton.
- Ink Quality: This is a big one. You want to see that the printer uses archival pigment-based inks. These are specifically designed for longevity and can resist fading for over 100 years, keeping your art looking fresh and vibrant.
- Protective Finish: After printing, a clear coating is applied to protect the canvas from UV light, moisture, and scuffs. The most common choices are matte, semi-gloss, or glossy. Each one affects the sheen and colour depth differently. A matte finish is the go-to for a traditional, glare-free art look that feels timeless.
Choosing and Preparing Your Perfect Image
The journey to a beautiful canvas print really begins the moment you pick your photo. It's a common misconception that any image looking sharp on your phone or computer will automatically translate well to canvas. The reality is, moving from a backlit digital screen to a textured, physical medium takes a little know-how to get a result you'll be proud to hang on your wall.
A truly stunning canvas print comes down to three things working together: resolution, lighting, and composition. You might have a photo that’s full of meaning, but if it's technically weak, the final print can end up looking blurry, pixelated, or just plain flat.
Getting Your Head Around Image Resolution
This is, without a doubt, the most critical technical detail. Resolution, which we measure in DPI (dots per inch), is all about how much detail is packed into your digital file. A high-resolution photo has plenty of data, letting you blow it up for printing without losing those crisp, clean lines. On the other hand, a low-resolution image just doesn't have enough information to work with. If you try to stretch it to fit a large canvas, you’ll be left with a soft, blocky mess.
The gold standard for high-quality printing is 300 DPI. While you might get away with 150 DPI for a smaller print that’s viewed from a distance, aiming for 300 DPI is your best bet for a canvas that looks sharp and professional, even up close. The good news is that most modern smartphones and DSLR cameras capture images with more than enough resolution for common canvas sizes. Just make sure you're using the original, full-size file—not a compressed version you've downloaded from social media or saved from a messaging app.
I’ve seen it happen countless times: someone sends a photo saved from Facebook, which is often compressed to around 72 DPI to help it load quickly online. It looks fine on a screen, but when enlarged for a canvas print, the result is always disappointing.
What Really Makes a Photo "Canvas-Worthy"?
Beyond the technical side of things, some photos just seem made for canvas. The unique, woven texture of the material can bring an image to life, but it can also detract from it if the photo isn't a good fit.
Here’s what I’ve learned to look for over the years:
- Good Lighting: Photos with balanced light and a nice bit of contrast always translate beautifully. The canvas texture can sometimes swallow up detail in very dark or shadowy spots, so starting with a well-lit image ensures it retains its depth.
- Strong Composition: Simplicity is often key. Bold, striking subjects tend to have the biggest impact when printed on canvas. Think of a dramatic landscape, a captivating portrait, or even a minimalist abstract photo. Images that are too cluttered or busy can feel a bit lost on the textured surface.
- Vibrant but Natural Colour: Canvas does a brilliant job of showing off rich colours. Photos with a strong colour palette—like a fiery sunset or a field of spring flowers—look absolutely fantastic. Just keep in mind that the colours might appear a little softer on a matte canvas compared to what you see on a glossy screen.
This infographic gives a great visual breakdown of how DPI and pixel dimensions relate, using a 12x8 inch canvas as an example.
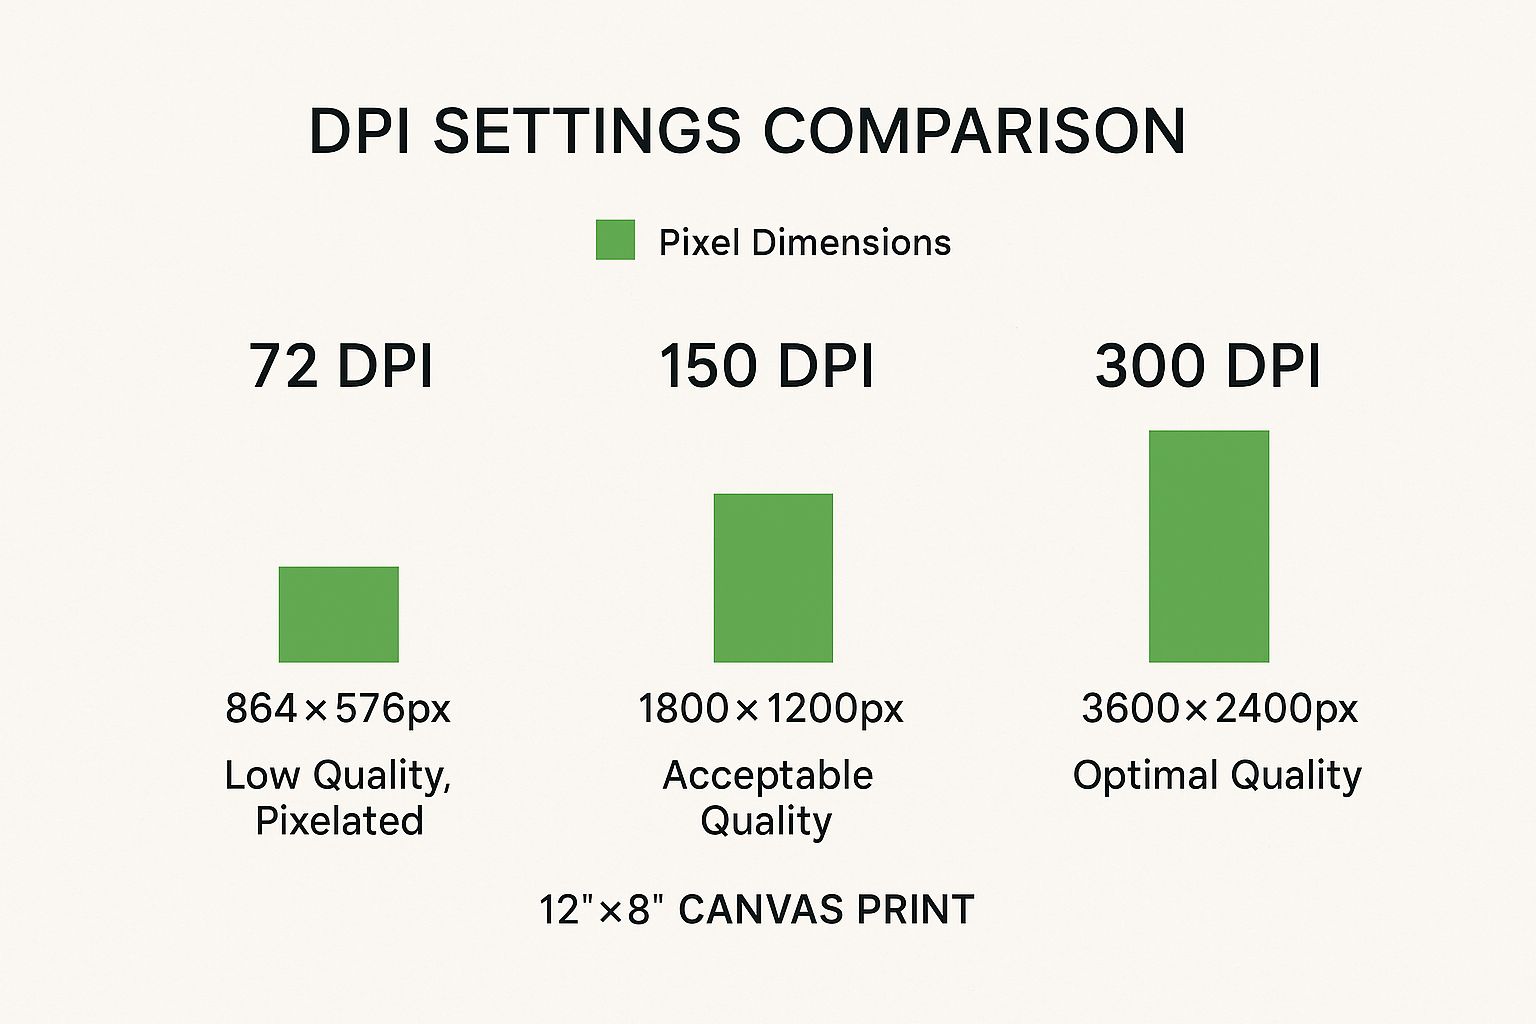
As you can see, hitting that optimal 300 DPI quality requires a much larger digital file than what’s needed for lower, more pixelated resolutions.
Simple Edits for a Professional-Looking Finish
You don't need to be a Photoshop whiz to get your image print-ready. A few quick tweaks using basic software (like your phone's built-in editor or a free programme like GIMP) can make all the difference.
- Crop and Resize: First, crop your photo to match the aspect ratio of the canvas you’ve chosen (for example, a 3:2 ratio for an 18x12 inch canvas). This simple step prevents any important details from getting chopped off during the printing and stretching process.
- Tweak Brightness and Contrast: Because ink on canvas isn't lit from behind like a screen, prints can sometimes come out looking a touch darker. A small bump in brightness and contrast will compensate for this and make your final print really pop.
- Enhance Colour Vibrancy: A subtle increase in saturation can help the colours appear rich and full on the canvas. The key here is "subtle"—it’s easy to go overboard and make the image look unnatural.
The demand for personalised decor like canvas prints is a huge global trend. The global photo printing market was valued at around USD 23 billion in 2023, which shows just how much people want to bring their digital memories into their homes. While we don't have hard numbers for New Zealand, local print businesses are definitely part of this worldwide shift towards tangible photo products. You can read more about the scale of the printing industry and its economic impact to get a bigger picture.
Finding the Right Canvas Printing Service
Once your image file is prepped and ready to go, the next big step is finding a printing partner who can truly bring your vision to life. This is a crucial choice. You’ll find everything from your local neighbourhood print shop to massive online-only operations, and figuring out who to trust with your photo is key to getting a result you'll love.
So, do you go local or online? It really comes down to what you value most. A local shop gives you that hands-on experience—you can often see and feel the different canvas materials and chat directly with the people who will be handling your print. There's a lot of peace of mind in that, especially for a really special project.
Online services, on the other hand, usually win on convenience and price. They often have a massive range of sizes and options you can order right from your sofa. The catch? You're relying on their website and customer reviews to judge the quality, which can sometimes feel like a bit of a gamble.
Let’s Talk Canvas Materials
Not all canvas is created equal. The material your photo is printed on makes a huge difference to how it looks and how long it lasts. This isn't just a technical detail; it's what gives your final piece its character.
- 100% Cotton Canvas: This is the classic, traditional choice for fine art. Cotton has a beautiful, slightly textured weave that gives prints that authentic, painterly feel. It’s fantastic at soaking up ink for rich, deep colours, but it does need a good protective coating to guard against moisture.
- 100% Polyester Canvas: As a synthetic option, polyester offers a very smooth surface, which makes colours pop with incredible vibrancy. It's also more resistant to moisture and less likely to stretch over time, making it a super durable choice. Some purists, however, feel it lacks the organic texture of real cotton.
- Poly-Cotton Blend: This is often the sweet spot. A poly-cotton blend gives you the lovely texture of cotton combined with the durability and colour stability of polyester. It’s a fantastic balance of quality and resilience, which is why it’s the go-to for most high-quality photo prints today.
If you ask me, a premium poly-cotton blend is the best bet for most projects. It consistently delivers that professional look while also having the structural integrity to last for years.
Decoding the Canvas Wrap Style
The "wrap" is all about how the edges of the canvas are finished as it’s stretched around the wooden frame. It might seem like a minor detail, but it has a massive impact on how the final piece looks hanging on your wall.
Choosing the right wrap is a game-changer for your artwork's final presentation. To make it easier, I've broken down the three main styles you'll encounter. Each one suits a different type of image and aesthetic.
Comparing Canvas Wrap Styles
| Wrap Style | Description | Best For | Considerations |
|---|---|---|---|
| Gallery Wrap | The image continues and wraps around the sides of the frame. | Landscapes, abstracts, and any photo where losing a small portion of the outer edge isn't critical. Creates a modern, borderless look. | You will lose about 5cm of your image from the top, bottom, and sides, so ensure no important details are near the edge. |
| Museum Wrap | The full image stays on the front surface. The sides are printed with a solid colour (usually white, black, or a complementary tone). | Portraits and compositions where every pixel of the original image needs to be visible on the front. | The solid-colour edges are visible from the side, which creates a more defined, framed feel even without an actual frame. |
| Coloured Border Wrap | Similar to a museum wrap, but the sides are a specific, chosen colour. | Tying the print into your room's decor or creating a 'faux frame' effect that adds a pop of colour. | The colour choice is key. A clashing or distracting colour can detract from the photo itself. |
Ultimately, the wrap style you select should complement your photograph, not compete with it. A gallery wrap offers a seamless, contemporary feel, while a museum wrap is perfect for preserving every detail of your shot.
Here in New Zealand, the demand for canvas prints is definitely growing, influenced by what's happening globally. People want more customisation, they're looking for eco-friendly printing options, and they love the ease of ordering online. Kiwi businesses are really stepping up, offering specialised services to meet this desire for personalised art that feels unique. You can learn more about these global photo printing trends on theinsightpartners.com to see where things are headed.
Your Checklist for a Quality Printing Service
To avoid common pitfalls like faded colours or a saggy canvas down the line, you need to do a little homework on your printer. A reputable service will be upfront about their materials and process.
Here’s a quick checklist to help you choose a winner:
- Printing Technology: Look for a service that uses Giclée printing. This isn't just a fancy marketing term; it’s a high-end inkjet process using a wide range of colours for incredible accuracy and detail.
- Ink Quality: Ask if they use archival pigment-based inks. Unlike cheaper dye-based inks that fade quickly, these are engineered to resist fading and can last for over 100 years in the right conditions.
- Real Customer Reviews: Don't just read the glowing testimonials on their homepage. Search for reviews on independent sites where customers post photos of what they actually received. It's the best way to get an unfiltered look at their work.
- Protective Coating: A professional canvas print should always be finished with a UV-protective and moisture-resistant coating. This clear sealant is vital for protecting the print from sun damage and allows you to gently dust it without worry.
- Frame Construction: The wooden stretcher bars that form the frame need to be solid and well-made to stop them from warping. Kiln-dried pine is a good, reliable standard to look for.
Putting in a little time to check these details upfront will pay off tenfold, ensuring your money is well spent on a beautiful piece of art you'll be proud to have on your wall for decades.
Turning Your Print into a Masterpiece: Stretching and Framing
Your print has finally landed, rolled safely in a tube, and the colours are even more vibrant than they looked on screen. But the job isn't quite done. That beautiful roll of canvas is just the beginning—the final steps of stretching and framing are what truly transform it into a piece of gallery-worthy art, ready to hang.
This is the stage where your photo really comes to life. Whether you're a hands-on DIY type or you’d rather trust a professional, knowing what’s involved is crucial for getting that flawless finish. Let's walk through both options.
The Hands-On Approach: Stretching It Yourself
If you're up for a satisfying weekend project, stretching a canvas yourself is absolutely achievable. It's a skill that gives you total control over the tension and finish, a craft that artists have been honing for centuries.
Before you dive in, you'll need to gather the right gear. Having everything on hand makes the whole process smoother and helps you sidestep common frustrations.
- Stretcher Bars: These wooden pieces form the hidden frame. You'll need four bars that match the dimensions you want for the finished piece. My advice? Don't skimp here—look for quality, kiln-dried pine to stop it from warping down the track.
- Canvas Pliers: This specialised tool is a genuine game-changer. It has a wide, padded jaw that grips the canvas securely without marking the fabric, letting you pull it properly taut with even pressure.
- A Heavy-Duty Staple Gun: Your standard office stapler won't even make a dent. You need a powerful staple gun and a good supply of staples (around 10mm is a great size) to securely fix the canvas to the back of the frame.
The end goal is to get a surface that’s as tight as a drum, with absolutely no sagging or wrinkles. You start by stapling the canvas to the middle of one stretcher bar. Then, using your canvas pliers, pull the canvas directly across to the opposite bar and pop a staple in the centre there. Repeat this for the other two sides, so your first four staples form a plus sign.
From that central point, you slowly work your way out towards the corners, always alternating sides to keep the tension even. The corners are definitely the trickiest part. They require a neat, folded tuck—much like wrapping a present—to create that clean, professional look from the side.
Finding the Perfect Frame
While a gallery-wrapped canvas looks stunning on its own, adding a frame can be the final polishing touch that ties the artwork into your room's decor. Framing a canvas isn't like framing a paper print behind glass; the options are specifically designed to complement the canvas's three-dimensional presence.
A hugely popular choice is the float frame. This style creates a really sophisticated visual effect.
A float frame leaves a small, deliberate gap—usually about 5-10mm—between the canvas edge and the inside of the frame. This makes it look as though your artwork is "floating" inside, adding a beautiful sense of depth.
Float frames have a minimalist, modern feel that draws the viewer's eye straight to the image. They work especially well for gallery-wrapped prints because they don't cover up the wrap-around edges of your photo.
Of course, more traditional frames can also look fantastic. If you go for a classic style, just check that it has enough depth (this is called the 'rebate') to fit the thickness of your stretched canvas. You'll typically secure the canvas into the frame from behind using offset clips.
Whether you decide to stretch it yourself or hand it over to a professional framer, these finishing touches are what elevate your print from a simple photo into a cherished piece of art. Taking the time to get this last step right ensures your memory will look its best for years to come.
Displaying and Caring for Your Artwork

You’ve done all the hard work, and now the best part is here: bringing your art home. After all the careful preparation, your beautiful canvas print is ready to take its place on your wall. This is the moment a digital file transforms into a true part of your living space.
Positioning is everything. One of the most common mistakes I see is artwork hung far too high. A good rule of thumb is to hang a piece so its centre sits at eye level, which is roughly 145-155 cm from the floor. This simple trick connects the art to the room and the people in it, making it feel perfectly placed.
Of course, for larger or heavier pieces, you need to think about more than just height. The right hardware is crucial. A single picture hook might be fine for a small, lightweight canvas, but it’s just not up to the task for anything with real heft. For those oversized prints, look at using a French cleat system or a pair of heavy-duty D-rings with picture wire to keep things secure and perfectly level.
Finding the Perfect Spot
Once your print is ready to go, displaying it perfectly is the final touch. The right hanging technique can elevate the entire room. For an in-depth look at getting it just right, check out a step-by-step guide to hanging your picture with precision—it’s packed with practical tips for any scenario.
Think about the room's context. Do you want a single, dramatic statement piece over the sofa? Or are you dreaming up a dynamic gallery wall? A gallery wall is a fantastic way to display a collection of photos, mixing different sizes and orientations to tell a bigger story. A pro tip: lay everything out on the floor first. This lets you play with the arrangement and find a balance you love before you even think about picking up a hammer.
Long-Term Canvas Care
A high-quality canvas print should last for generations, but its longevity really comes down to a bit of care and smart placement. The two biggest enemies of any print are direct sunlight and humidity. These are the culprits behind faded colours and a saggy canvas.
By far the most important part of preserving your print is its location. Simply keeping your canvas out of harsh, direct sunlight will do more to protect its vibrant colours than anything else. UV rays are relentless and will break down the ink pigments over time.
Think about the environment. Rooms like kitchens or bathrooms, with all their steam and moisture, aren't the best choice for canvas art. The constant humidity can cause the canvas to expand and contract, eventually losing its taught finish and even risking mould. A living room, bedroom, or hallway with a stable temperature is a much safer bet.
Simple Cleaning for a Lasting Print
Dust happens, but keeping your canvas clean is incredibly simple. There's just one golden rule: never use chemical cleaners or water. These can easily strip the protective varnish and cause irreversible damage to the inks.
For safe and effective cleaning, you only need a few simple tools:
- A soft, dry cloth: Gently wipe the surface to remove dust. A clean, lint-free microfibre cloth is perfect for this.
- A feather duster: For a quick, light touch-up, a feather duster is an excellent and very gentle option.
- A soft-bristled brush: A brand-new, soft makeup brush is great for delicately flicking dust from corners and textured areas without applying any pressure.
Treat your canvas like any other piece of fine art. A bit of gentle dusting is all it needs to look its best. By choosing the right spot and following these simple tips, the effort you put into printing your photos will result in a cherished piece of decor that looks just as stunning in twenty years as it does today.
Got Questions About Canvas Prints?
Even with the best plan, it's natural to have a few questions pop up when you're turning a favourite photo into a canvas print. Getting these details right is often what separates a good print from a truly stunning one.
Let's run through some of the most common queries I hear. Think of this as your quick-reference guide to getting the professional result you're after.
What's the Best Resolution for a Canvas Print?
For a sharp, professional-looking print, you really want an image file that's at least 150 DPI (dots per inch) at the final print size. But if you want the absolute best, the gold standard is 300 DPI. This higher resolution guarantees every tiny detail is captured with perfect clarity, which makes a huge difference, especially for larger canvases that people will see up close.
Before you upload anything, take a quick look at your photo's pixel dimensions. Most good online printing services will have a built-in quality checker that warns you if your image resolution is too low for the size you've chosen. As a rough guide, a photo from any modern smartphone or DSLR is usually fine for most standard canvas sizes. Just make sure you're using the original, full-quality file—never a downsized version you've pulled from social media.
A classic mistake I see all the time is people using a photo they've saved from Facebook or a messaging app. These services compress images down to about 72 DPI to save server space. It looks perfectly fine on your phone screen, but when you blow it up for a print, it becomes a blurry, pixelated mess.
Should I Go for a Matte or Glossy Finish?
This really boils down to two things: the vibe of your photograph and the lighting in the room where it will hang. Each finish plays with light and colour in a completely different way.
A matte finish is hands-down the most popular and classic choice, and for good reason. It has absolutely no glare, making it ideal for brightly lit rooms or any space with big windows. The non-reflective surface gives your print a softer, more painterly feel that looks incredible for portraits and fine art shots.
On the other hand, a glossy or semi-gloss finish makes colours look more saturated and adds a real punch of contrast. This can be brilliant for a dramatic landscape or an abstract piece where you want the colours to leap off the wall. The main thing to watch out for is reflection; under direct light, it can be quite distracting. If you're aiming for that timeless, gallery-quality look, matte is almost always your safest—and most elegant—bet.
How Do I Clean My Canvas Print Without Damaging It?
Keeping your canvas looking pristine is easy, as long as you're gentle. The most important rule is to never use water, cleaning chemicals, or anything abrasive. These will strip the ink right off, ruin the protective coating, and permanently damage your print.
For day-to-day care, a soft, dry, lint-free cloth or a feather duster is all you need to give it a light dusting.
- For regular upkeep: A gentle wipe-down about once a month is usually plenty.
- For a stubborn spot: If you notice a small mark, you can very lightly dampen a tiny corner of a microfibre cloth with plain water and gently blot the area. Always test this on a hidden corner or the side edge of the canvas first, just to be certain it doesn't lift any ink.
Honestly, the best long-term care strategy is prevention. Keep your artwork out of direct sunlight and away from high-humidity spots like bathrooms. This protects it from the two biggest culprits of damage: fading and moisture. Do that, and your print will remain a vibrant centrepiece in your home for years to come.
At SONI DESIGN, we pour our passion for design into every single project, helping you turn your cherished memories into stunning pieces of art. Our team is here to bring your vision to life with vibrant, high-quality canvas prints that tell your story.
Ready to create something beautiful? Explore our printing services and start your project today!
Leave a Comment
Stay home & get your daily
needs from our shop
Start You'r Daily Shopping with Nest Mart