
Your cart is currently empty.

Printing on canvas is a fantastic way to turn your digital photos into something tangible and textured. It gives your images a classic, artistic feel that a standard paper print just can't replicate. Think of it as elevating your most cherished memories—from candid family moments to breathtaking travel snaps—into genuine masterpieces ready to hang on your wall. The process adds a real sense of depth, giving your photos a gallery-worthy quality.
Bringing Your Digital Photos to Life
Welcome to the vibrant world of canvas printing, where your favourite digital images get a new lease on life as permanent fixtures in your home. Unlike a glossy photo behind glass, a canvas print has a unique, tactile surface that brings a real warmth and character to any space. It’s the perfect middle ground between a simple photograph and a piece of fine art.
Here in New Zealand, there's been a massive shift towards personalised home décor. Kiwis are increasingly looking for ways to make their living spaces truly reflect their personalities and tell their stories. Canvas prints are a perfect fit, letting you showcase your most meaningful moments in a beautiful, lasting way. They’re so much more than just decorations; they become conversation starters and daily reminders of the people and places you hold dear.
Think of this guide as your complete roadmap to the art of printing on canvas. We'll walk you through everything you need to know, covering all the essential bits and pieces:
- Material Selection: How to pick the right canvas and inks for a vibrant, long-lasting print.
- File Preparation: Getting your digital image ready to ensure a flawless result.
- Printing Technology: A look at the process that transfers your image onto the canvas.
- Finishing Touches: Choosing the perfect wrap and frame to complete your masterpiece.
The infographic below really paints a picture of the home décor scene in New Zealand, highlighting just how much we love personalised art like canvas prints.
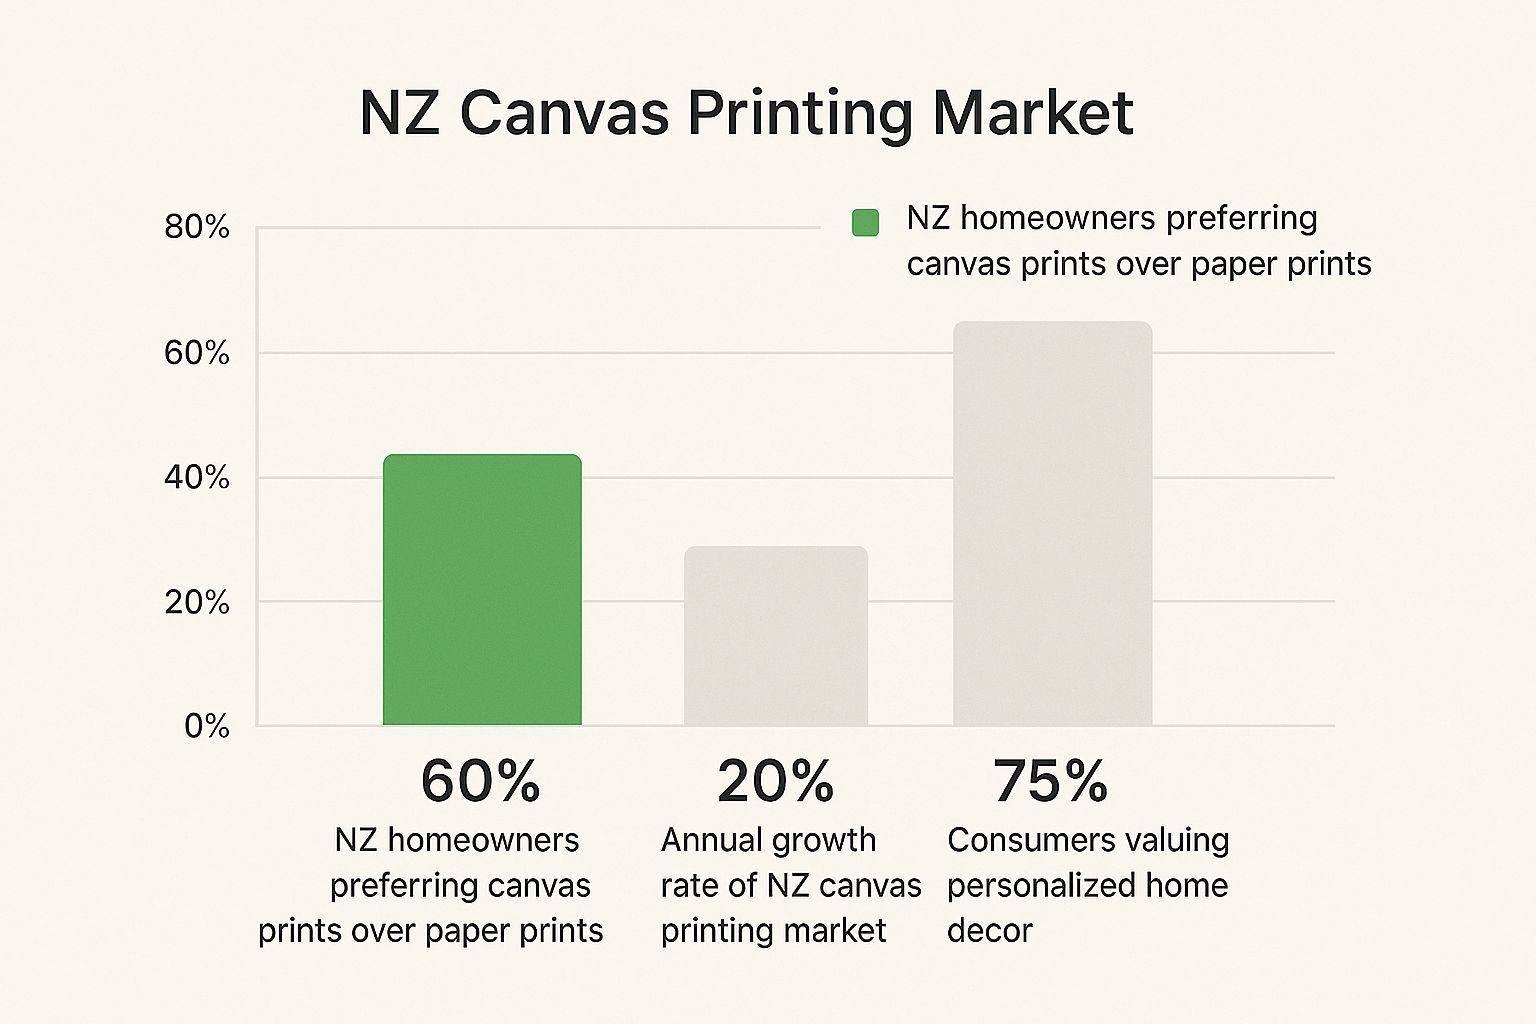
As you can see, this isn't just a fleeting trend. The desire for unique, meaningful art is driving some serious growth in the canvas printing industry.
What’s really interesting is how this part of the market is thriving. While the broader printing industry in New Zealand has seen a bit of a downturn, the demand for custom canvas art just keeps climbing. It shows how much value we place on having something truly special in our homes. You can dig deeper into NZ's printing industry trends on ibisworld.com.
Choosing Your Canvas and Inks
Every great canvas print starts with the right foundation. Think of it like a master painter selecting their canvas and pigments—the materials you choose are the very first step in creating a piece that will look stunning and stand the test of time. Your choice here will directly influence the print's texture, how vibrant the colours appear, and its overall durability.
Let's dive into the canvas itself. The material you pick sets the tone for the entire piece, affecting both how it looks and how it feels to the touch.
Understanding Canvas Materials
When you start looking into canvas, you'll find it generally falls into two camps: natural fibres and synthetic ones. Each has its own personality, making it a better fit for different projects and where you plan to hang the final piece.
-
Cotton Canvas: This is the classic, go-to choice for high-quality art prints. Its natural, slightly textured weave is brilliant at soaking up ink, which gives you those rich, deep colours and an authentic artistic finish. It’s perfect for portraits and fine art reproductions that will hang indoors.
-
Polyester Canvas: Being a synthetic option, polyester offers a much smoother, more uniform surface. This material is incredibly durable and holds up well against moisture, making it a solid pick for prints that might live in more challenging spots, like a covered patio or a busy café.
Another key detail is the canvas weight, measured in grams per square metre (GSM). It’s a lot like the thickness of paper—a higher GSM number (think 380-420 GSM) means you’re getting a heavier, more durable canvas that feels substantial. A lower GSM might be kinder on the wallet, but it can feel a bit flimsy and may be more likely to sag over time.
The Critical Role of Inks
Once you've settled on your canvas, the next big decision is the ink. The type of ink used is what breathes life into your image, dictating not just the colour accuracy but also how well the print will resist fading from sunlight and other environmental factors.
The secret to a long-lasting print is the marriage of archival-quality inks and a premium canvas. A professionally made piece can fight off fading for over 100 years, turning a beautiful image into a family heirloom.
Different printing methods use different inks, and each has its own strengths.
-
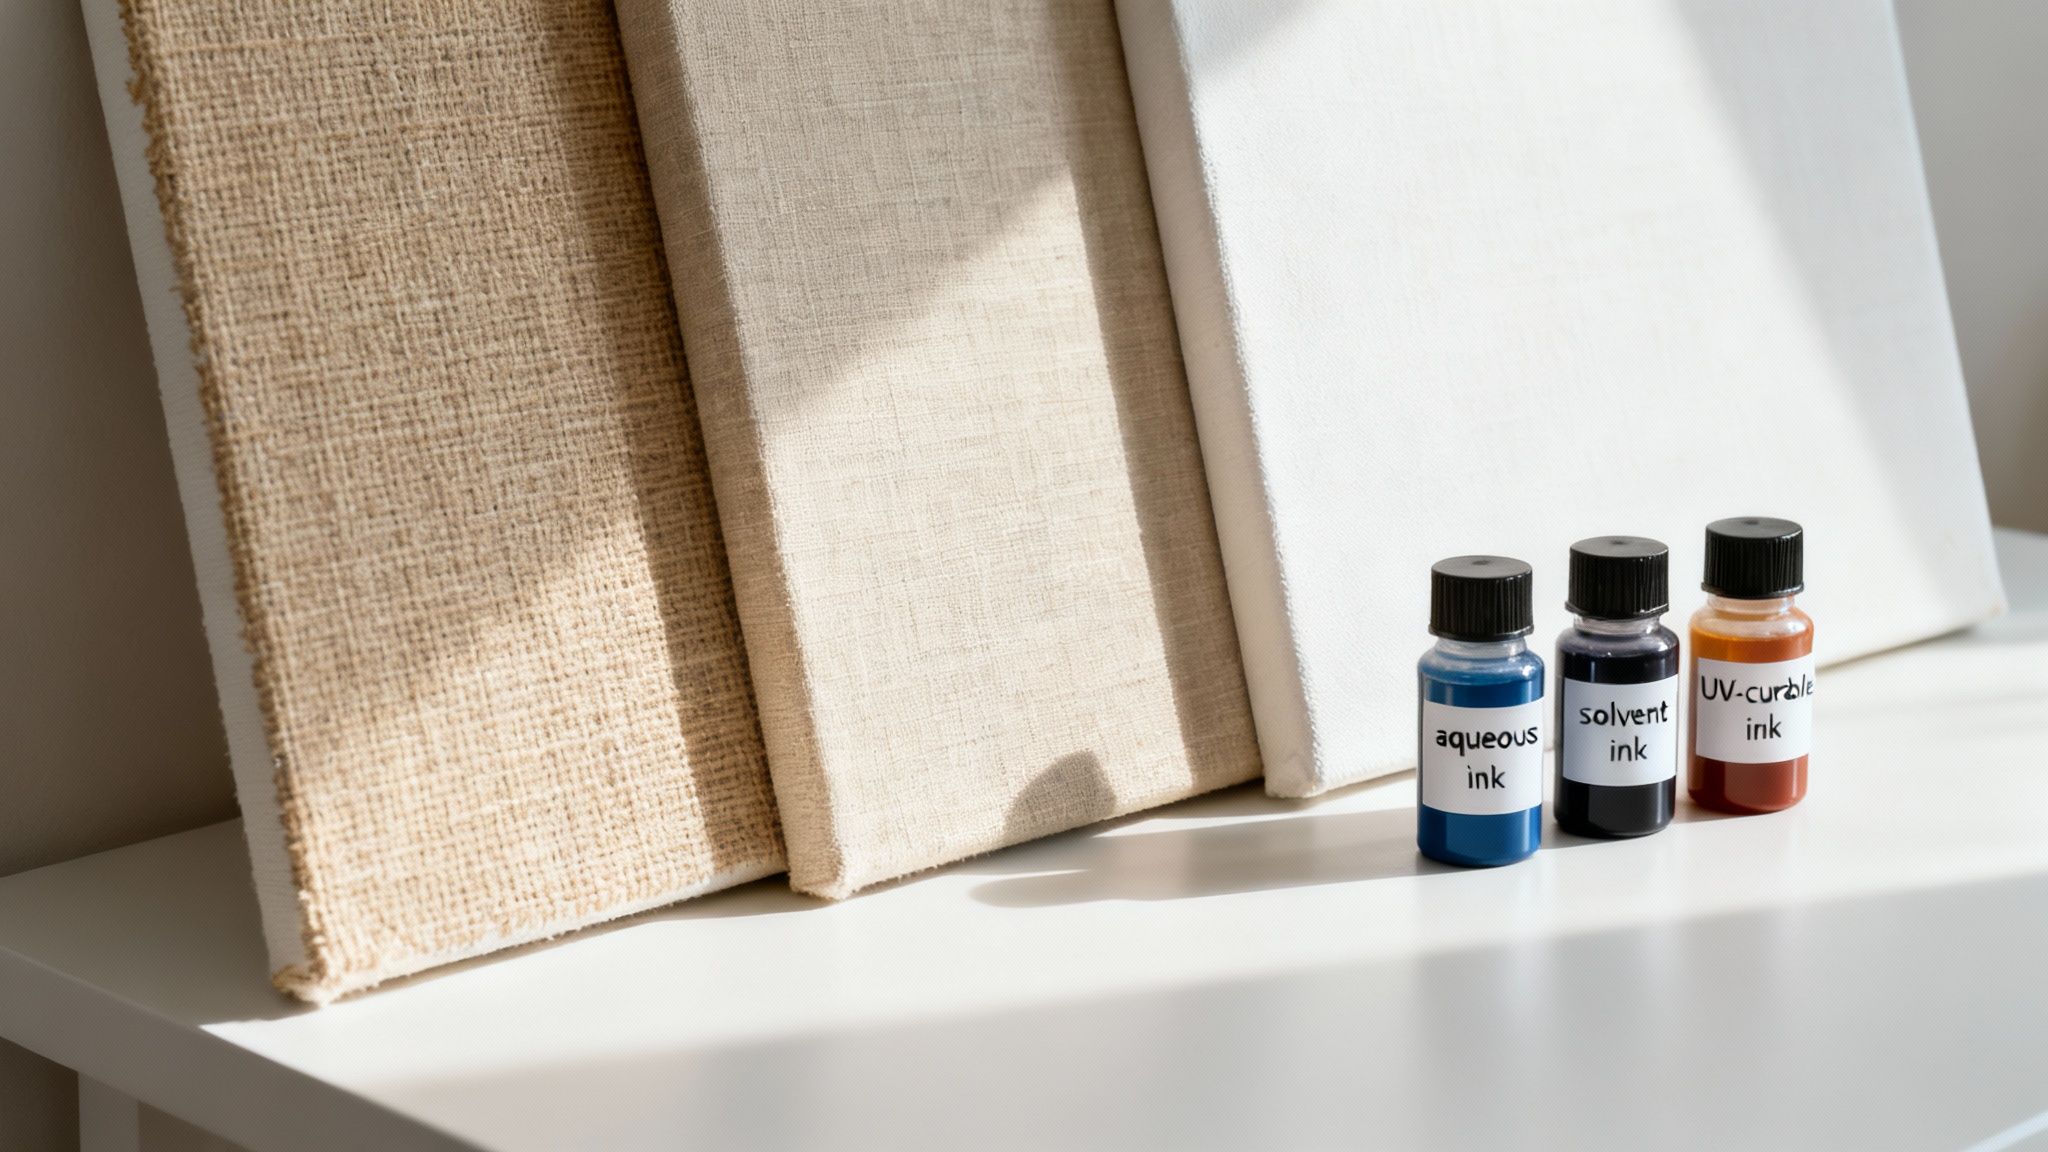
Aqueous Inks: These water-based inks are famous for their incredible colour range and ability to capture fine detail. They’re the top choice for high-resolution photos and fine art. The trade-off? They're not big fans of water or UV light, so they need a protective coating and a life indoors.
-
Solvent Inks: These are the tough guys. Solvent inks are incredibly resilient, offering great water and scratch resistance. They’re often used for outdoor signs because they can take a beating, but they sometimes struggle to produce the very subtle colour shifts you get with aqueous inks.
-
UV-Curable Inks: This is a fantastic modern option. The ink is laid onto the canvas and then instantly "cured" or dried with UV light. This creates an extremely durable finish that’s resistant to fading, scratching, and moisture, making it a versatile choice for both indoor and outdoor displays.
The following table breaks down how these materials and inks stack up, helping you decide on the perfect combination for your specific project's needs—whether it's for appearance, durability, or budget.
Canvas Material and Ink Comparison
| Feature | Cotton Canvas | Polyester Canvas | Aqueous Inks | UV-Curable Inks |
|---|---|---|---|---|
| Look & Feel | Traditional, textured, "art gallery" feel. | Smooth, consistent, modern finish. | Exceptional colour vibrancy and detail. | Excellent colour, slightly raised texture from cured ink. |
| Best For | Fine art, portraits, indoor displays. | Photos, commercial spaces, high-moisture areas. | High-resolution photography, fine art reproductions. | Indoor/outdoor displays, high-traffic areas, commercial graphics. |
| Durability | Good, but susceptible to moisture and sagging over time. | Excellent resistance to moisture, shrinking, and stretching. | Lower resistance to UV light and water; requires coating. | High resistance to fading, scratching, and moisture. |
| Ink Absorption | Absorbs ink deeply for rich, matte colours. | Ink sits on the surface, creating sharp, vibrant images. | Sinks into canvas fibres for a smooth, integrated finish. | Cures on the surface, creating a durable, protective layer. |
| Cost | Generally higher price point. | More budget-friendly. | Cost-effective for high-quality indoor prints. | Can be a higher initial cost, but offers long-term durability. |
Ultimately, choosing the right canvas and ink is all about balancing what you want with what you need. A high-GSM cotton canvas with aqueous inks would be a beautiful choice for a treasured family photo hanging in the living room. But for a bold, graphic piece in a bustling office, a durable polyester canvas printed with UV-curable inks is the more practical way to go.
Advances in print technology, like UV and large-format printing, have seriously upped the game for canvas printing quality in New Zealand and around the world. These innovations allow businesses to produce incredibly high-resolution prints with amazing colour, meeting the surging demand for personalised art and décor. If you're curious about market trends, you can learn more about the global canvas roll market on futuremarketinsights.com.
Preparing Your File for Flawless Printing
A breathtaking canvas print doesn’t just happen at the printer. It all starts with the digital file you send over. Getting this step right is the single most important thing you can do to make sure the final product looks as good on the wall as it does on your screen.
Think of it like this: your digital image is the recipe, and the printer is the chef. A blurry, low-quality recipe is going to result in a disappointing meal, no matter how skilled the chef is. Taking a few minutes to prep your file correctly is the secret ingredient to a print you'll be proud of.
Resolution: The Building Blocks of a Sharp Image
First up is resolution. This is all about the level of detail packed into your image, and it’s usually measured in Pixels Per Inch (PPI). Imagine your image is a detailed mosaic made from thousands of tiny coloured tiles (pixels). The more tiles you cram into every inch, the sharper and clearer the picture will be when it's printed.
For canvas, the gold standard is 300 PPI at the final print size. But here’s some good news: the natural texture of canvas is incredibly forgiving. This means you can often get fantastic results with a resolution as low as 150 PPI, which is a lifesaver if you're working with a slightly older photo.
Let’s put that into perspective with a real-world example:
- You want a 40cm x 60cm canvas.
- For the best possible quality (300 PPI): Your image file should be around 4724 x 7087 pixels.
- For a great-looking print (150 PPI): A file of 2362 x 3544 pixels will still look sharp and impressive.
A quick tip: Most modern smartphones and digital cameras already capture photos with more than enough pixels for large prints. The real trap is using compressed images you’ve downloaded from social media or received through a messaging app—these platforms shrink files to save space, which crushes the quality needed for a good print. Always use the original, full-size file!
Colour Space and File Formats
Next, let's talk about colour. Your screen and a printer "speak" different colour languages. The way your image stores this information is called a colour space, and the two you’ll run into most often are sRGB and Adobe RGB.
- sRGB: This is the universal standard for the web and just about every screen you look at. It's the safest bet for ensuring the colours you see on your monitor are what you get on the canvas.
- Adobe RGB: This is a more specialised space with a wider range of colours, especially in the green and cyan tones. It can produce some stunningly vibrant results, but only if your entire workflow—from your monitor to the printer's equipment—is professionally calibrated for it.
For most people, saving your file in sRGB is the best way to avoid any nasty surprises with colour shifts.
When it comes to the file type, you're usually choosing between a JPEG and a TIFF.
| File Format | Best For | Key Characteristic |
|---|---|---|
| JPEG/JPG | Nearly all photos and general use. | It cleverly compresses the file to make it smaller and easier to upload without a huge drop in quality. |
| TIFF | Professional photographers seeking absolute perfection. | A "lossless" format that keeps every single pixel of image data. The files are massive but offer the ultimate quality. |
The Final Checklist Before You Print
Before you hit that 'upload' button, run through this quick checklist. No matter what you're printing on, preparing your artwork and comparing various printing methods is a crucial step for turning a digital idea into a physical product.
- Check Your Resolution: Is the PPI high enough for the size of canvas you want?
- Tweak Brightness and Contrast: Your phone and computer screens are backlit, which makes images appear brighter than they will in print. Giving your photo a slight boost in brightness can make a huge difference.
- Add a Touch of Sharpening: A little bit of sharpening can really make the details pop and stand out against the subtle weave of the canvas.
- Watch Your Edges! Remember, part of your image needs to wrap around the wooden frame. Make sure no important details—like faces, signatures, or text—are sitting right on the edge. As a rule of thumb, leave at least 5cm of extra image area (known as "bleed") on all four sides to be safe.
How Your Image Gets Printed on Canvas
So, you’ve picked the perfect canvas and have your digital file ready to go. Now for the really exciting part: seeing your image jump from the screen onto the fabric. The technology used for professional canvas printing is a brilliant mix of precision engineering and artistic touch, turning your digital pixels into a physical work of art.
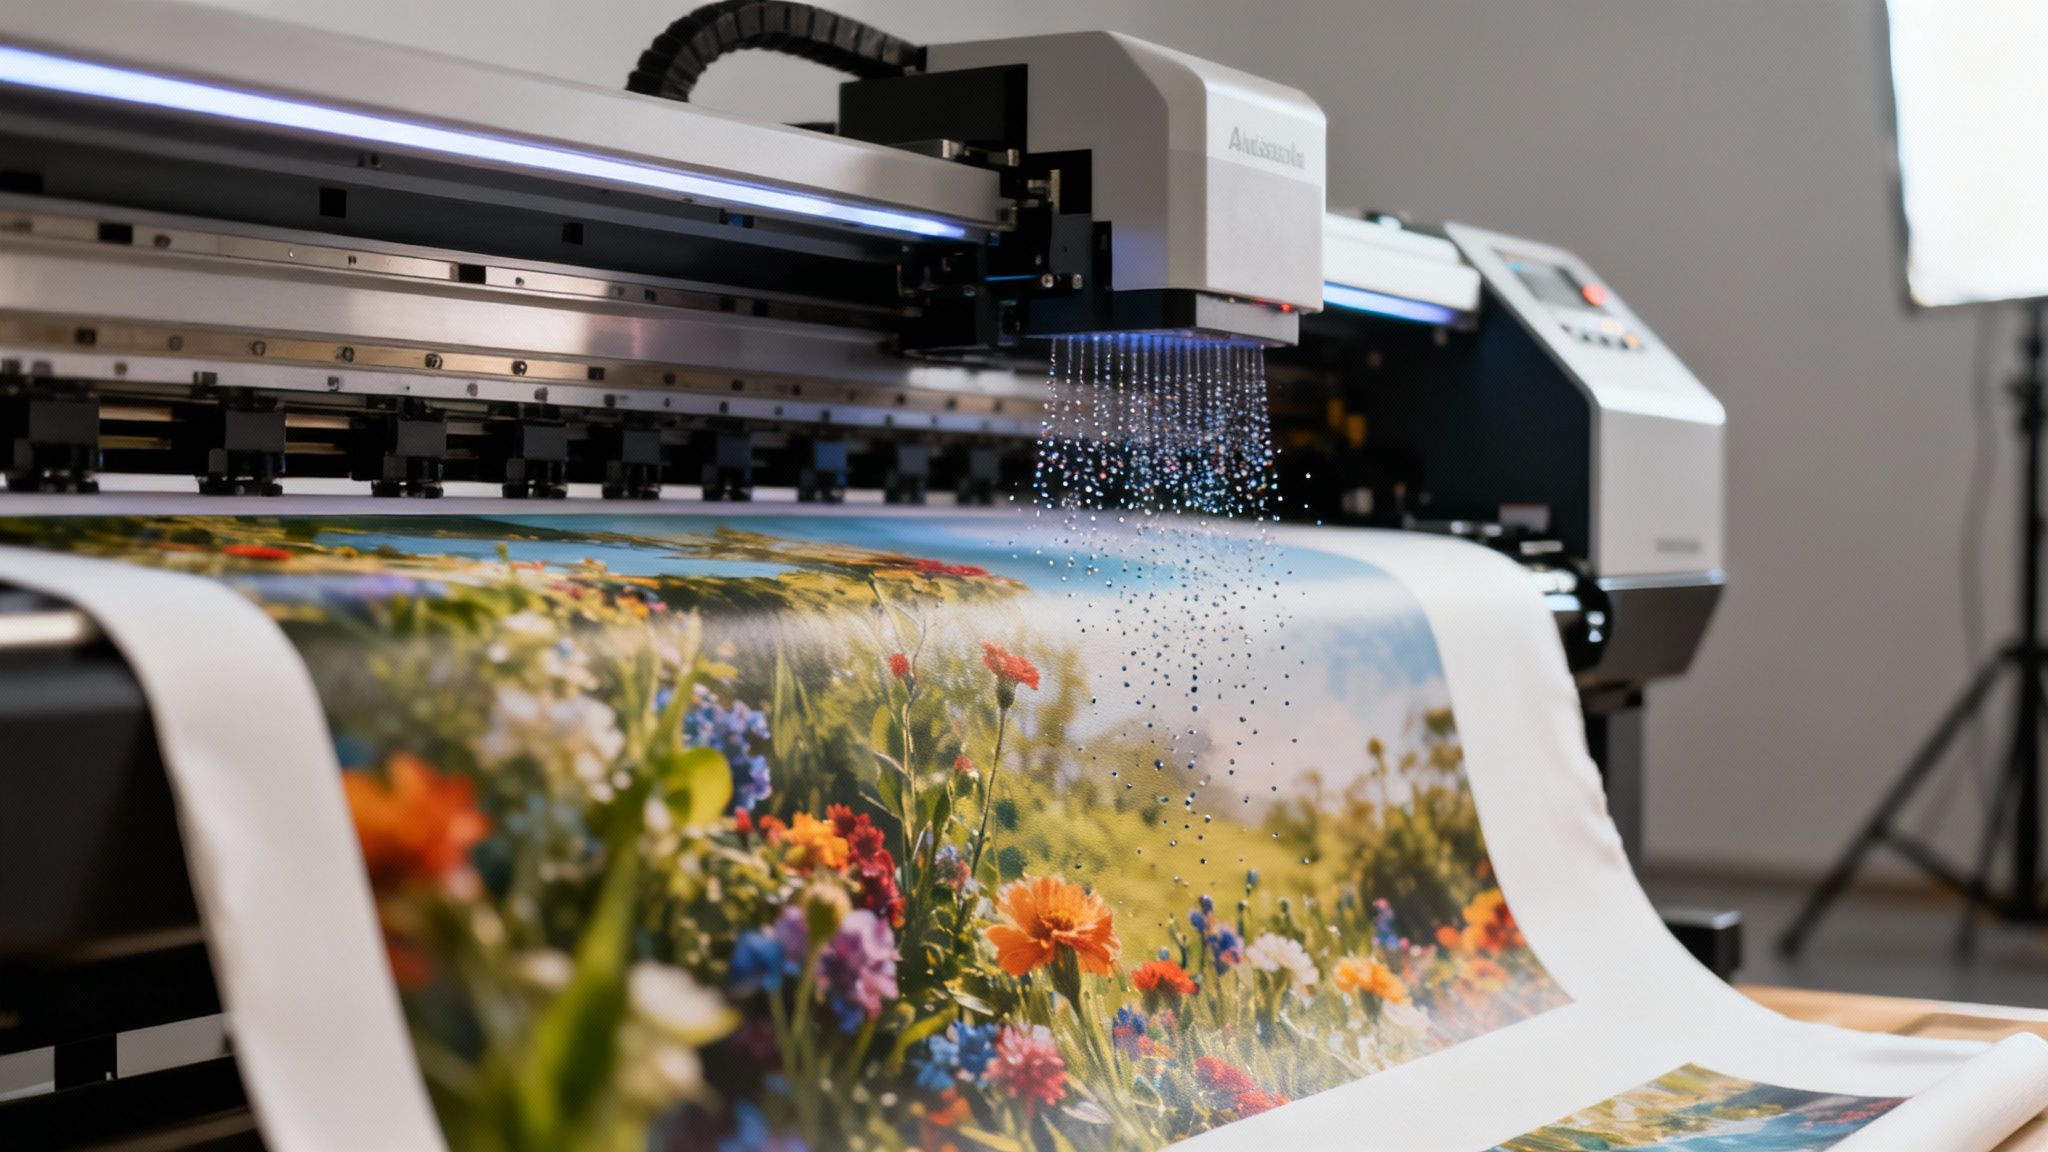
The gold standard for high-quality printing on canvas is known as wide-format inkjet printing. Don't picture your desktop printer at home; these are seriously specialised machines built for one purpose: fine art reproduction. The fancy term you’ll often hear for this is giclée printing, which is just French for "to spray."
And that name really hits the nail on the head. The printer sprays millions of microscopic droplets of archival-quality ink directly onto the canvas with incredible accuracy. Imagine an ultra-precise airbrush where the printer head glides methodically across the surface, layering colours to build your image with breathtaking detail and flawless tonal shifts.
The Magic Behind Giclée Printing
What really sets a professional giclée print apart is the sheer level of detail it can achieve. These printers use a much wider range of ink colours—often 8 to 12 different cartridges—compared to the basic four (cyan, magenta, yellow, and black) in a standard office printer. This expanded colour palette lets them reproduce a massive spectrum of colours, giving you deeper, richer blacks, more vibrant hues, and subtle gradients that stay true to your original vision.
This is the kind of precision that perfectly captures the delicate blush on a cheek in a family portrait or the deep, moody blues of a Fiordland landscape. The tiny ink droplets blend together seamlessly on the textured canvas, creating a continuous tone that feels much more like a painting than a simple print. If you're curious about the full hands-on process, there are great guides on how to make canvas prints from scratch that walk you through every step.
Getting the Colour Just Right: From Screen to Canvas
One of the biggest hurdles in printing is making sure the finished product actually looks like it did on your screen. This is where professional colour calibration is absolutely vital. A fiery red that pops on your backlit monitor can easily look a bit flat when printed onto an absorbent canvas surface.
To get around this, professional print shops use something called ICC profiles (short for International Colour Consortium profiles). Think of an ICC profile as a special translator for colour. It’s a small data file that ensures colour looks consistent no matter what device it's on.
An ICC profile essentially defines how a specific device—like your monitor or a particular printer loaded with a specific canvas and ink set—sees and reproduces colour. Using these profiles, a print expert can accurately predict and control how the colours in your file will look on the final canvas.
This obsessive attention to colour management is the final, crucial piece of the puzzle. It guarantees that the warm, glowing sunset you photographed on holiday is recreated with all its original mood and feeling intact. This commitment to quality is what defines true print artisans. While New Zealand's printing industry is broad, canvas printing specialists are the craftspeople within it, thriving by offering bespoke, high-quality products that people love.
Finishing Touches That Create a Masterpiece
Once the ink is dry, your canvas print isn't quite finished. In fact, some of the most important steps are yet to come. The final finishing touches are what transform a simple print into a professional, gallery-worthy piece of art that’s ready to hang and admire.
These last steps protect your image, give it structure, and ensure it looks spectacular on your wall for decades.
Think of it like a chef plating a beautiful meal. The ingredients have been perfectly cooked, but it's the final presentation—the garnish, the careful arrangement on the plate—that makes it a true masterpiece. This is where your canvas truly comes to life.
Protecting Your Print with Varnish
Before your canvas even thinks about meeting its frame, it needs a protective coating. This isn't just a cosmetic step; it’s an essential shield that preserves the quality and longevity of your print. A high-quality liquid laminate, or varnish, is carefully and evenly applied across the entire surface.
This layer does a few critical jobs:
- UV Protection: It’s like sunscreen for your art, filtering out the harsh ultraviolet rays that cause colours to fade and lose their punch over time.
- Moisture and Dust Resistance: The varnish creates a barrier against humidity and everyday dust, which makes the canvas much easier to wipe clean and care for.
- Colour Enhancement: A good varnish subtly deepens the blacks and makes every colour pop with a little more vibrancy and contrast, giving the whole piece a beautiful richness.
Without this protective layer, a canvas is pretty vulnerable to the elements. With it, you can extend its life for decades, turning a simple print into a genuine family heirloom.
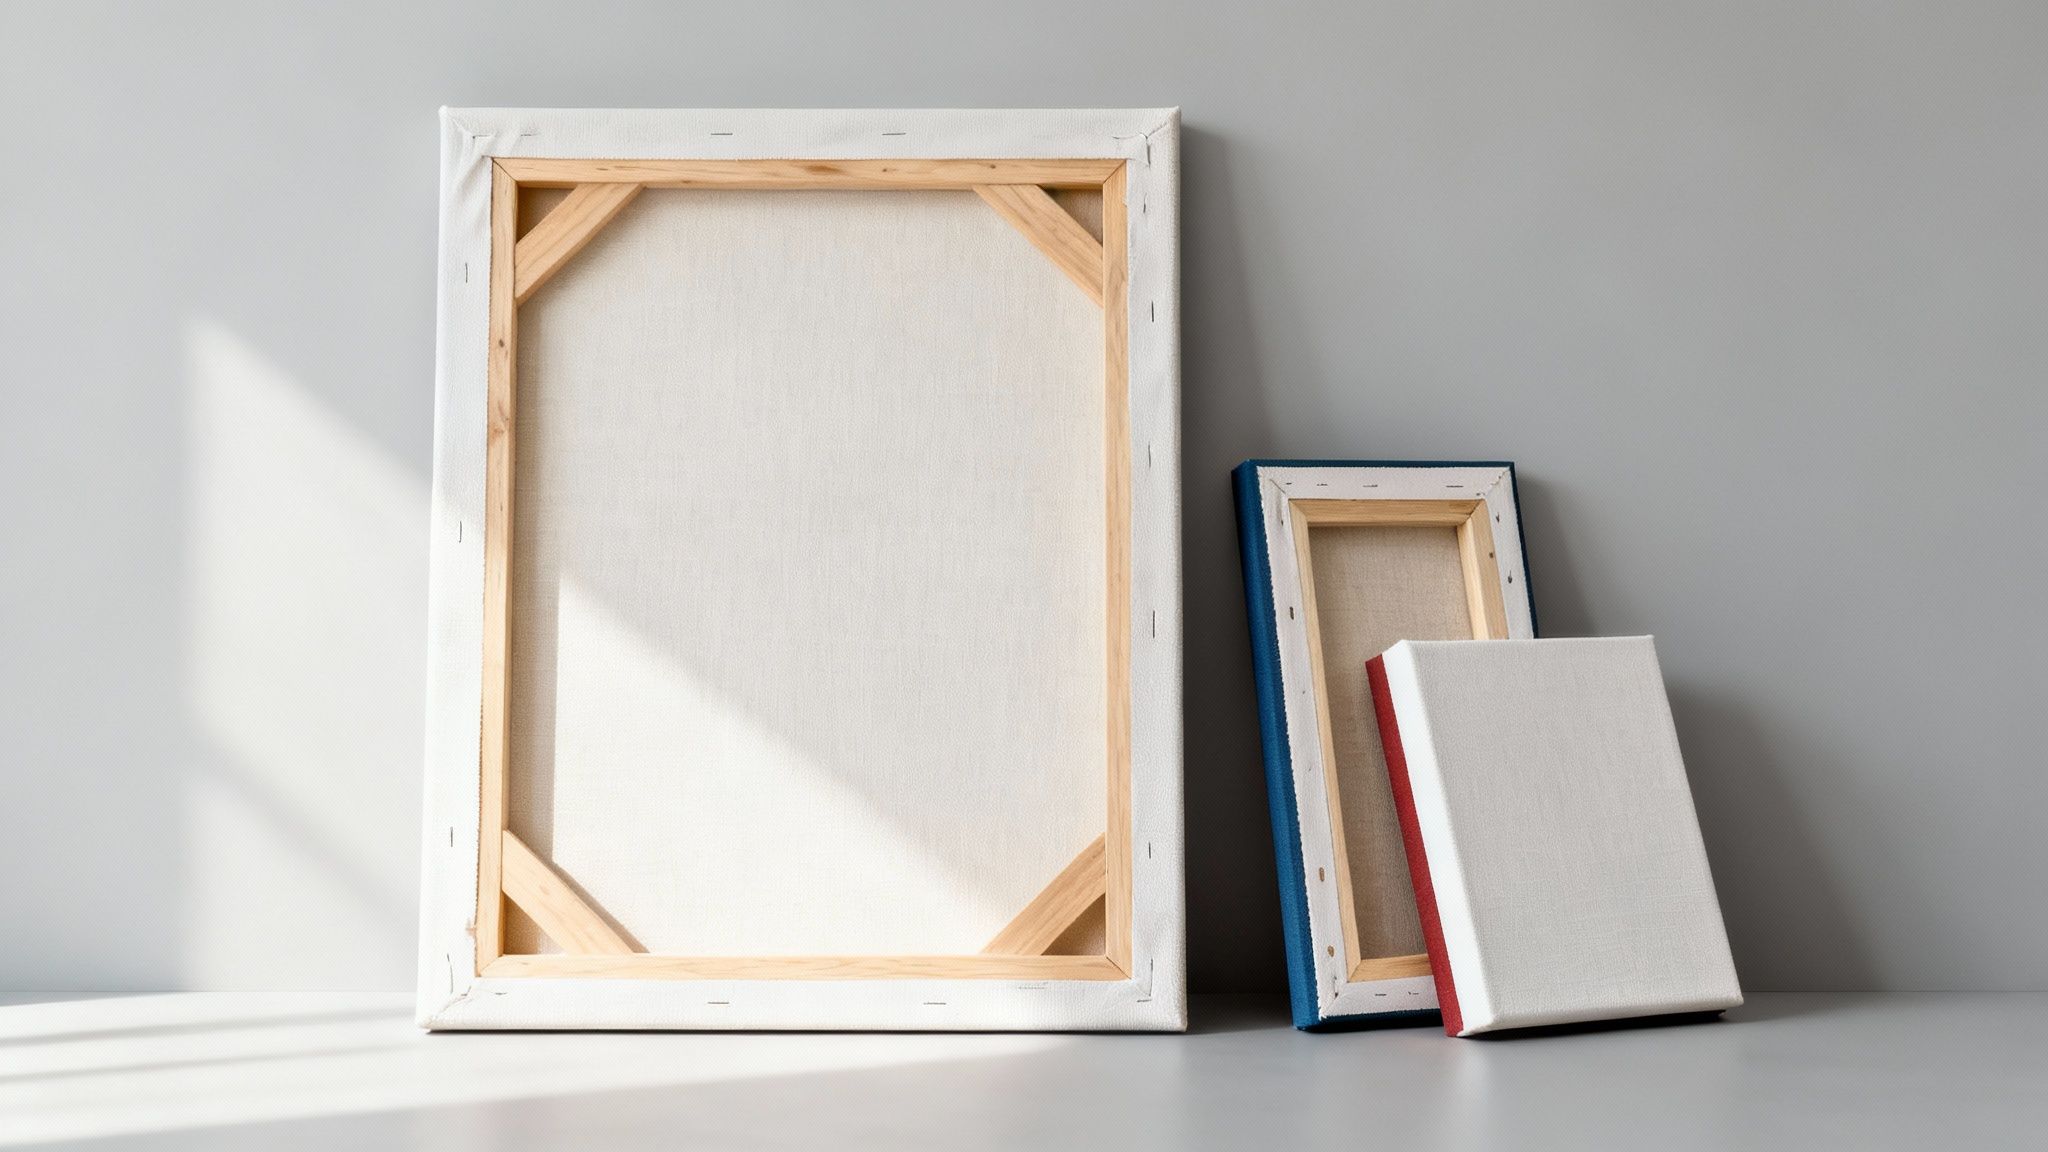
The Art of Stretching and Wrapping
With the print fully protected, it's time to give it its final form by stretching it over a wooden frame, often called stretcher bars. The way the edges of the canvas are handled—the "wrap"—has a massive impact on the final look. Each style suits different types of images and interior design aesthetics.
The way a canvas is wrapped is more than a technical step; it’s a design choice that defines the artwork's final character. Choosing the right wrap ensures the focus remains on your image and that the piece hangs beautifully in its intended space.
Let's break down the most popular options you’ll come across.
H3: Gallery Wrap
This is by far the most common and contemporary choice. With a gallery wrap, the image itself extends seamlessly around the edges of the frame. The result is a clean, modern, three-dimensional piece that's ready to hang straight out of the box—no extra framing required. This style is perfect for landscapes and abstract art, where losing a tiny bit of the image around the edges won't compromise the main subject.
H3: Museum Wrap (or Solid Colour Edge)
A museum wrap keeps the entire image right on the front surface of the canvas. The sides are then finished with a solid colour, usually black, white, or a complementary tone that’s been carefully pulled from the image itself. This method is ideal for portraits or photos where important elements, like a person's head or an artist's signature, are too close to the edge to be wrapped around the side.
H3: Mirror Wrap
The mirror wrap is a clever hybrid of the two. It works by taking the outer couple of inches of your image, digitally flipping it, and using that "mirrored" section to cover the sides. This gives you the continuous, three-dimensional look of a gallery wrap without sacrificing any of your original composition from the front. It’s an excellent solution for tightly cropped photos where every single pixel counts.
Choosing the Perfect Frame
The last big decision is whether to add an outer frame. A gallery-wrapped canvas looks fantastic on its own, but sometimes a frame is that final touch that gives it a more polished, traditional finish.
- Floating Frames: This is a very modern option where the canvas is set inside a frame with a small gap left all the way around. This creates a stylish illusion that the artwork is "floating" inside. It adds a sophisticated border without covering up any of the canvas edges.
- Traditional Frames: For a more classic look, a standard decorative frame can be fitted snugly around the stretched canvas. This works wonderfully for formal portraits or reproductions of traditional art, helping the piece blend in with more classic home décor.
Canvas Wrap and Finishing Options
To help you decide, here’s a quick comparison of the different canvas wrap styles and finishing choices you can make to get the perfect presentation for your artwork.
| Finishing Style | Description | Best For | Visual Effect |
|---|---|---|---|
| Gallery Wrap | The image continues around the sides of the frame. | Landscapes, abstract art, modern décor. | Clean, modern, and three-dimensional. |
| Museum Wrap | The sides of the canvas are a solid colour (e.g., black or white). | Portraits, tightly cropped images. | Classic and defined, drawing focus to the front. |
| Floating Frame | An outer frame with a gap between it and the canvas. | Any canvas print needing a refined, contemporary finish. | Sophisticated and elegant; makes the art "pop." |
| Traditional Frame | The canvas is set inside a conventional picture frame. | Traditional art, formal portraits, classic interiors. | Ornate, classic, and provides a decorative border. |
Ultimately, the choice comes down to the artwork itself and the space where it will be displayed. Each finishing style offers a unique character, ensuring your canvas print looks exactly the way you envisioned it.
Still Have Questions About Canvas Prints?
Even with the basics covered, you might find a few questions still lingering. That's completely normal. Diving into the details is what turns a good print into a great one, giving you the confidence to get started.
Let's walk through some of the most common things people ask, covering everything from file specs to keeping your print looking pristine for years to come.
What’s the Minimum Resolution for a Good Canvas Print?
This is easily the question we hear the most, and for good reason! The goal is always a sharp, clear image. For a truly flawless result, your image file should be 300 pixels per inch (PPI) at the size you want to print. Think of this as the professional standard.
But here’s the good news: canvas is incredibly forgiving. Its beautiful, woven texture naturally softens an image, meaning you can get a stunning print with a resolution as low as 150 PPI. It masks minor imperfections in a way that glossy photo paper just can't.
So, what does that look like in the real world? For a classic 40x60 cm print, an image file that’s roughly 2360x3540 pixels will look absolutely brilliant. Most modern smartphones shoot photos much larger than this, so chances are the picture you already have is more than ready to go.
How Long Will My Canvas Print Last?
The lifespan of your canvas comes down to one thing: the quality of the materials. When a print is made with archival-quality inks and finished with a protective UV-resistant coating, it can easily last over 100 years indoors without any noticeable fading.
A few key things play a part in its longevity:
- Ink Quality: We're talking about archival pigment inks, which are specifically formulated to resist fading for generations.
- Canvas Material: A high-grade, acid-free canvas is essential. It provides a stable base that won’t yellow with age.
- Protective Coating: A good UV varnish is non-negotiable. It’s like sunscreen for your art, shielding it from damaging light.
- Display Conditions: Common sense goes a long way. Keeping your canvas out of direct sunlight and away from damp areas like bathrooms is key.
A well-made canvas print isn't just a decoration; it's a potential heirloom. Investing in quality from the start means you're creating a piece that can be passed down and enjoyed for a lifetime.
What Is a Gallery Wrap Finish?
A "gallery wrap" is a very popular, contemporary way to finish a canvas. It’s a technique where the printed image extends beyond the front of the canvas, wrapping all the way around the edges of the wooden stretcher frame. The canvas is then pulled taut and stapled neatly on the back, completely out of sight.
The result is a clean, three-dimensional piece that feels like it’s floating on the wall. It’s ready to hang right out of the box, no traditional frame needed. This sleek presentation really lets the artwork speak for itself. It’s different from a "museum wrap," where the image is only on the face and the sides are simply a solid colour (usually white or black).
How Should I Clean My Canvas Print?
Taking care of your canvas is much simpler than you might think. A gentle touch is all it needs. For routine cleaning, just give it a light dusting with a soft, dry, lint-free cloth. A microfibre cloth works perfectly.
The most important rule is to never use water, chemical sprays, or any abrasive materials. These can easily damage the protective coating, smudge the ink, and permanently ruin the surface of your print. It's also wise to avoid hanging your canvas in a steamy bathroom or any area with high humidity, as the moisture can cause the wooden frame to warp over time.
Ready to turn your vision into a stunning reality? The team at SONI DESIGN is passionate about bringing your ideas to life with exceptional quality and care. Let’s create something extraordinary together! Check out our services at https://www.sonidesign.co.nz.
Leave a Comment
Stay home & get your daily
needs from our shop
Start You'r Daily Shopping with Nest Mart