
Your cart is currently empty.
Welcome to the ultimate guide on getting posters printed right here in New Zealand. Even with everything going digital, a well-made physical poster still has the power to stop people in their tracks. It's a classic for a reason, whether you're promoting an event, decorating a space, or getting your brand out there.
This guide will walk you through the whole process, from that first spark of an idea to holding a stack of professionally printed posters you can be proud of.
Your Roadmap to Stunning Posters in New Zealand
We'll cut through the jargon and get straight to what matters. We're talking about choosing the right paper (and what on earth 'GSM' even means), picking a size that actually gets noticed, and making sure your digital file looks just as good on paper as it does on your screen.
By the time you're done here, you'll know exactly what you need to confidently work with any Kiwi printer and bring your vision to life.
Here’s a quick look at what you’ll get out of this guide:
- An understanding of the key terms printers use every day.
- How to pick the right materials for your specific project.
- Simple design tips to ensure a flawless print run.
- What to look for in a great local printing partner.
The Printing Scene in Aotearoa
New Zealand's printing industry is a tough, adaptable bunch. While it's no secret that digital media has shaken things up, local printers are still a vital part of the landscape for businesses and individuals alike. The market has definitely seen some changes, with the number of printing businesses shrinking by an average of 3.4% each year between 2019 and 2024.
But it's not all doom and gloom. As of 2025, there are around 775 printing businesses up and running nationwide, which is a small but hopeful tick upwards. This tells us the industry is finding its feet, focusing on quality, custom work like poster printing for marketing and events. If you want to dig deeper into the numbers, you can check out the full report on New Zealand's printing businesses.
A brilliant poster does more than just share information. It grabs attention, sends a clear message in a heartbeat, and creates a real-world connection with whoever sees it.
Key Decisions in Poster Printing at a Glance
Getting a poster printed involves a few key choices. Each one affects the final look, feel, and price of your posters. To make it easier, we've put together this quick-reference table that breaks down the main decisions you'll need to make.
| Decision Point | Common Options | Best For |
|---|---|---|
| Paper Stock | 150gsm Silk, 200gsm Gloss, 250gsm Matte | Art prints, event promotions, retail displays |
| Paper Finish | Matte, Gloss, Silk/Satin, Lamination | Avoiding glare, vibrant colours, a premium feel, durability |
| Poster Size | A4, A3, A2, A1, A0 | Handouts, notice boards, shop windows, trade shows, billboards |
| Colour Mode | CMYK (Cyan, Magenta, Yellow, Black) | Professional printing to ensure colour accuracy |
| Resolution | 300 DPI (Dots Per Inch) | Crisp, clear images without pixelation |
| Quantity | Short run (1-50), Bulk (100+) | One-off projects, large-scale marketing campaigns |
Think of this table as your cheat sheet. As we dive into each of these areas, you can refer back to it to see how all the pieces fit together to create the perfect final product.
Getting a Feel for Paper Stocks and Finishes
The design on the screen is only half the battle. How a poster actually feels in your hands—its weight, its texture, the way it catches the light—plays a massive part in how people perceive your message. Choosing the right paper can transform a good design into a truly great one, giving it a professional, purposeful feel.
Diving into the world of paper jargon can seem a bit much at first, but it's pretty straightforward once you know the basics. Let's break down the options for your poster print NZ project so you can pick the perfect match for your artwork.
What is Paper Weight (GSM) Anyway?
The first thing to get your head around is paper weight, which we measure in GSM (Grams per Square Metre). It’s a simple concept: a higher GSM means a thicker, sturdier, and more substantial piece of paper. Think of the difference between a flimsy newspaper and a premium business card.
The right GSM for your poster really depends on where it’s going and how long you need it to last. A one-night event poster doesn't need the same heft as an art print destined for a gallery wall.
Here’s a quick rundown of what these numbers mean in the real world here in New Zealand:
- 130–170 GSM: This is your standard, lightweight stock. It's easy on the wallet and perfect for big print runs of promotional posters, like for gigs or local events, where they don't need to last forever.
- 200–250 GSM: Now we're getting into a nicer, more premium territory. This weight has a quality feel and offers better durability, making it ideal for in-store displays, professional presentations, or high-quality prints that need to look sharp without being as rigid as a board.
- 300+ GSM: This is the heavy stuff, almost like a thin card. It feels luxurious and is built to last. Go for this when you need top-of-the-line art reproductions, premium shop signage, or any poster that needs to scream quality and stand up to being handled.
Choosing Your Finish: Matte vs. Gloss vs. Silk
Once you’ve got the weight sorted, your next call is the finish. This is the coating applied to the paper that dictates how it looks and interacts with light. The three big players are matte, gloss, and silk.
Each one has its own personality, and the best choice hinges on your design, where you plan to display the poster, and the vibe you're aiming for.
Think of the finish as the final coat of varnish on a painting. It can either create a subtle, sophisticated look or make the colours pop with brilliant energy. It’s all about protecting the artwork while enhancing its intended mood.
Let’s see how they stack up.
| Finish Type | Best For | Key Characteristics |
|---|---|---|
| Matte | Art prints, text-heavy designs, and posters under direct light. | Has a flat, non-reflective surface that’s smooth to the touch. It completely prevents glare, which makes text a breeze to read and gives images a soft, almost velvety look. |
| Gloss | Photos, bold and colourful designs, movie posters. | Super shiny and reflective. This finish makes colours look incredibly vibrant and deep, creating a high-impact, attention-grabbing poster. |
| Silk (or Satin) | Premium corporate posters, event promotions, retail displays. | The perfect middle ground. It has a lovely, low-sheen lustre that boosts colour without the harsh glare of a full gloss finish. It looks and feels sophisticated. |
Adding an Extra Layer of Protection with Lamination
For posters that need to withstand the elements or a bit of rough handling, lamination is a brilliant final touch. This is where a thin, protective plastic film is applied right over the top of your printed poster.
This simple step offers serious protection against moisture, grubby fingerprints, scuffs, and even fading from UV light. It’s pretty much essential for posters in busy cafes, on outdoor notice boards, or at trade shows.
Lamination doesn't just protect; it can also boost the look of your poster. A gloss laminate will make your colours even richer, while a matte laminate adds that classy, non-reflective finish along with serious durability. It's a smart move for any poster print NZ job that you need to go the distance.
Choosing the Right Poster Size for Maximum Impact
Is your poster meant to be a subtle whisper on a café notice board or a booming announcement across a packed convention hall? The physical size of your poster is one of the first and most critical decisions you'll make, directly influencing its visibility, cost, and ultimately, its success.
Getting this right isn't just about picking dimensions off a list; it’s about picturing your poster in its final home. In New Zealand, most printers stick to the international 'A' series paper sizes. It's a brilliantly simple system where each size is exactly half of the one before it, making it incredibly easy to scale your design up or down.
From Handouts to Head-Turners: The NZ Standard Sizes
Let's break down the most common sizes you'll encounter for a poster print NZ project and see where they work best. Each one has a specific job to do, from up-close-and-personal info sheets to massive, traffic-stopping displays.
- A4 (210 x 297 mm): Think of your standard office paper. A4 is perfect for handouts, detailed information sheets, or posters pinned to a small community board where people will be reading them from arm's length.
- A3 (297 x 420 mm): Double the size of A4, an A3 poster has a bit more visual punch. It's a great choice for staff room notices, promotions inside a shop window, or small event posters where viewers are only a few steps away.
- A2 (420 x 594 mm): Now we're getting into attention-grabbing territory. An A2 is large enough to be seen from across a room, making it a go-to for in-store retail displays, band posters, and informational signs at events.
- A1 (594 x 841 mm): This is where your message really starts to shout. A1 posters are impossible to ignore in high-traffic areas, making them ideal for trade show graphics, major event advertising, and large storefront window displays.
- A0 (841 x 1189 mm): The giant of the family. An A0 is designed for maximum impact from a serious distance. Think outdoor advertising, huge exhibition halls, or anywhere you need to stop people in their tracks.
Making Sense of Scale and Viewing Distance
Sometimes the numbers don't quite paint a picture. To really understand these sizes, it helps to put them in context.
The table below gives you a quick reference guide, connecting the standard sizes to their common uses and, crucially, the distance from which they can be comfortably read.
NZ Poster Size Guide Comparison
| Size Code | Dimensions (mm) | Common Use Case Examples | Ideal Viewing Distance |
|---|---|---|---|
| A4 | 210 x 297 mm | Handouts, notice boards, data sheets | Up to 1 metre |
| A3 | 297 x 420 mm | Small event promos, shop windows, cafe menus | 1-2 metres |
| A2 | 420 x 594 mm | Retail displays, conference signage, small movie posters | 2-3 metres |
| A1 | 594 x 841 mm | Trade shows, storefronts, large event advertising | 3-5 metres |
| A0 | 841 x 1189 mm | Outdoor billboards, exhibition halls, major announcements | 5+ metres |
Thinking about viewing distance is key to effective design—there’s no point cramming tiny text onto a huge A0 poster that will only ever be seen from the other side of a carpark.
This infographic also provides a handy comparison of two popular paper finishes, which work hand-in-hand with your size choice to create the final look.
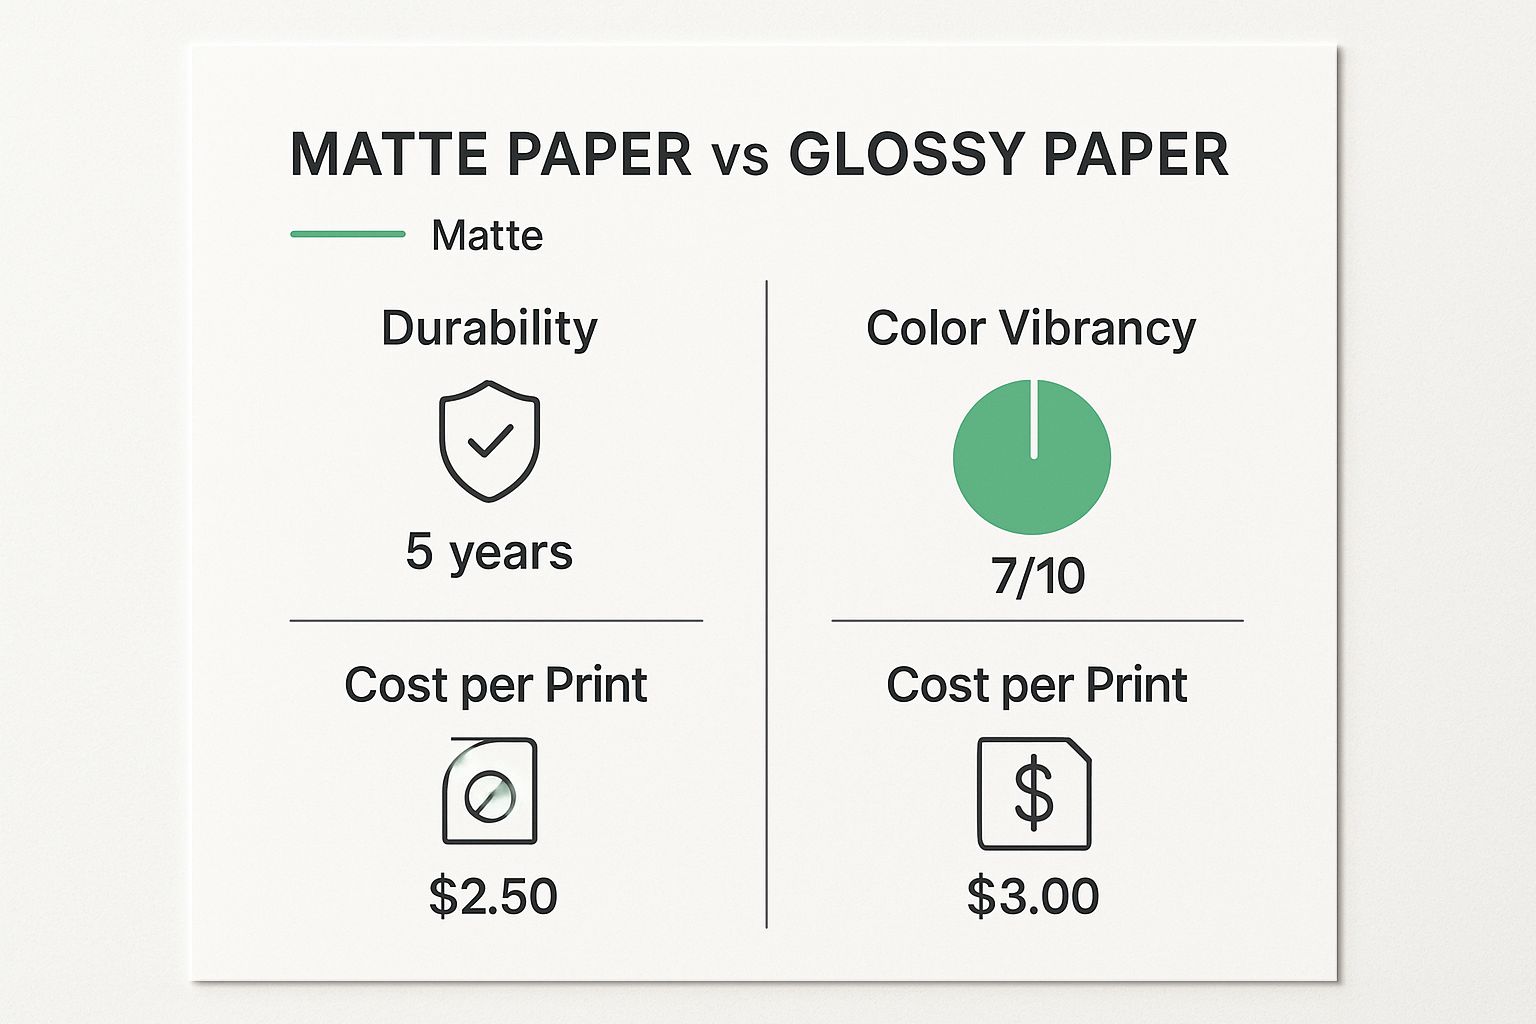
As you can see, there's a trade-off. Glossy stock makes colours pop but can be less durable, while matte offers a more resilient, sophisticated finish at the cost of some vibrancy.
A quick rule of thumb for viewing distance: For every 50cm of poster height, you need at least 2-3 metres of viewing distance for it to be legible. An A2 poster (almost 60cm high) should be clear from about 3 metres, while a giant A0 needs to be readable from over 6 metres away.
When to Go Custom
While the standard 'A' sizes cover almost every situation, don't feel locked in. If you've got an odd-sized frame to fill, an awkward bit of wall space, or a creative design that just doesn't fit a standard ratio, a custom-sized print is the way to go. Most good NZ printers are more than happy to trim to bespoke dimensions, giving you a perfect fit every time.
Getting Your Artwork Ready for a Flawless Print
The term "print-ready" can sound a bit intimidating, but it's really just about making sure the design on your screen translates perfectly onto paper. Getting your digital file right from the get-go is the single best way to avoid common (and costly) printing headaches.
Think of it like giving your printer a perfect blueprint. A properly prepared file means no surprise colour changes, fuzzy images, or strange white borders. Let's walk through the key things to check for your next poster print NZ project so the final result is exactly what you envisioned.
Resolution and Why It Matters
Resolution is the secret ingredient for a sharp, professional-looking poster. We measure it in DPI, which stands for Dots Per Inch. This number simply tells the printer how many tiny dots of ink to spray onto every single inch of the paper.
It's a bit like trying to blow up a small passport photo to the size of a billboard. The image would become a blurry, pixelated mess because you're stretching a small amount of information over a huge area. Low-resolution files do the same thing when they hit the printing press.
For a crisp, clear result that looks fantastic up close, your artwork needs to be set up at 300 DPI at its final print size. This is the gold standard for high-quality printing here in New Zealand and around the world.
You can usually set this in your design software, whether it's Adobe Photoshop or Canva. It’s always best to start your design at the right resolution rather than trying to fix it later.
The Big Difference: RGB vs. CMYK
Here’s one of the most common traps in printing: the colours on your screen are created differently from the colours on paper.
Your monitor uses light to create colour with a model called RGB (Red, Green, Blue). A printer, on the other hand, uses ink with a model called CMYK (Cyan, Magenta, Yellow, and Key/Black). The RGB colour range is massive and can produce incredibly bright, glowing tones that ink simply can't replicate on a physical page.
- RGB (Red, Green, Blue): This is for screens. It’s an "additive" system, mixing light to create colour.
- CMYK (Cyan, Magenta, Yellow, Black): This is for print. It’s a "subtractive" system, where ink absorbs light on paper.
If you send a printer an RGB file, their software will automatically convert it to CMYK, but the result can be disappointing. Colours often look duller or muddier than you expected. To keep complete control and get accurate colours, always convert your files to CMYK before you send them to your Kiwi printer.
Don't Forget to Add Bleed
Ever seen a business card or flyer with a tiny, unprofessional-looking white sliver along one edge? That’s what happens when a design has no "bleed." Printing presses and trimming machines are incredibly precise, but they aren't perfect down to the micrometre.
A bleed is just a little bit of extra background or image that extends past the final trim line of your poster. It gives the printer some wiggle room during the final cut.
The standard for most NZ printers is a 3mm bleed on all four sides. When the poster is trimmed down to its finished size, the blade cuts into this bleed area, guaranteeing your design runs right to the very edge. For example, if you're designing an A2 poster (420 x 594 mm), your actual file should be 426 x 600 mm to include the bleed. When you're aiming for your poster to really pop, understanding the impact of backlit graphics can also add a whole new level of vibrancy to your design.
How to Choose the Right Poster Printer in NZ
Finding the right printing partner is just as important as getting your artwork perfect. A good printer doesn’t just splash ink on paper; they’re the final checkpoint for your project, making sure everything comes out looking sharp. With so many options for a poster print NZ job—from the shop down the road to massive online services—it pays to know what to look for.
Think of your printer as your quality control expert. The best ones have a process to catch potential problems before they turn into a box of expensive mistakes. Let's walk through how to find a partner you can trust.
Key Questions to Ask Any Potential Printer
Before you hand over your files, it's worth asking a few direct questions. The answers will tell you a lot about their reliability, service quality, and whether they're a good fit for what you need. It’s like a mini-interview for a very important job.
Here’s a good starting list:
- What are your typical turnaround times? Get a feel for both their standard and express options. You never know when you'll have an urgent job.
- Do you ship nationwide? A simple one, but crucial. Make sure they can get your posters to you and find out what the shipping costs and timelines look like.
- What’s your customer support like? If something goes wrong, can you actually talk to a person on the phone, or are you stuck with a chatbot?
- Can I get a sample pack of your paper stocks? Honestly, this is the best way to judge quality. Seeing and feeling the paper yourself tells you more than any website photo ever could.
Why an Online Proofing System Matters
One feature that separates the pros from the amateurs is a solid online proofing system. This is basically a final digital preview of your poster that you have to approve before they hit the big green "print" button. It's your last chance to catch that sneaky typo or an image that's gone a bit fuzzy.
A good system will clearly show you the trim lines and bleed area, so there are no nasty surprises when you open the box. It’s a simple step, but it gives you peace of mind and helps avoid the headache of a reprint.
Never underestimate the power of seeing a sample first. A physical sample pack lets you judge the true colour vibrancy, paper texture, and overall print quality in a way no computer screen can. It’s the ultimate test of a printer’s capabilities.
The Shift Towards Print on Demand
The printing world in New Zealand is definitely moving towards smarter, more flexible ways of working. A big trend for 2025 is print-on-demand (POD), a model where you only print exactly what you need, when you need it. This simple idea cuts down on overproduction, saves on storage, and drastically reduces waste.
Kiwi businesses are using POD to manage costs and offer more personalised products without committing to a massive print run. It’s perfect for short-run jobs like posters for a local event or a limited-edition art print. You can read more about how Kiwi businesses are adopting POD to stay competitive.
Local Shops vs. Big Online Services
At the end of the day, your choice often comes down to this: do you go with your local neighbourhood print shop or a large-scale online provider? Both have their place.
Local Print Shops:
- The upside: You get personalised, face-to-face service and expert advice. They're fantastic for tricky jobs or when you want to be more hands-on.
- The downside: They can sometimes be a bit pricier and might have longer lead times than the big players.
Large Online Printers:
- The upside: They usually offer better prices, especially on bulk orders, and have super-fast turnarounds with slick online ordering.
- The downside: The service can feel impersonal, and you miss out on that in-person expert eye.
The right choice really depends on your project. If you're printing a huge batch of standard posters and cost is your main driver, an online service is probably your best bet. But for a custom art print where you want to discuss every little detail, nothing beats the expertise of your local shop.
Understanding Costs And Future Trends In NZ Poster Printing
Now that you’ve got the low-down on paper stocks, sizes and preflight checks, it’s time to map these choices back to your bottom line. Think of each decision like a block in a Jenga tower—heavier stock, larger dimensions or elaborate finishes all stack up in price. Spot UV varnish or a matte lamination, for instance, might give your design that final flourish but will also add a touch more to your quote.
At the core, the cost of your poster mirrors the specs you select. A heavier paper (measured in GSM), a jump from A3 to A1 format, or an intricate finish all nudge the unit price upward. For instance, swapping a standard 150 GSM sheet for a robust 250 GSM stock will noticeably lift your per-poster cost.
Quantity, however, is the true game-changer. It’s like buying in bulk at a wholesale market—the larger the run, the more you dilute the printer’s setup charges. As a rule of thumb, ordering 100 A2 posters often brings the price down to a fraction of what a single print would cost.
Looking Ahead: The Rise Of Sustainable Printing
Green printing has sprinted from a niche corner into mainstream practice among Kiwi businesses. Rising environmental awareness—and an expectation that brands leave a lighter footprint—means eco-friendly options are no longer a bonus but part of the brief.
Here are some of the sustainable options gaining traction:
- Recycled Paper Stocks: Sourced from post-consumer waste, these sheets boast a natural texture and cut down on virgin pulp use.
- FSC-Certified Papers: Backed by the Forest Stewardship Council, this stamp ensures forests and communities benefit from responsible forestry.
- Vegetable-Based Inks: Swapping petroleum for plant oils reduces volatile organic compounds and simplifies end-of-life recycling.
Choosing sustainable printing isn’t just about being green; it sends a clear message that your brand values quality, community and Kiwi conservation ideals.
Despite the rise of digital media, poster printing still commands a robust foothold. New Zealand’s print industry is on track to hit NZD 1.4 billion by 2025, buoyed by demand for tangible, high-impact visuals. On a global scale, posters are forecast to generate nearly USD 9.8 billion in revenue by 2035, with eco-friendly innovations shaping much of that growth. For an in-depth outlook, explore the future of the posters and frames market.
Got Questions About Poster Printing? We’ve Got Answers.
Even after going through all the details, you might have a couple of questions nagging at you before you hit ‘print’. It’s completely normal. This section tackles the most common queries we get from people all over New Zealand, giving you the clear, no-fuss answers you need to get your project over the finish line.
Think of this as a final checklist to make sure you’re ready to go, whether you’re a design veteran or printing your very first poster.
How Quickly Can I Get My Posters?
This is probably the number one question we hear! For most poster printing jobs in NZ, you can expect a standard turnaround of 3-5 working days after you’ve given the final design your seal of approval. Remember, that's the printing time – shipping will add another day or two, depending on where you are in Aotearoa.
Caught in a real time crunch? Many printers offer an express or even a next-day service for a bit extra. If you’re up against a hard deadline, your best bet is to pick up the phone and chat with them directly to see what’s possible before you place the order.
What’s the Best File Format to Send?
When it comes to printing, a high-resolution PDF is the undisputed champion. It’s the industry standard for a reason. This format essentially locks your entire design—fonts, images, colours, and layout—into a neat little package, guaranteeing that what you see on your screen is exactly what comes off the press.
If you’re using design software like Adobe InDesign or Illustrator, exporting to a print-ready PDF is simple. Just make sure you’ve included that crucial 3mm of bleed and set the file to CMYK colour mode. While a high-quality PNG or JPG can sometimes work in a pinch, a PDF is always the safest and most professional choice.
Can I Really Just Print One Poster?
Absolutely! The days of needing to order hundreds of copies are long gone. Thanks to the magic of modern digital printing, most NZ print shops are more than happy to print a single, one-off poster for you. It's perfect if you're creating a unique piece of art for your wall, a special banner for a birthday, or just want a test print to check the quality before you go all-in on a big run.
The one thing to be aware of is the cost. The price per poster will be noticeably higher for a single print compared to a bulk order. That's because the setup is the same whether you're printing one or one hundred, so the cost drops dramatically as the quantity goes up.
Think of it like this: a single print is a bespoke order, while a large run is mass production. You pay a premium for the personalised, one-off service, but gain huge economies of scale with volume.
How Do I Design a Great Poster Without a Huge Budget?
You don’t need to spend a fortune to create a poster that turns heads. There are some incredible free online design tools out there, with Canva being a crowd favourite. It gives you access to thousands of professional templates and a super simple drag-and-drop interface, so you can whip up a fantastic design without any expensive software.
When it comes to saving money on the actual printing, here are a few handy tips:
- Stick to standard sizes: Choosing an A2 or A3 poster is always cheaper than going for custom dimensions.
- Go for a lighter paper stock: For most indoor or short-term promos, a 150gsm paper is a great, budget-friendly option that still looks fantastic.
- Order in bulk: If you have a feeling you’ll need more posters down the line, printing them all in one go will slash your cost per poster.
At SONI DESIGN, we’re all about turning your vision into a high-quality print that gets noticed. Whether it's a single masterpiece for your lounge or a thousand posters for a campaign, our team is here to help every step of the way. Let's create something extraordinary together!
Leave a Comment
Stay home & get your daily
needs from our shop
Start You'r Daily Shopping with Nest Mart