
Your cart is currently empty.
When it comes to networking in New Zealand, the standard business card size you'll want to use is 90mm x 55mm. This dimension has become the go-to for most Kiwi businesses and printers for a good reason. It strikes the perfect balance, giving you enough canvas for your design and contact details while still being compact enough to tuck neatly into a wallet or cardholder.
Why the NZ Standard Matters
Getting your business card specs right is one of those small but crucial details that makes a big first impression. Think of it this way: the size, feel, and quality of your card are tangible reflections of your brand's professionalism and attention to detail. Nailing these physical brand assets is a foundational part of effective strategies for brand growth.
Here in New Zealand, the printing industry has settled on 90mm by 55mm as the universal standard. It’s a subtle but important distinction from what you might find overseas. For instance, the common North American size is slightly smaller at 89mm x 51mm, a difference that reflects local printing equipment and conventions.
A Quick Global Comparison
While sticking to the 90mm x 55mm size is your safest bet for local use, it's helpful to know how our Kiwi standard stacks up internationally, especially if you do business overseas. The image below gives you a great visual breakdown of the key differences.
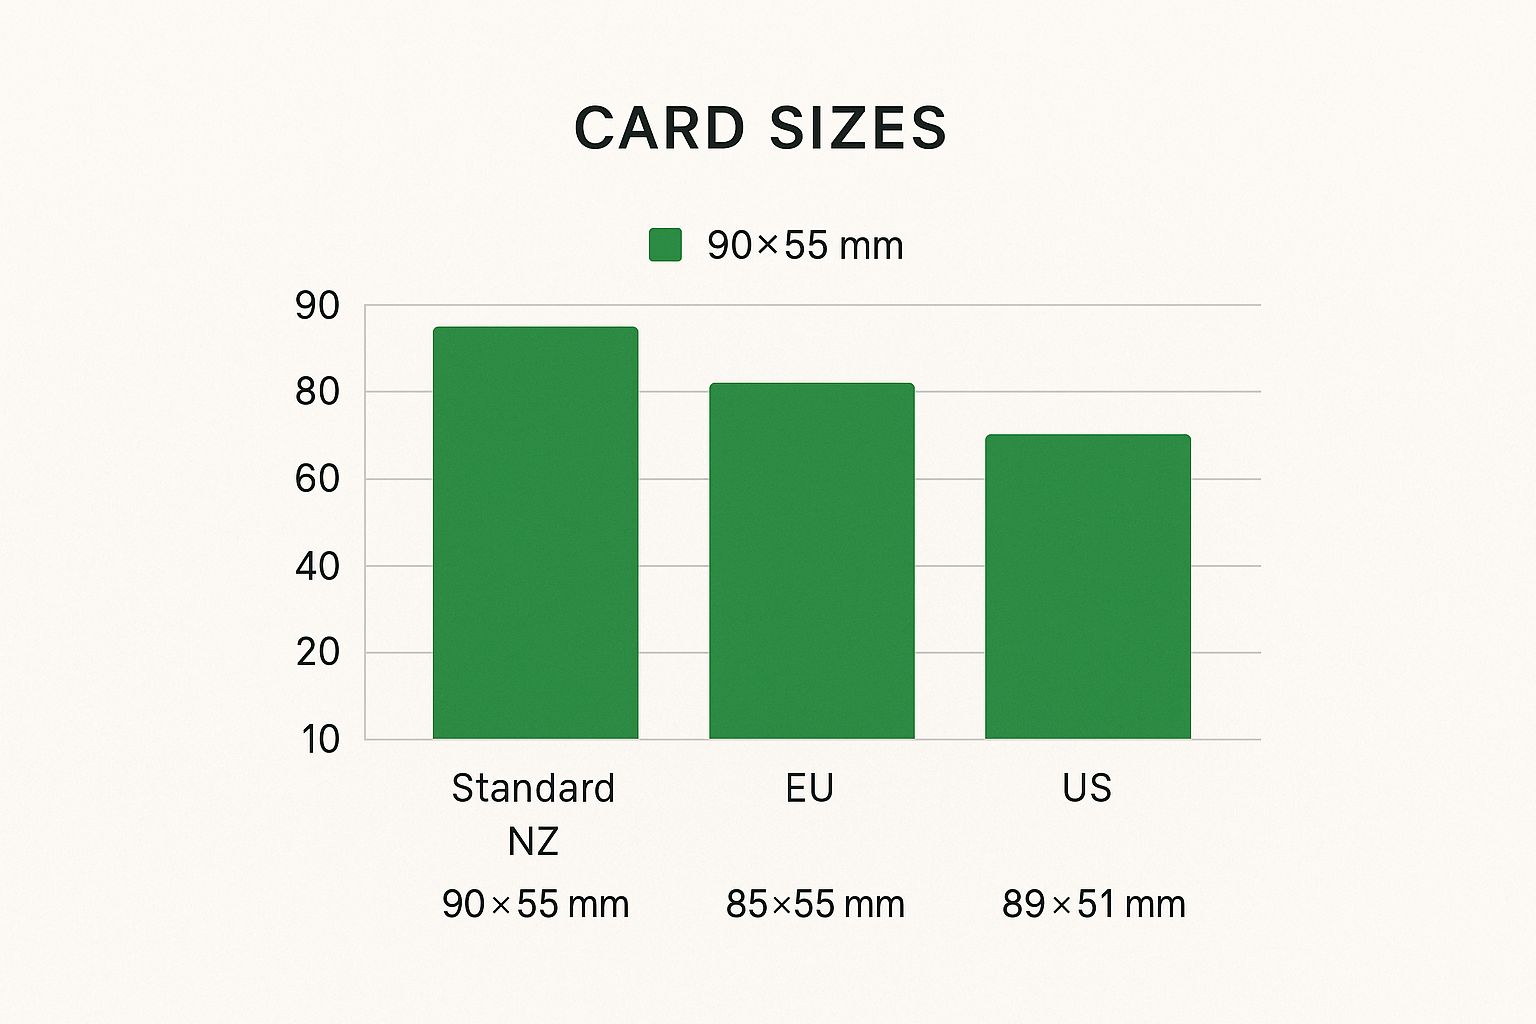
As you can see, the New Zealand card is a little longer and wider than its US and European equivalents. It might not seem like much, but that extra space can make a real difference when you're laying out your design, giving your logo and text just a bit more room to breathe.
To put these minor but significant variations into perspective, here’s a quick-reference table.
NZ Business Card Size vs International Standards
| Region | Dimensions (Metric) | Dimensions (Imperial) |
|---|---|---|
| New Zealand | 90mm x 55mm | 3.54" x 2.17" |
| United States/Canada | 89mm x 51mm | 3.5" x 2" |
| Europe (most of) | 85mm x 55mm | 3.35" x 2.17" |
| United Kingdom/Ireland | 85mm x 55mm | 3.35" x 2.17" |
| Australia | 90mm x 55mm | 3.54" x 2.17" |
This comparison highlights that the NZ standard aligns perfectly with Australia's, but differs from North American and European norms. Keeping these sizes in mind ensures your card will fit in with local expectations, wherever you happen to be.
Why 90mm x 55mm Became the New Zealand Standard
Ever wondered why a business card in New Zealand almost always measures 90mm x 55mm? It's a great question. There's no official government mandate or law setting this size. Instead, it’s a dimension that has been cemented through decades of practical use and widespread agreement among printers, designers, and businesses across the country.
This size really hits a sweet spot. It offers a slightly larger canvas for branding and contact details compared to some other international standards, but it's not so large that it becomes awkward or bulky. The roots of this specific size trace back to historical printing practices and pure convenience. Printers throughout New Zealand eventually standardised their equipment and workflows around these dimensions, which naturally made it the most efficient and cost-effective option for everyone.
A Perfect Fit for Wallets and Global Norms
A huge part of why the 90mm x 55mm size works so well is its practicality. It slides neatly into the credit card slots found in just about every wallet, which is crucial. If your card is easy for people to keep, they're more likely to hold onto it.
While it’s not an officially regulated international size, it’s very common across Europe and Oceania, often sharing similarities with banking card dimensions. It's a touch larger than the standard North American card (89mm x 51mm), but that small difference gives Kiwi businesses a bit more room to play with. If you're interested in the history, you can learn more about standard business card dimensions and see how different regions evolved their own norms.
The Practical Edge for Designers
From a design perspective, those extra millimetres are surprisingly valuable. The slightly larger area gives you a distinct advantage.
- Improved Readability: You have enough room to use slightly larger fonts for names, phone numbers, and email addresses. This makes the card easier to read at a glance without feeling cluttered.
- Better Use of White Space: More space means you can incorporate more negative space into your layout. This is key for creating a clean, modern, and professional aesthetic that doesn't overwhelm the eye.
- Stronger Visual Impact: Your logo and other key visual elements have more room to breathe, helping them stand out and make a more memorable first impression.
At the end of the day, sticking with the 90mm x 55mm standard is a smart move. It ensures your card will look professional, be simple to get printed anywhere in New Zealand, and provide a great experience for anyone you hand it to. It's a proven formula for effective networking.
Mastering Critical Print Specifications
Once you've settled on the standard NZ business card size, the next step is getting your design ready for a professional printer. This involves moving beyond the basic dimensions and getting familiar with a few key technical terms. To make sure your cards look sharp and not accidentally botched, you need to understand three core concepts: the trim line, the bleed, and the safe area. I always think of these as the non-negotiable rules of the print world.
The trim line is the easiest to grasp. It's simply the final, finished edge of your 90mm x 55mm card. This is exactly where the printer’s guillotine is meant to slice your card from a much larger sheet. But here's the catch: mechanical cutting, no matter how precise, can have tiny variations. Relying on the trim line alone is a gamble you don't want to take.
The Role of Bleed and Safe Area
So, how do you avoid those awful, thin white slivers at the edge if the cut is slightly off? The answer is the bleed. A bleed is an extra margin of your background colour or image that you purposefully extend beyond the trim line. It’s a safety net for your design.
Pro Tip: For a New Zealand business card, a 3mm bleed on all four sides is the industry standard. This means your actual design file should be set up as 96mm x 61mm. That extra room gives the printer the buffer they need to deliver a flawless, edge-to-edge finish.
On the flip side, the safe area (sometimes called a safety margin) is a protective zone inside the trim line. It’s crucial to keep all your important content—like your name, logo, and contact numbers—well within this space. This margin is typically 3mm to 5mm from the trim line. If you place anything essential too close to the edge, you risk it being clipped or completely cut off during trimming.
Here's a quick summary to keep in mind:
- Bleed: Your background design should extend 3mm beyond the trim line to prevent white edges after cutting.
- Trim Line: This is the final cut size of the card, which will be 90mm x 55mm.
- Safe Area: All your key text and logos must stay at least 3mm inside the trim line to be safe from the blade.
Getting these technical specs right is the foundation, but a great business card also needs a compelling look. You might find it helpful to brush up on this by mastering the principles of visual design, which are universal to any effective creative project.
How to Prepare Your Print-Ready File
So, you’ve finalised your design. Fantastic! The next step is absolutely crucial for getting the results you want: preparing a technically perfect, print-ready file. If you send your printer a file that’s set up correctly, you’re guaranteeing the finished card will look exactly as you envisioned it. This checklist covers the essential, non-negotiable requirements that any printer in New Zealand will expect.
Check Your Colour Mode and Resolution
First things first, let’s talk colour. Your design software needs to be set to CMYK (Cyan, Magenta, Yellow, Key/Black). It's a common mistake to design in RGB, which is the colour mode for digital screens. If you send an RGB file to a commercial printer, the colours on the final card can look completely different—and often disappointingly dull. To avoid any nasty surprises, set your document to CMYK right from the start.
Next up is resolution. For a crisp, professional print, your file resolution must be 300 DPI (dots per inch). Anything lower will make your images and even your text look pixelated and blurry. It’s a small detail that makes a huge difference to the quality and feel of your card.
File Format and Export Settings
When it comes to the file format, the industry standard is a high-quality PDF. A PDF is brilliant because it packages all your fonts, images, and layout elements into a single, self-contained file. This prevents things from shifting around or, even worse, going missing when your printer opens it on their system.
As you export your file from software like Canva or Adobe Illustrator, make sure you tick the boxes to include the proper print marks.
- Bleed: Your PDF must contain the 3mm bleed we talked about earlier.
- Trim Marks: These are tiny lines in the corners of your document that tell the printer precisely where to cut the card down to its final 90mm x 55mm size.
Getting your PDF export settings right gives the production team everything they need for a flawless print run. It's the best way to minimise delays and avoid any frustrating mistakes.
If you’re feeling a bit out of your depth with the technical side of things, it’s often worth getting an expert to give you a hand. Professional graphic design services can take care of all these file preparation details for you, ensuring a perfect result every time.
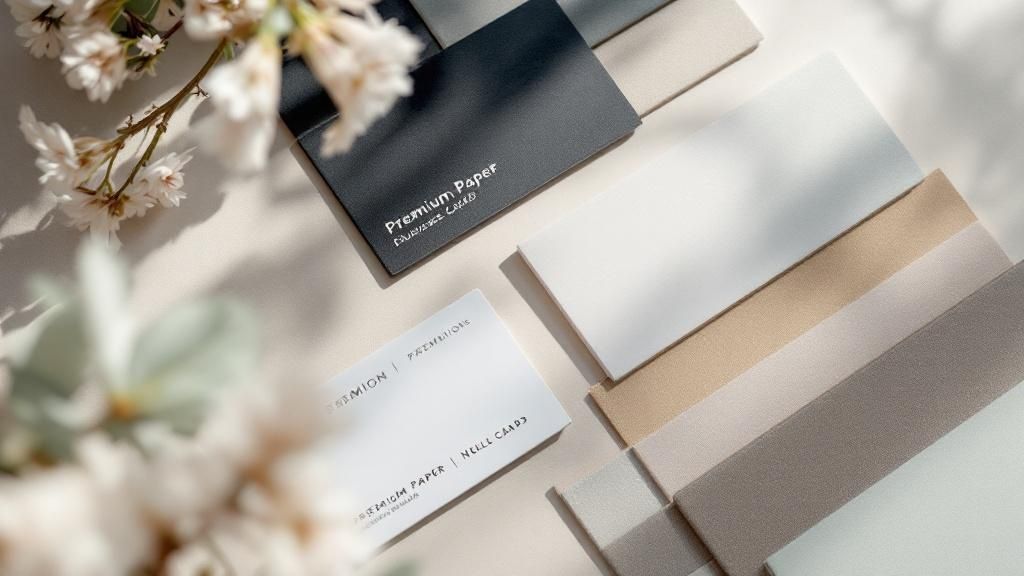
Choosing the Right Paper and Finish
Getting the NZ business card size right is the first step, but the actual feel of the card in someone's hand is just as important. The paper stock and finish you choose say a lot about your brand's commitment to quality before anyone even reads the text.
The paper's weight, measured in grams per square metre (GSM), is what gives a card its sturdiness. A thin, flimsy card can feel cheap, but a really thick one can seem clunky. For a professional, durable business card, you'll want to aim for a paper weight between 300 and 400 GSM. This range feels substantial and premium without being too bulky to fit in a wallet.
Selecting a Finish That Fits Your Brand
The finish you apply to your card changes both its look and its feel. Each option has a different effect and can completely shift how your design is perceived.
- Matte Finish: This gives you a smooth, non-reflective surface that feels modern and sophisticated. It’s a great fit for elegant, minimalist designs and has the practical benefit of being easy to write on.
- Gloss Finish: A shiny, reflective coating that makes colours look incredibly vibrant. If your brand is bold and energetic, or you have a colourful design, a gloss finish will make it pop.
- Uncoated Stock: This choice has no extra coating, leaving it with a natural, textured paper feel. It's an excellent option for rustic or eco-conscious brands wanting to project a more organic, authentic image.
Think about what your finish says about you. A sleek matte card works perfectly for a design consultant or a lawyer, whereas a vibrant gloss finish might be the ideal choice for a photographer or graphic designer.
Elevating Your Design with Special Finishes
If you really want your card to be memorable, special finishes can add a unique visual and tactile element that standard printing just can't match.
For example, you could try spot UV. This is where a glossy varnish is applied to specific parts of a matte card—like your logo or a graphic pattern—to create a stunning contrast. Another fantastic option is foiling, which adds a metallic sheen to text or images. It brings a touch of luxury and immediately draws attention to the most important parts of your card. These premium details can turn a simple business card into a genuine conversation starter.
Thinking Outside the Standard Dimensions
While the standard 90mm x 55mm is a rock-solid choice for most, sometimes you need to break the mould to make a real impression. Going for a non-standard size isn't just a quirky decision; it's a strategic move that can make your brand instantly stand out in a sea of identical rectangles. It signals creativity and shows you're not afraid to do things differently.
Choosing an alternative size is fundamentally a branding choice. Think about it: a square card feels modern and bold, a great fit for a design agency or tech startup. A slim card, on the other hand, comes across as elegant and refined, perfect for a luxury brand or a high-end consultant. The physical shape of the card begins to tell your brand's story before a single word is even read.
Exploring Creative Alternatives
Plenty of printers across New Zealand offer a variety of unique shapes and sizes to help you make a statement. While these options might cost a little more than the standard run, the potential for being remembered is often well worth the small extra investment.
Here are a few popular creative options to consider:
- Square Cards: Typically sized at 55mm x 55mm, these cards are clean, contemporary, and visually striking. They're a fantastic choice for brands with minimalist logos or a strong visual identity.
- Slim Cards: These usually stick to the standard 90mm length but have a reduced height, creating a sleek, elongated feel. This format feels sophisticated and works well for businesses aiming to project an image of elegance and precision.
- Rounded Corners: A simple but incredibly effective tweak to the standard NZ business card size. Rounding off the corners softens the card's appearance, giving it a friendlier and more approachable vibe.
The biggest upside to a unique card is its "wow" factor. But there's a practical downside to consider: a non-standard shape might not fit neatly into a wallet or a standard cardholder, which means it could get lost or set aside.
Ultimately, it comes down to balancing memorability against convenience. If your brand identity is built on being unique and forward-thinking, a custom shape can be a powerful tool. It's a calculated risk, but one that can pay off by making your card—and by extension, your brand—genuinely unforgettable.
Common Questions About Printing Business Cards in NZ
Even with the main specs sorted, a few questions often pop up just before sending a design off to print. Getting these details right is the final step to ensuring your business cards look as professional in person as they do on your screen. Here are some quick answers to the most common queries we hear.
What Resolution Should My File Be?
For the best results, your design file must be set to 300 DPI (dots per inch). This is the industry standard for high-quality printing. Anything lower, and you risk your logo and text looking fuzzy or pixelated—a detail that can make or break a first impression.
Should I Use CMYK or RGB?
Always design and save your final print file in the CMYK colour model. CMYK (Cyan, Magenta, Yellow, Key/Black) is the four-colour process used by all professional printers. While your screen displays in RGB (Red, Green, Blue), printing in this mode can cause major colour shifts. Sticking to CMYK from the start ensures the colours you see on screen are the ones you get on the finished card.
Can I Make My Business Card Vertical?
Absolutely! A portrait-style card is a fantastic way to stand out from the stack. Just flip the standard dimensions. Your card will be 55mm wide by 90mm tall. All the other rules, including the bleed and safe area, apply in exactly the same way. It's a simple switch that gives your card a unique and memorable feel without complicating the printing process.
At SONI DESIGN, we specialise in turning your vision into a tangible reality with high-quality printing and design services. Let us help you create a business card that truly represents your brand. Start your project with us today!
Leave a Comment
Stay home & get your daily
needs from our shop
Start You'r Daily Shopping with Nest Mart