
Your cart is currently empty.

Ever found yourself wanting a t-shirt with a specific photo, a favourite quote, or a silly inside joke that you just can't find in stores? That's exactly where iron-on transfer paper comes in. It's a special type of paper that lets you print a design from your computer and press it directly onto fabric.
Essentially, it bridges the gap between your digital ideas and your wardrobe. All you need is a basic inkjet printer and a regular household iron to turn a plain piece of clothing into something completely unique.
How Does Iron-On Transfer Paper Actually Work?
Think of it as a high-tech sticker for fabric. The paper has a thin, heat-activated film on one side. When you print your design onto this film and apply heat, the adhesive melts and fuses with the fibres of the fabric, making your design a permanent part of the garment.
This simple but clever process puts the power of customisation in your hands. It’s perfect for making personalised gifts, creating team shirts, or even starting a small design business right from your kitchen table, no expensive screen-printing gear required.
The Science Behind the Bond
So, what’s happening when you press that hot iron down? It's all about heat, pressure, and time. A standard household iron can easily reach 180-200°C, which is the sweet spot for melting the polymer adhesive on the transfer paper. This heat effectively melts your printed image into the fabric's weave.
The Golden Rule: A successful, long-lasting transfer depends on getting three things right: enough heat, firm pressure, and the right amount of time. If you skimp on any one of these, you risk the design peeling, cracking, or fading after the first wash.
Getting a feel for this balance is the key to mastering the craft. It's less about just pressing and more about creating a solid, lasting bond between the design and the fabric.
This diagram breaks down the core components of the process.
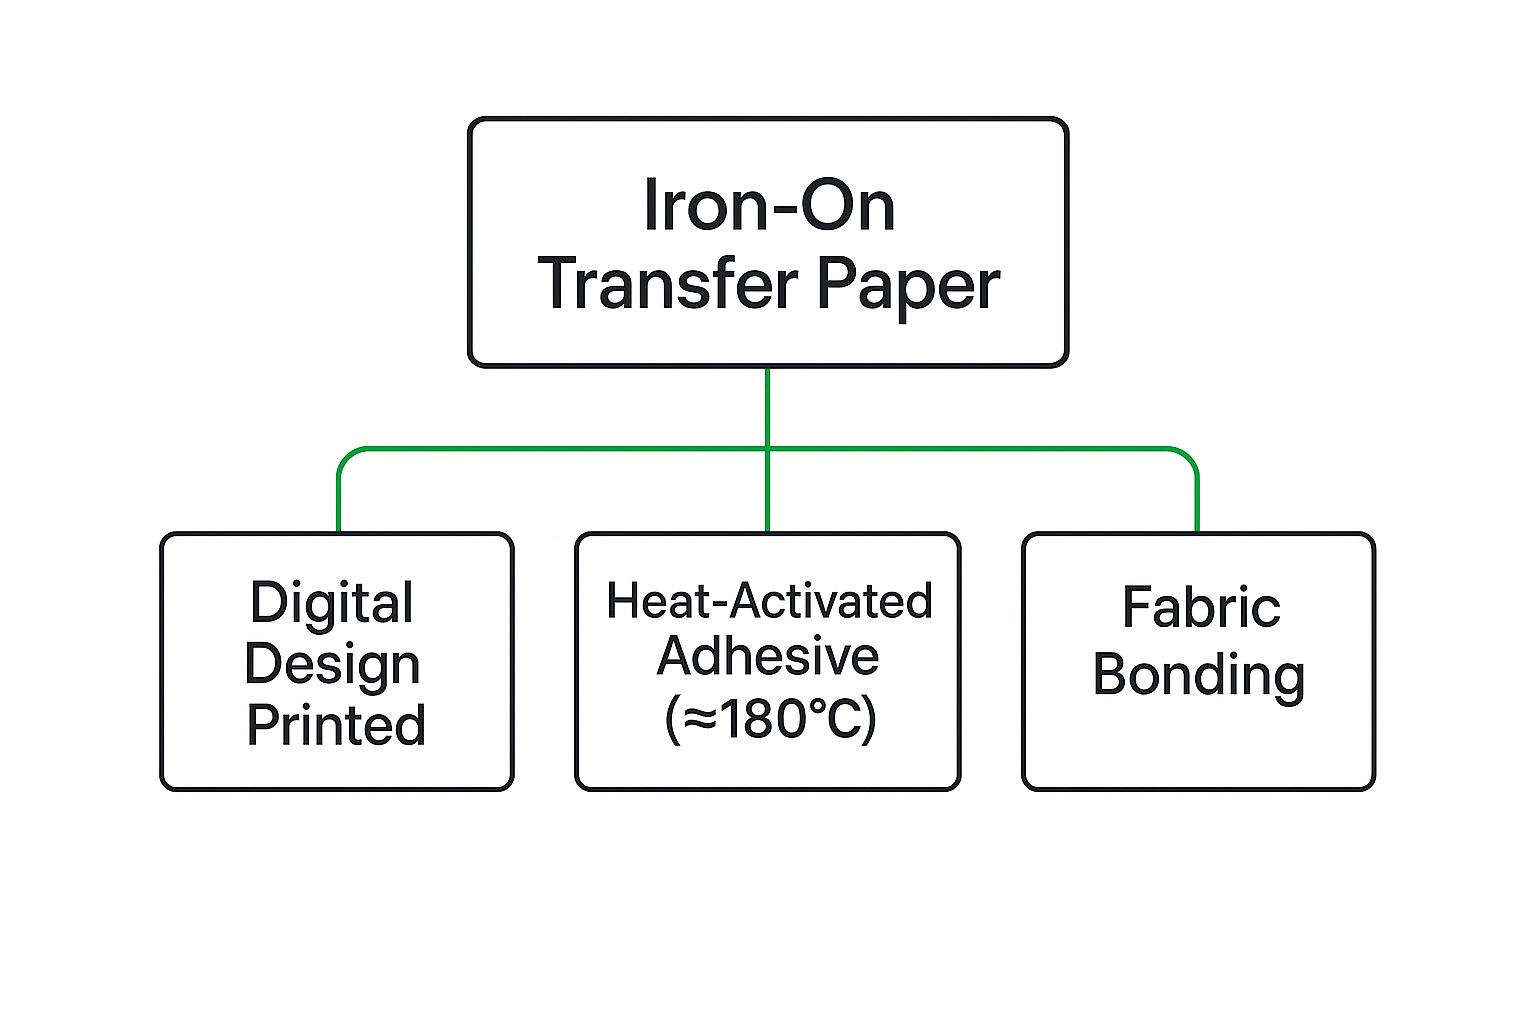
As you can see, it's a straightforward journey from digital file to finished product, with the transfer paper and a hot iron acting as the essential tools to make it happen.
Choosing the Right Paper for Your Project
Getting your project right from the get-go really boils down to one thing: picking the correct iron on transfer paper. It’s a bit like choosing the right paint for a wall. You wouldn't use indoor paint for an outdoor fence and expect it to last, would you? The same logic applies here. The right paper is the foundation for a design that not only looks brilliant but also survives the washing machine.
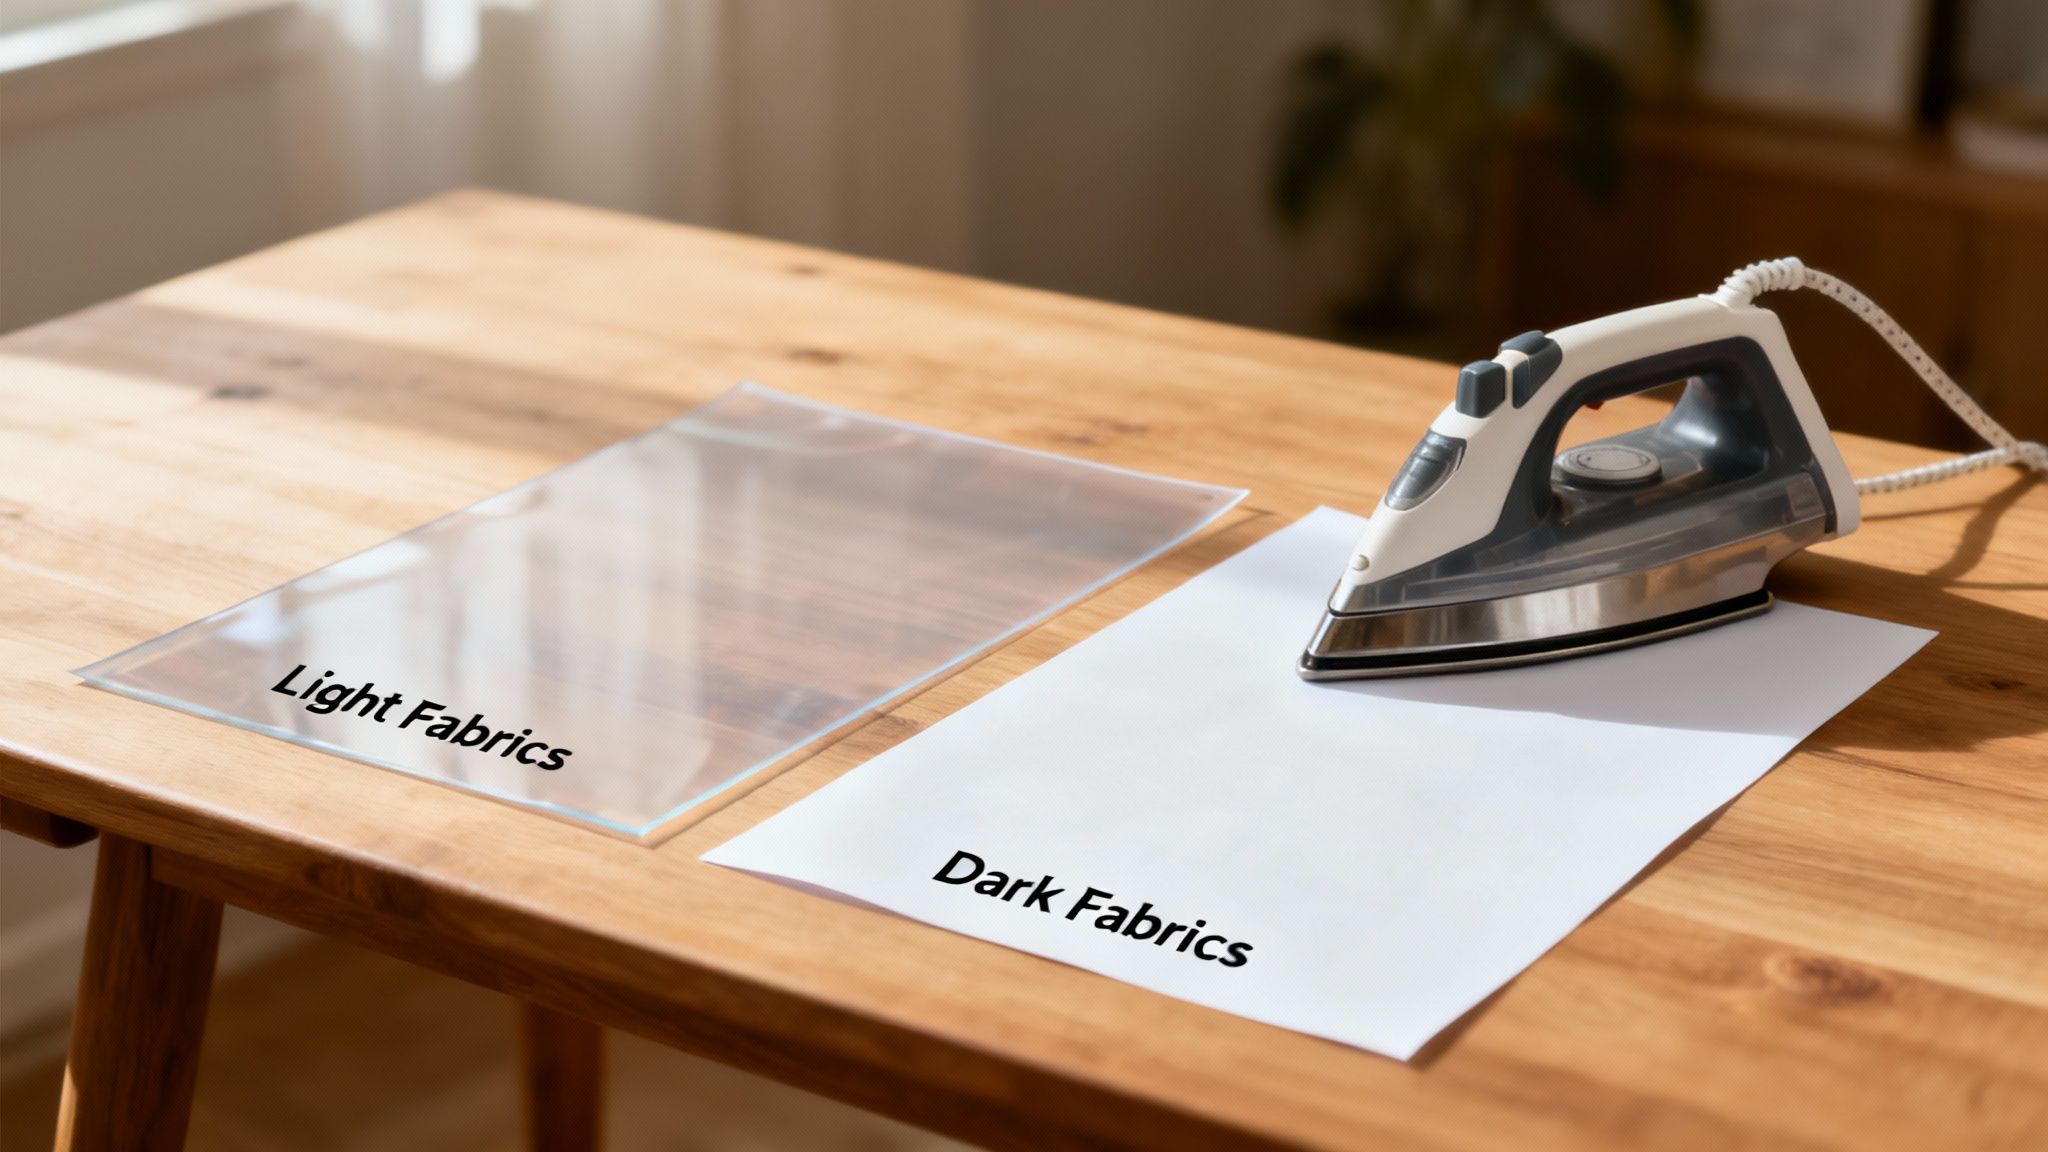
The first, and most crucial, fork in the road is the colour of your fabric. This single factor splits transfer papers into two very different categories, each designed to do a specific job.
H3: Light vs Dark Fabric Paper
If you're working with white, cream, pastels, or any light-coloured material, you'll want transfer paper for light fabrics. This type has a transparent polymer film. When you apply heat, any part of the paper you haven't printed on simply becomes clear, letting the fabric's own light colour show through. It’s designed to blend in beautifully.
Try using that same paper on a black or dark blue shirt, however, and your design will all but disappear. The dark fabric underneath will swallow the colours, turning your vibrant artwork into a muddy, barely visible smudge.
That’s where transfer paper for dark fabrics saves the day. This paper has an opaque, solid white background. Think of it as a built-in primer. This white layer goes down first, giving your inks a bright canvas to sit on so they pop, no matter how dark the garment is. The catch? You have to trim your design very carefully, because any leftover border will iron on as a noticeable white patch.
Key Takeaway: Choosing the paper type isn't just a friendly suggestion; it's a hard and fast rule. Light paper for light fabrics, dark paper for everything else. Getting this wrong is the number one reason first-time projects end in frustration.
H3: Inkjet vs Laser Printer Paper
The next piece of the puzzle is your printer. Are you using an inkjet or a laser printer? They work in completely different ways, and the paper is formulated specifically to match one type of technology.
- Inkjet Transfer Paper: This is what most at-home crafters will use. It’s made to absorb the tiny droplets of liquid ink from an inkjet printer, locking the colour in place without smudging or bleeding.
- Laser Transfer Paper: This paper is tougher, built to handle the intense heat from a laser printer's fuser. Its unique coating is designed to bond with toner—which is a fine powder—as it melts onto the surface.
Putting inkjet paper in a laser printer is a spectacularly bad idea. The heat can literally melt the paper's coating and fuse it to the inside of your machine, causing some very expensive damage. On the flip side, if you use laser paper in an inkjet, the liquid ink will just sit on the surface and smear, creating a blurry mess.
To help you make the right call at a glance, here’s a quick guide.
Transfer Paper Selection Guide
| Paper Type | Best For | How It Works | Key Consideration |
|---|---|---|---|
| Light Fabric Inkjet | White & light-coloured fabrics | Transparent film blends with the fabric colour. | Your design must be mirrored before printing. |
| Dark Fabric Inkjet | Black & dark-coloured fabrics | Opaque white base makes colours vibrant. | You must trim precisely around the design. |
| Light Fabric Laser | White & light-coloured fabrics | Special coating for toner; transparent finish. | Mirror your design; requires high heat. |
| Dark Fabric Laser | Black & dark-coloured fabrics | White base for toner; withstands high heat. | Trim carefully; no need to mirror the image. |
Choosing between these options ensures you have the right tool for the job, preventing common mistakes and guaranteeing a professional-looking result.
The desire for one-of-a-kind, personalised clothing isn't slowing down, which is what fuels the market for products like iron on transfer paper. Globally, the textile transfer paper market was valued at an impressive USD 871.6 billion in 2025 and is set to keep growing. While specific figures for New Zealand are harder to come by, these global market trends show a massive and expanding interest in DIY customisation everywhere.
Your Step-by-Step Application Guide
Alright, you’ve picked your paper, and now it’s time for the fun part—bringing your design to life. This is where the magic happens, turning a digital idea into something you can actually wear. Follow these steps closely, and you’ll end up with a professional-looking result that really lasts.
Step 1: Prepare and Print Your Design
Everything starts on your computer. Before you even think about printing, give your artwork a final once-over. Is it high-resolution? To avoid a blurry, pixelated mess, you'll want to aim for 300 DPI (dots per inch). This is the gold standard for sharp, clean prints.
Now for the most important part of this stage: mirroring. If you're working with iron-on transfer paper for light fabrics, you must flip your design horizontally before printing. Think of it like a temporary tattoo—you're placing it face-down, so the image has to be reversed to look right once it's transferred. If you're using paper for dark fabrics, you can skip this step since it's applied face-up.
Once the design is ready, load a single sheet of transfer paper into your printer. A few quick tweaks to your printer settings will make a huge difference.
- Paper Type: Look for a "T-Shirt Transfer," "Photo," or "Glossy" paper setting in your printer's menu.
- Print Quality: Crank it up to the highest setting, usually called "High" or "Best."
- Orientation: Double-check you've loaded the paper correctly so your masterpiece prints on the coated side, not the plain backing.
Print your design, then give the ink at least 10-15 minutes to dry completely. Don't rush this, or you'll risk smudging your hard work.
Step 2: Get Your Fabric and Workspace Ready
While the ink is setting, it's time to prep your fabric. Always start with a pre-washed garment, but be sure to skip the fabric softener. Softener leaves a chemical film on the fibres that can stop the transfer from sticking properly.
Next, set up your ironing station. You need a solid, heat-resistant surface, like a wooden table or a kitchen counter with a pillowcase laid over it. A standard ironing board is actually your enemy here—the padding and mesh surface will absorb all the pressure you need for a good bond.
Crank your iron up to the highest cotton setting and—this is critical—turn the steam function off. Steam is just moisture, and moisture will ruin the adhesive. Once the iron is hot, give the garment a quick press to smooth out any wrinkles and warm up the fabric, creating the perfect canvas for your design.
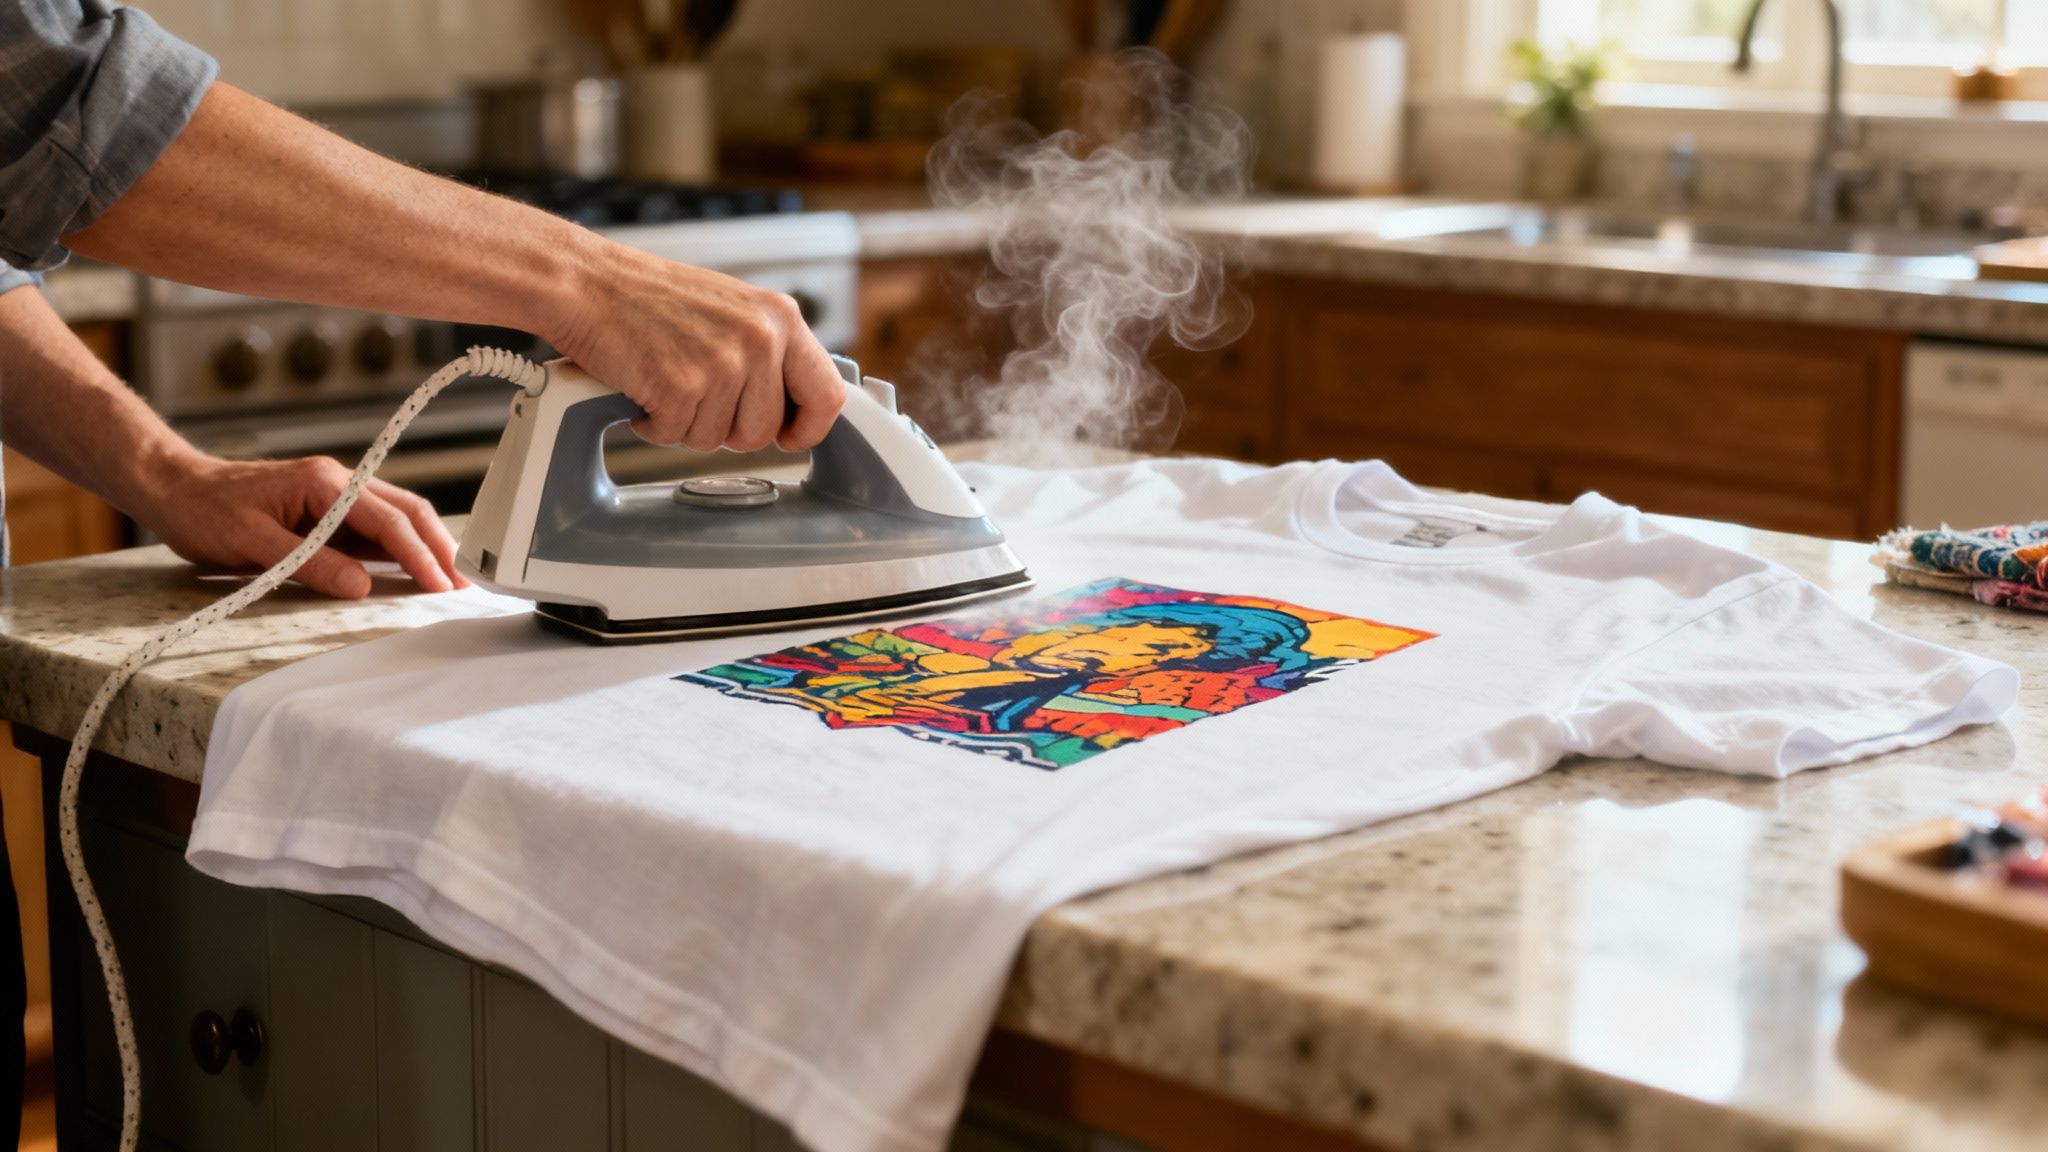
Step 3: Apply Heat and Pressure
With your design printed and your fabric prepped, it's go-time. If you're using paper for dark fabrics, carefully peel off the backing and place your design face-up on the shirt. For light fabric paper, you’ll place it face-down.
Pro Tip: When working with dark fabric paper, always place the included parchment paper (or a spare sheet of baking paper) over your design. This acts as a protective shield between the hot iron and the printed ink.
Now, bring the heat. Press down with firm, even pressure—don't be afraid to put your body weight into it! Instead of gliding the iron around like you're just getting rid of wrinkles, hold it in one spot for the recommended time (usually 15-30 seconds), then move to the next section with a slight overlap. Pay special attention to the edges and corners, as these are the first places to start peeling if they don't get enough heat.
Step 4: Cool and Peel for the Big Reveal
The final step all comes down to whether your paper is "hot peel" or "cold peel." Check the instructions that came with your paper, because getting this wrong can undo all your hard work.
- Hot Peel: Just like it sounds, you peel the backing paper off immediately while the transfer is still piping hot. We’re talking within seconds of lifting the iron.
- Cold Peel: You need to be patient. Let the transfer cool down completely to room temperature, which might take a few minutes. If you try to peel it while it’s still warm, the design could stretch, crack, or lift off entirely.
When you’re ready, peel the backing away in one smooth, steady motion. And there you have it—your custom-printed garment is complete! To make sure it stays looking great, wait at least 24 hours before its first wash. This gives the adhesive time to fully cure and bond with the fabric fibres, resulting in a durable finish you can be proud of.
Common Mistakes and How to Avoid Them
Even those of us who have been doing this for years can run into a bit of trouble. We’ve all been there. You follow the steps, but the final result is just… not right. Getting a perfect finish with iron-on transfer paper is a bit of a science, and a few small missteps can lead to some major frustration.
Let's walk through the most common pitfalls so you can sidestep them from the get-go.
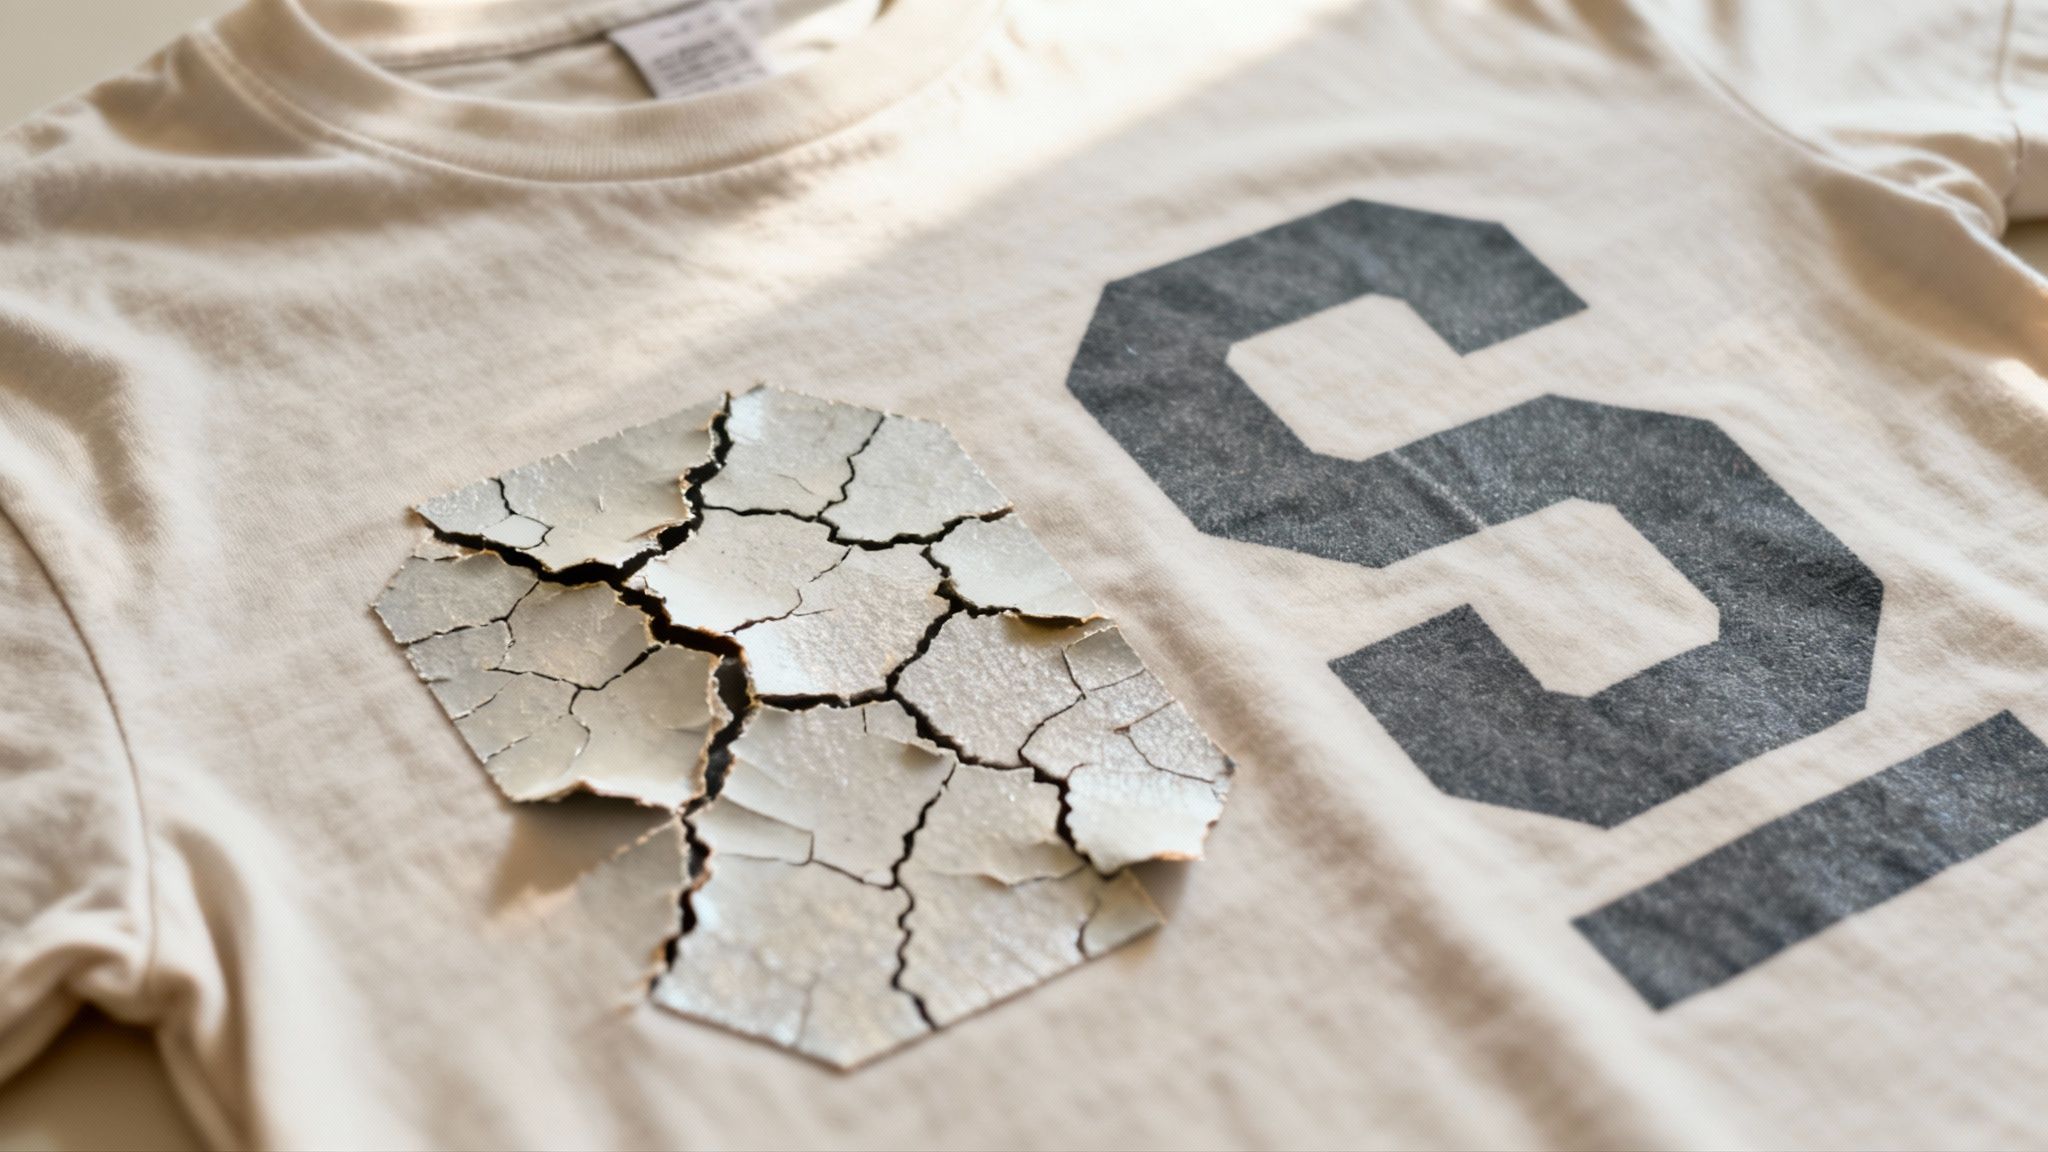
Diagnosing Peeling and Cracking Designs
The most heartbreaking issue? A design that looks amazing at first, only to crack and peel after its first trip through the wash. This is almost always down to one thing: a weak bond between the transfer and the fabric.
The problem usually lies in the application trifecta: heat, pressure, and time. If one of these is off, the transfer won't stick around for long.
- Insufficient Heat: Your iron needs to be hot. I'm talking about its highest setting. If it’s too cool, the adhesive only melts on the surface instead of properly fusing with the fabric fibres. That’s a recipe for a design that will lift right off.
- Uneven Pressure: You can’t just glide the iron back and forth like you’re pressing a shirt. You need to put your body weight into it, applying firm, even pressure. This is why a wobbly ironing board is your enemy; it absorbs all that effort. A solid table or countertop is a much better choice.
- Rushing the Process: I know it's tempting to speed things up, but every transfer paper has a recommended pressing time for a reason. Cutting this short, even by a few seconds, means the adhesive doesn’t get the chance to create that permanent, durable bond you're after.
Another common complaint is a blurry or faded image. This problem almost always starts at the printer, not with the iron. If you use "plain paper" settings, the printer simply won't lay down enough ink to create a rich, vibrant transfer.
The Enemy of Adhesion: Steam and Moisture
Whatever you do, never use the steam function on your iron. Even a tiny bit of moisture can completely ruin the adhesive's ability to bond with the fabric. Make sure the steam is switched off and the water reservoir is empty before you even think about starting.
Avoiding Colour and Quality Issues
Want your designs to look crisp and professional? A little prep work before you even hit "print" makes all the difference.
- Select the Right Print Quality: Always dive into your printer's settings and choose "Best" or "High Quality."
- Choose the Correct Paper Type: Tell your printer what you're working with. Selecting a setting like "Photo Paper" or "T-Shirt Transfer" signals it to use more ink for a saturated, brilliant result.
- Use High-Resolution Images: Rubbish in, rubbish out. Start with a high-quality image, ideally 300 DPI (dots per inch). A low-resolution file will look pixelated and fuzzy, no matter how perfect your application technique is.
The desire for unique, personalised gear is what drives this whole industry. In fact, the global heat transfer paper market was valued at around USD 550 million in 2023, with massive growth happening in the Asia-Pacific region. This boom in the craft and custom apparel world is definitely being felt right here in New Zealand. You can find more insights about this growing market on DataHorizzon Research.
Caring for Your Custom Printed Garments
You’ve done the hard work, your design is on, and your new custom garment looks amazing. So, how do you keep it that way? The secret to a long-lasting print isn't just in the application—it’s all in the aftercare. Get this part right, and you'll prevent your design from fading, cracking, or peeling away after a few trips through the laundry.
The most critical rule is simple: be patient. You absolutely must wait at least 24 hours before that first wash. This waiting period is non-negotiable, as it gives the heat-activated adhesive the time it needs to fully cure and properly bond with the fabric's fibres. Jumping the gun and washing it too soon will almost certainly weaken that bond before it has a chance to set.
Once that first day has passed, a few small changes to your laundry routine will make all the difference. Consistency is key here.
The Golden Rules of Washing
To protect your creation, you need to treat it with a bit more care than your average t-shirt. Think of the design as a delicate layer that needs shielding from the harshness of a typical wash cycle.
Here are the essential rules for washing any garment you've customised with iron on transfer paper:
- Turn It Inside Out: This is the easiest and most effective way to protect the design from rubbing against other clothes in the machine.
- Wash in Cold Water: Hot water is the enemy of your transfer. It can soften the adhesive and cause the colours to bleed or fade much faster. Cold water is always the safer bet.
- Use a Mild Detergent: Steer clear of harsh detergents, bleach, or fabric softeners. The chemicals in these products can attack the adhesive and break down the print over time.
Pro Tip: If you want your design to last as long as possible, skip the dryer. The intense heat from a machine dryer is the number one cause of cracking and peeling. Your best and safest option is to hang it up and let it air dry.
The appetite for DIY customisation is growing everywhere, and New Zealand is no exception. While specific data on iron-on paper is hard to find, the closely related thermal paper market was valued at USD 34.1 million in 2024. This figure gives us a hint of the strong local demand for creative printing solutions. You can dig into some of these adjacent market insights on Future Market Insights.
Frequently Asked Questions
When you're right in the middle of a project, that's always when the questions pop up. Getting a quick, clear answer is the key to keeping your creative momentum, so let's tackle some of the most common queries crafters have about iron on transfer paper.
Can I Use Iron On Transfer Paper on Any Fabric?
While it’s incredibly versatile, transfer paper isn’t a magic bullet for every material in your closet. It works best and creates the most durable designs on fabrics with a high cotton content, like 100% cotton or a good poly-cotton blend. The natural fibres in these materials are perfect for gripping onto the adhesive.
There are a few materials you’ll want to steer clear of, though:
- 100% Synthetic Fabrics: Materials like polyester, nylon, or spandex can be a real problem. The high heat needed for the transfer can easily melt or scorch them.
- Heavily Textured Materials: Think rib-knit, waffle weave, or coarse canvas. Their uneven surfaces prevent the transfer film from making full contact, which usually results in a patchy, incomplete bond that will start peeling in no time.
The Golden Rule for Fabric: When in doubt, do a quick test. Iron a tiny, unprinted corner of the transfer paper onto a hidden spot on your garment, like an inside hem. This little test will show you exactly how the fabric reacts to the heat before you commit to the full design.
Why Did My Design Crack After Washing?
This is easily the most frustrating thing that can happen, but the good news is that it's almost always preventable. When a design cracks, it's a sure sign of a weak bond between the transfer and the fabric—a bond that didn't form properly during the initial application.
It almost always comes down to a problem with one of these three critical elements:
- Not Enough Heat: Your iron needs to be on its absolute hottest setting, with the steam turned completely off. If it isn't hot enough, the adhesive won't melt properly and sink into the fabric fibres.
- Not Enough Pressure: A gentle press just won't cut it. You need to apply firm, even pressure using your body weight. This is why a sturdy table works so much better than a padded, wobbly ironing board.
- Not Enough Time: Skimping on the recommended ironing time, even by just 20-30 seconds, can lead to a bond that looks good at first but fails the moment it hits the wash.
What’s the Difference Between Hot Peel and Cold Peel?
This term simply tells you when to remove the paper backing after you've finished ironing. It's a crucial detail that changes between brands and types of iron on transfer paper, and getting it wrong can absolutely ruin your project.
- Hot Peel: This means you peel the backing paper off immediately, while the transfer is still piping hot (usually within 5-10 seconds of lifting the iron). This process tends to leave the design with a softer, more flexible feel that becomes part of the fabric.
- Cold Peel: This one requires a bit of patience. You have to let the garment and transfer cool down completely to room temperature before you even think about peeling the backing. This method often results in a slightly thicker, glossier finish.
Always, always double-check the instructions that came with your paper. Peeling a cold-peel paper while it's still hot will almost certainly stretch, distort, or pull your design right off the fabric.
At SONI DESIGN, we're passionate about helping you bring your creative visions to life with top-quality printing. Whether you're a business needing standout promotional gear or a crafter perfecting your next project, we have the tools and expertise to make it happen. Explore what we offer at our SONI DESIGN website and let's create something brilliant together.
Leave a Comment
Stay home & get your daily
needs from our shop
Start You'r Daily Shopping with Nest Mart