
Your cart is currently empty.

Double-sided foam tape is so much more than just another sticky roll. It’s a serious bonding solution that delivers strength, flexibility, and a clean finish that messy liquid glues and clunky fasteners just can't compete with. For businesses, it’s the invisible force holding together everything from retail displays to event signage.
Your Secret Weapon for a Flawless Finish
Forget about weak adhesives that give up under pressure or messy glues that ruin your surfaces. Double-sided foam tape is the unsung hero for businesses everywhere—from retail and hospitality to events and beyond. It’s the invisible workhorse that lets you confidently mount a stunning café sign to a textured brick wall or ensures your crucial fixtures stay put during a hectic trade show.
The easiest way to understand its power is to think of it like a sandwich. The foam in the middle is the "carrier," which gives the tape its thickness, cushioning, and flexibility. On either side of that foam is a layer of powerful adhesive, ready to grab onto different surfaces. A simple peel-away liner protects the sticky stuff until you’re ready to go. This basic structure is the key to its unique problem-solving abilities.
More Than Just Sticking Things Together
What really sets foam tape apart from flat tapes or liquid adhesives is how it handles real-world imperfections. Its conformable foam core creates an incredibly strong bond even on irregular or mismatched surfaces, filling in all the tiny gaps to ensure complete contact. This makes it perfect for mounting things on surfaces that are never perfectly smooth, like painted drywall, textured wallpaper, or raw wood.
But that unique structure brings a few other game-changing benefits to the table:
- Vibration Dampening: The foam core is brilliant at absorbing minor vibrations. This is a huge deal if you're mounting items on machinery, vehicles, or even just walls in high-traffic areas where things get bumped. It stops the bond from slowly weakening over time.
- Stress Distribution: Instead of concentrating all the weight on one or two points like a screw or nail would, the tape spreads the load evenly across its entire surface area. This massively reduces the risk of damaging the surface you’re mounting to.
- Sealing Properties: Many foam tapes use closed-cell materials, which create a tight barrier against moisture, dust, and air. This makes them great for sealing gaps around windows and doors or for any job that needs to stand up to the elements outdoors.
By swapping out traditional fasteners for foam tape, you don’t just get a cleaner, more professional look—you also get to skip drilling holes. You preserve the integrity of your walls and surfaces, speed up installation, and save a ton of time and labour.
At the end of the day, this isn't just about adhesion; it's about reliable performance. Whether you're a café owner hanging a new menu, a real estate agent putting up "For Sale" signs, or a hotel manager mounting décor, this tape gives you a dependable and aesthetically pleasing solution. It lets you bring your creative and commercial visions to life with confidence, knowing the bond is secure, clean, and built to last.
Choosing the Right Foam and Adhesive Combination
Picking the right double-sided foam tape is a bit like choosing the right tool for a job. You wouldn't use a tiny hammer to break up concrete, and you certainly wouldn't use an industrial-strength tape for a temporary display that needs to come down cleanly. The real secret to success is matching the foam carrier and the adhesive to the specific demands of your project.
It’s easy to think all foam tapes are the same, but that’s far from the truth. Understanding the core components is the first step to making a smart choice. The foam itself, known as the carrier, is what gives the tape its flexibility, cushioning, and ability to stand up to the elements. The adhesive, on the other hand, is all about the bond—its strength, temperature range, and how well it grips different surfaces.
This diagram breaks down the simple but effective structure of double-sided foam tape, showing how the protective liner, adhesive, and foam core work together.
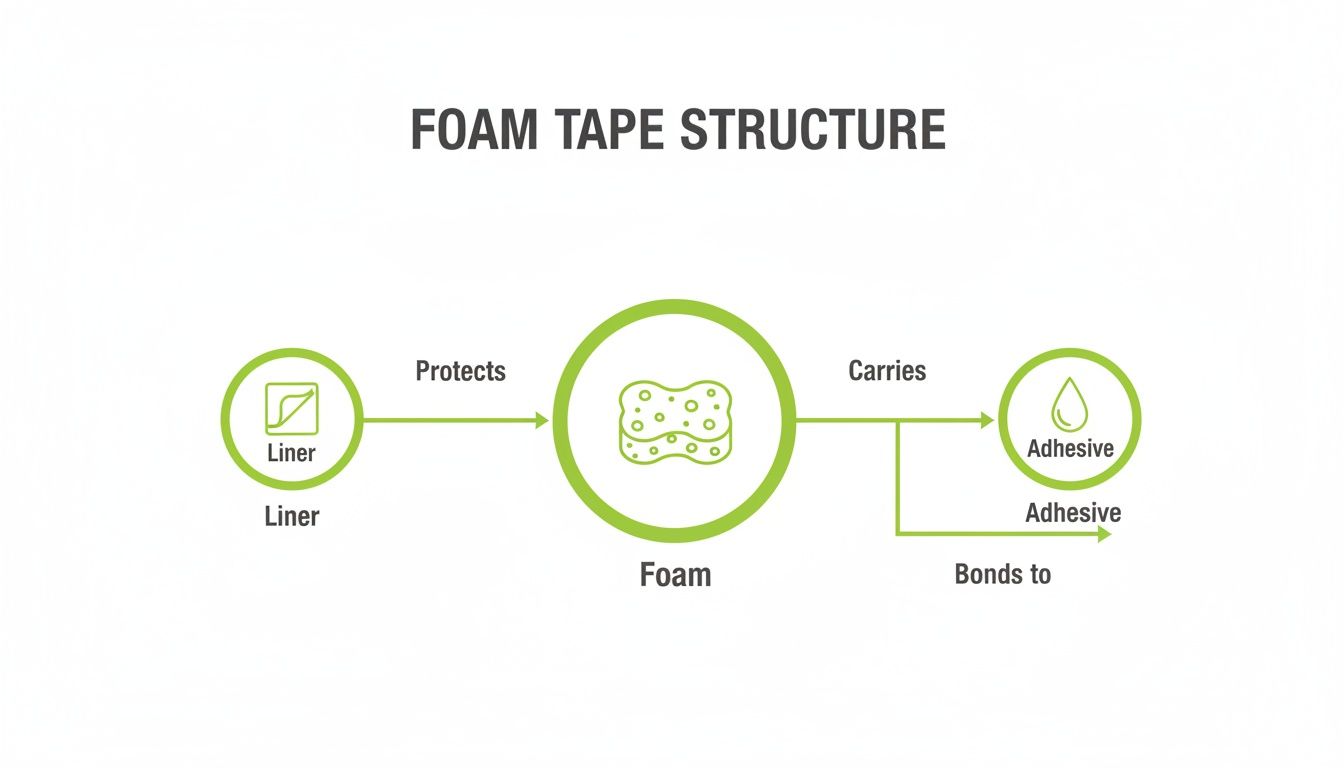
This layered construction is precisely what gives the tape its unique power to bond, seal, and cushion all at once. By swapping out the materials for each layer, manufacturers can create tapes that are fine-tuned for very specific jobs.
Understanding Foam Carrier Types
The foam carrier is the heart of the tape, giving it its substance and physical properties. You'll mainly come across three common materials: polyethylene, acrylic, and vinyl. Each has its own set of strengths.
-
Polyethylene (PE) Foam: Think of PE foam as the versatile all-rounder. It's a cost-effective, closed-cell foam that conforms well to surfaces and offers good resistance to moisture and chemicals. It’s an excellent choice for general-purpose mounting, like putting up interior signage, assembling point-of-purchase displays, or attaching decorative trim.
-
Acrylic Foam: This is the heavy-lifter in the foam tape world. Acrylic foam carriers deliver superior strength, durability, and fantastic resistance to extreme temperatures and UV light. This makes them the go-to for tough, long-term jobs, such as mounting heavy signs outdoors or bonding architectural panels that need to last.
-
Vinyl (PVC) Foam: Vinyl foam finds a nice balance between flexibility and strength. It's highly conformable, which makes it perfect for creating tight seals against air, dust, and light, especially on irregular surfaces. You'll often see it used for gasketing in window and door installations or for providing cushioning in electronic devices.
Decoding Adhesive Systems
The adhesive is every bit as critical as the foam. The two main types you'll find on double-sided foam tape are rubber-based and acrylic-based adhesives.
Your choice of adhesive directly impacts the bond's longevity, its performance in different temperatures, and its suitability for various materials. An acrylic adhesive might be essential for a permanent outdoor sign, while a rubber-based one could be perfect for temporary event graphics that need to be removed cleanly.
A rubber-based adhesive typically offers a high initial tack, meaning it grabs on quickly and aggressively. This is incredibly useful for fast-paced assembly lines or for applications where you need an immediate, strong hold. The trade-off is that rubber adhesives generally have lower resistance to high temperatures and UV exposure, making them a better fit for indoor use.
Acrylic adhesives, in contrast, build up their bond strength over time, often taking 24-72 hours to reach their full potential. What they lack in that initial grab, they more than make up for in long-term performance. They boast excellent resistance to temperature extremes, chemicals, and UV light, ensuring a durable bond that can last for years, even in harsh outdoor conditions.
The growing demand for these durable solutions is clear in market trends. The global double-sided tape market, valued at around USD 8.3 billion, is projected to hit USD 12.5 billion by 2031. The foam-backed segment is leading the charge in revenue share, largely thanks to its superior cushioning properties. For a deeper dive, you can explore more data on this market growth trend.
Getting the right combination of foam and adhesive ensures your double-sided foam tape won’t just stick—it will perform exactly as you need it to, delivering a secure, reliable bond that truly stands the test of time.
Translating Tech Specs into Real-World Performance
Ever tried to read a technical data sheet for double-sided foam tape? It can feel like deciphering a foreign language, packed with numbers and industry jargon that don't immediately tell you what you need to know. But getting to grips with these specs is the secret to choosing a tape that performs flawlessly for your job, whether you're mounting a sign on a café's brick wall or securing fixtures in a hotel.
Let's translate the most important specs into practical, real-world terms. Think of this as your decoder ring for data sheets, helping you connect the numbers to how the tape will actually behave once it’s out of the roll and on the job.
Tape Thickness and Its Role in Gap Filling
The thickness of a foam tape, usually measured in millimetres (mm), is one of its most critical features. This isn't just about how chunky the tape feels; it directly affects its ability to conform to different surfaces.
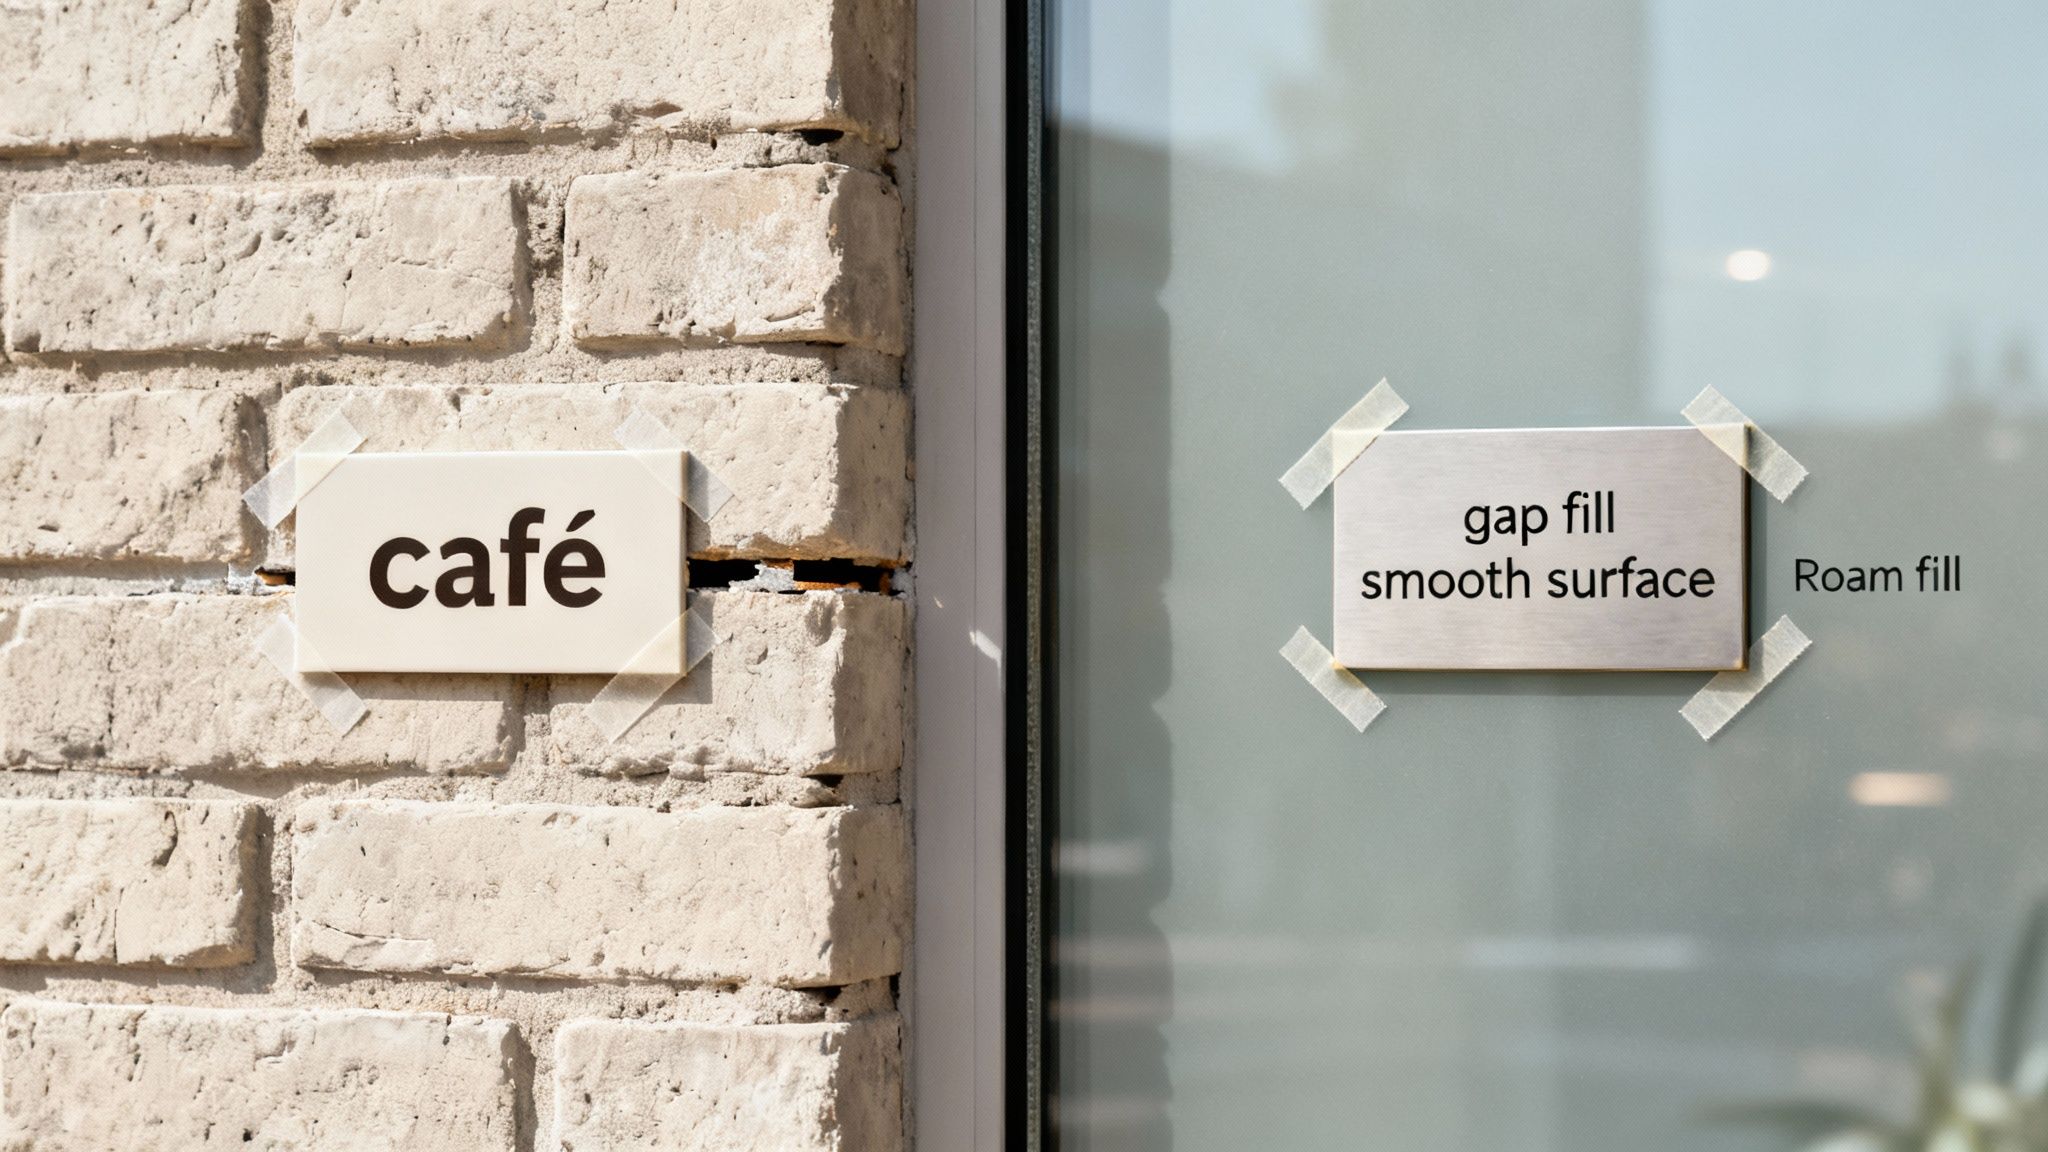
Imagine trying to stick a sign to a rough, textured brick wall. A thin, flat tape would only grab the high points of the brick, leading to a weak, unreliable bond. This is where a thicker double-sided foam tape shines. It compresses into the low spots and fills the gaps, ensuring the adhesive makes 100% contact with the surface for a seriously strong grip.
- Thin Tapes (e.g., 0.8mm): These are your go-to for smooth, flat surfaces like glass, polished metal, or high-gloss plastics. They give you a sleek, low-profile finish.
- Thicker Tapes (e.g., 1.6mm or more): Absolutely essential for irregular, textured, or mismatched surfaces like brick, unpainted wood, or concrete. The extra foam provides the cushioning needed to create a solid bond.
Understanding Tape Density
Density tells you how much foam material is packed into a given space, often measured in kilograms per cubic metre (kg/m³). In simple terms, it's about how firm or soft the foam is and how well it will resist being squashed.
A lower-density foam is softer and more conformable, which makes it brilliant for filling gaps or creating seals against dust and moisture on uneven surfaces. On the other hand, a higher-density foam is firmer and more rigid. It has greater internal strength and is much better suited for heavy-duty applications where the tape needs to support a significant load without compressing over time.
According to research from Fact.MR, the market for this tape is projected to hit USD 22.1 billion by 2034. This steady growth shows just how much businesses are relying on these specialised tapes for demanding jobs where failure isn't an option.
Deciphering Strength Ratings
This is where things can get a bit confusing because strength is measured in a few different ways. The two most common ratings you'll come across are shear strength and tensile strength.
Shear Strength vs. Tensile Strength Analogy:
Picture a poster taped to a wall. Shear strength is the force that stops the poster from sliding down the wall. Tensile strength is the force that stops someone from pulling the poster straight off the wall, away from the surface.
Shear strength measures the tape’s ability to resist parallel forces—that sliding or slipping motion. It's a critical spec for mounting anything vertically, as it's the force that defies gravity. High shear strength means your sign, mirror, or dispenser will stay exactly where you put it.
Tensile strength (also known as peel adhesion) measures the force required to pull the tape directly away from a surface. This tells you how resistant the tape is to being lifted or peeled off. High tensile strength is vital for applications where the bonded object might get bumped or be subjected to lifting forces.
Once you understand these key specs, you can move beyond guesswork. You’ll be able to confidently read a data sheet and choose the perfect double-sided foam tape with the right thickness, density, and strength to make your project a success.
Matching Your Tape to Any Surface for a Perfect Bond
The success of any mounting job comes down to one critical factor: the surface. You could have the strongest foam tape in the world, but if it’s not the right match for the material you’re sticking it to, you’re basically setting yourself up for failure. A lasting bond isn't just about the tape; it’s about creating a perfect partnership between the adhesive and the substrate.
Understanding your surface is always the first step. Think about trying to stick something to a rain-slicker versus a piece of untreated wood. The tape will grab onto the wood instantly, but it will struggle to get a grip on that slick, water-repellent plastic. This simple difference is all about a concept called surface energy.
High Energy vs. Low Energy Surfaces
Without getting lost in the science, surface energy just describes how easily an adhesive can "wet out"—or spread across—a material to form a solid bond.
-
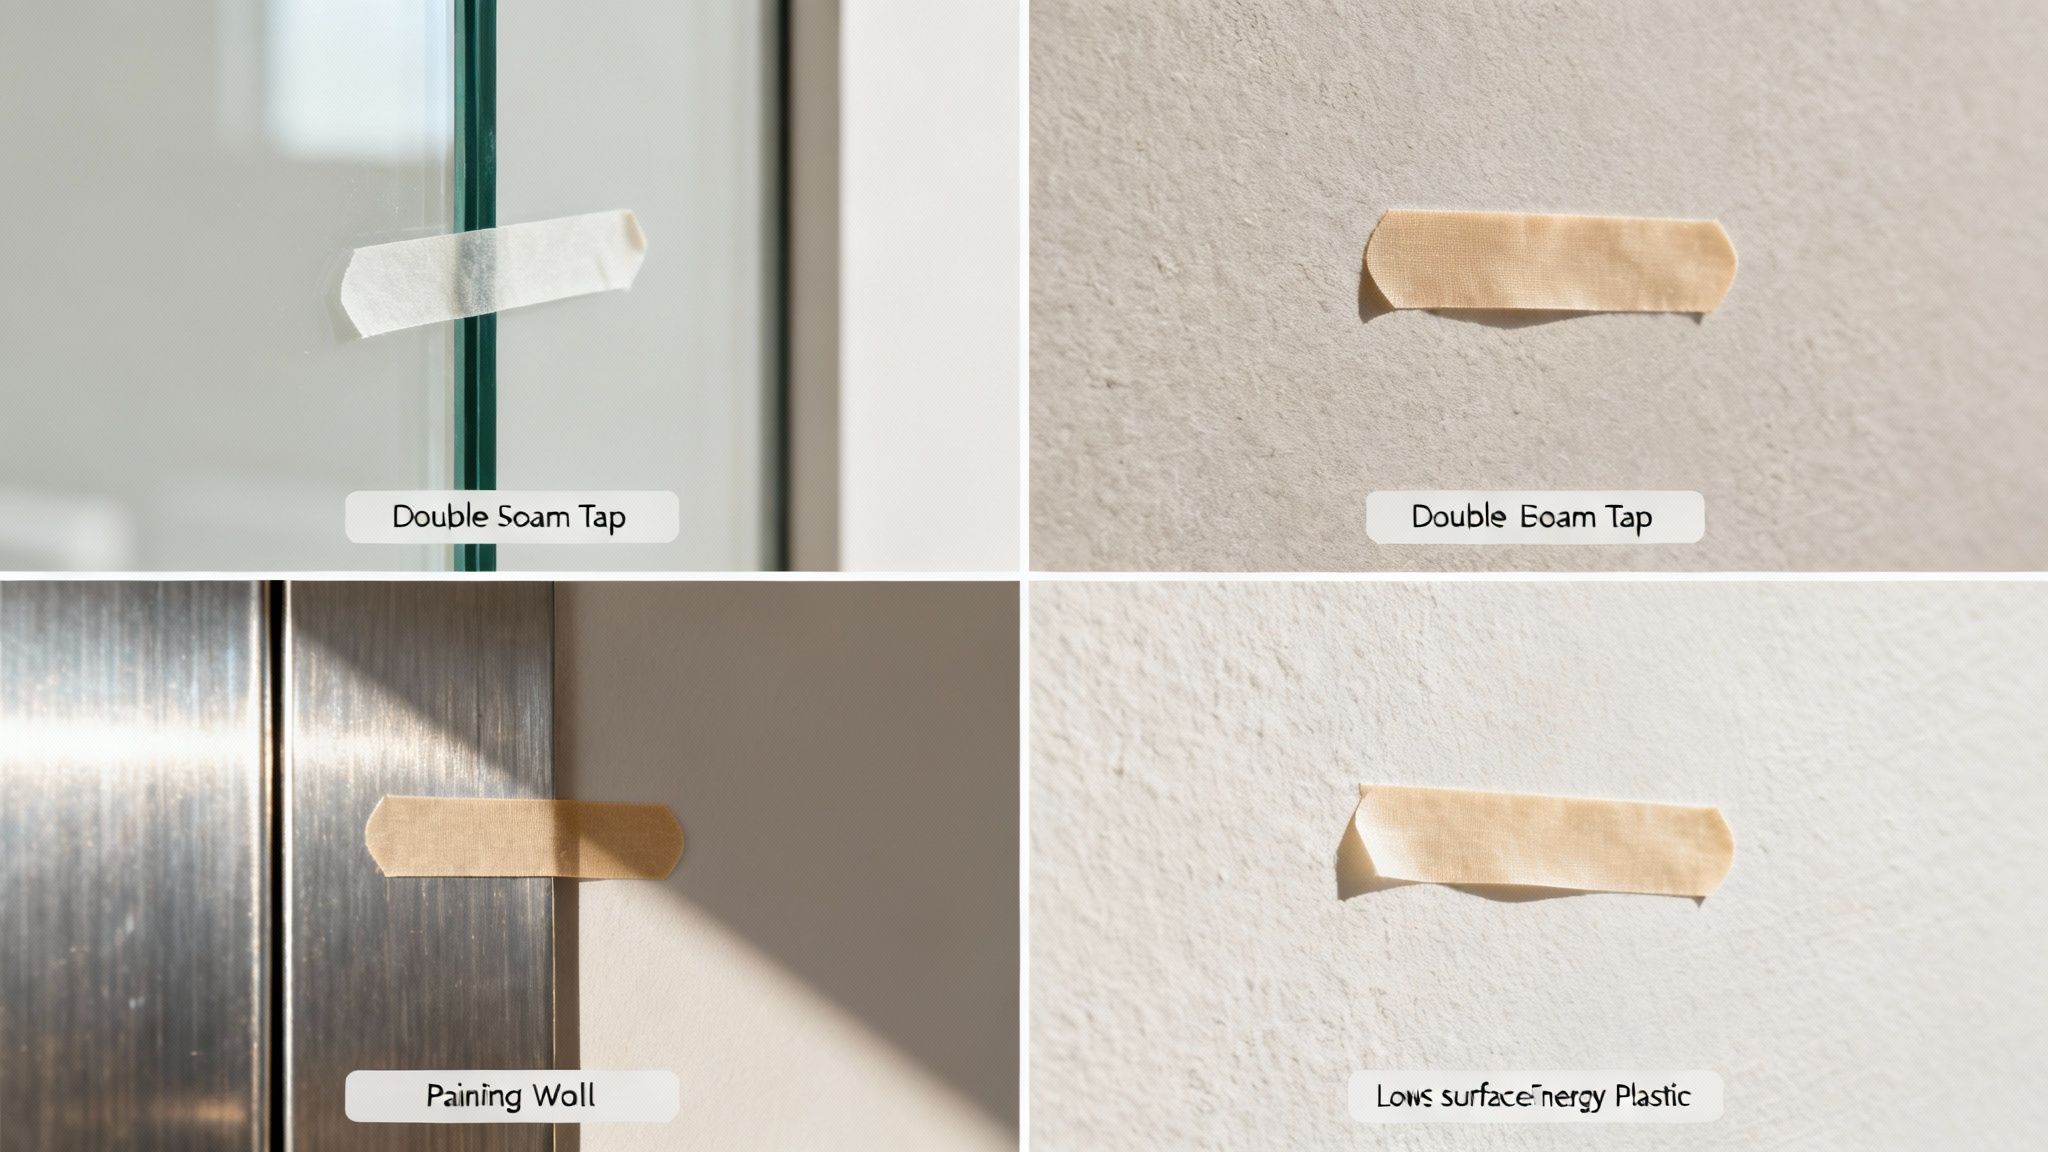
High Surface Energy (HSE) Materials: These are the easy ones. Materials like glass, raw metal (like aluminium), and untreated wood are very receptive to adhesives. The adhesive can flow across them easily, creating a powerful, uniform bond with minimal fuss.
-
Low Surface Energy (LSE) Materials: These surfaces are the tricky ones. They’re slick and repellent, making it difficult for standard adhesives to get a proper grip. Common culprits include plastics like polyethylene (think plastic containers) and polypropylene (often used in car parts and packaging).
For these challenging LSE plastics, you need a specialised double-sided foam tape. The adhesive must be specifically formulated to bond to them. Using a general-purpose tape on these surfaces is one of the most common reasons for bond failure.
Choosing the right tape for the surface is non-negotiable. It’s like using the right key for a lock; the wrong one might fit, but it will never turn. A specialised LSE-bonding tape ensures you get a secure connection on even the most difficult plastics.
This understanding is vital for businesses here in New Zealand. The Asia-Pacific foam tape market is experiencing accelerated growth, driven by manufacturing and e-commerce. Local Kiwi businesses in retail, hospitality, and design can take advantage by adopting the right foam tape solutions for everything from packaging to signage, helping them stay competitive. You can dig deeper into the regional foam tape market trends to get the full picture.
Your Pre-Application Surface Checklist
Before you even think about peeling the liner off the tape, running through a quick mental checklist can save you a world of frustration. Answering these simple questions will point you directly to the perfect tape for your project, whether you're mounting real estate signs, installing hotel décor, or affixing dispensers in a healthcare setting.
Ask yourself the following:
- What’s the surface material? Is it glass, metal, wood, drywall, or a type of plastic? This will tell you if a standard tape will do the job or if you need one designed for LSE surfaces.
- Is the surface smooth or textured? A rough, porous, or uneven surface like brick or unpainted wood needs a thicker foam tape to fill in the gaps and guarantee full contact.
- Will it be indoors or outdoors? Outdoor applications demand a tape with excellent resistance to UV light, temperature changes, and moisture. An acrylic foam tape is usually your best bet here.
- How much weight will it hold? Always check the tape's weight rating. For heavy items like large mirrors or signs, you’ll need a high-strength acrylic foam tape and enough surface area to support the load safely.
- Is the bond permanent or temporary? For permanent installations, a high-bond acrylic adhesive is ideal. For temporary displays or event signage, look for a tape with a rubber-based adhesive that offers clean removability.
By taking a few moments to properly assess the surface and the job's requirements, you move from hoping the bond will hold to knowing it will. This deliberate approach is what ensures a professional result, every single time.
A Step-by-Step Guide to Flawless Application
Getting a professional, long-lasting bond isn’t about luck; it’s all about technique. Even the strongest double-sided foam tape will fail if it’s not applied correctly. This guide will walk you through the process, step by step, to make sure every application is a success—from prep work to the final press.
If you follow these best practices, you'll sidestep the common pitfalls and create bonds that are not only strong and reliable but also look fantastic.
We'll break this down into three key phases: preparing the surface, applying the tape, and the all-important curing period. Skipping any of these can weaken the bond, so each one deserves proper attention.
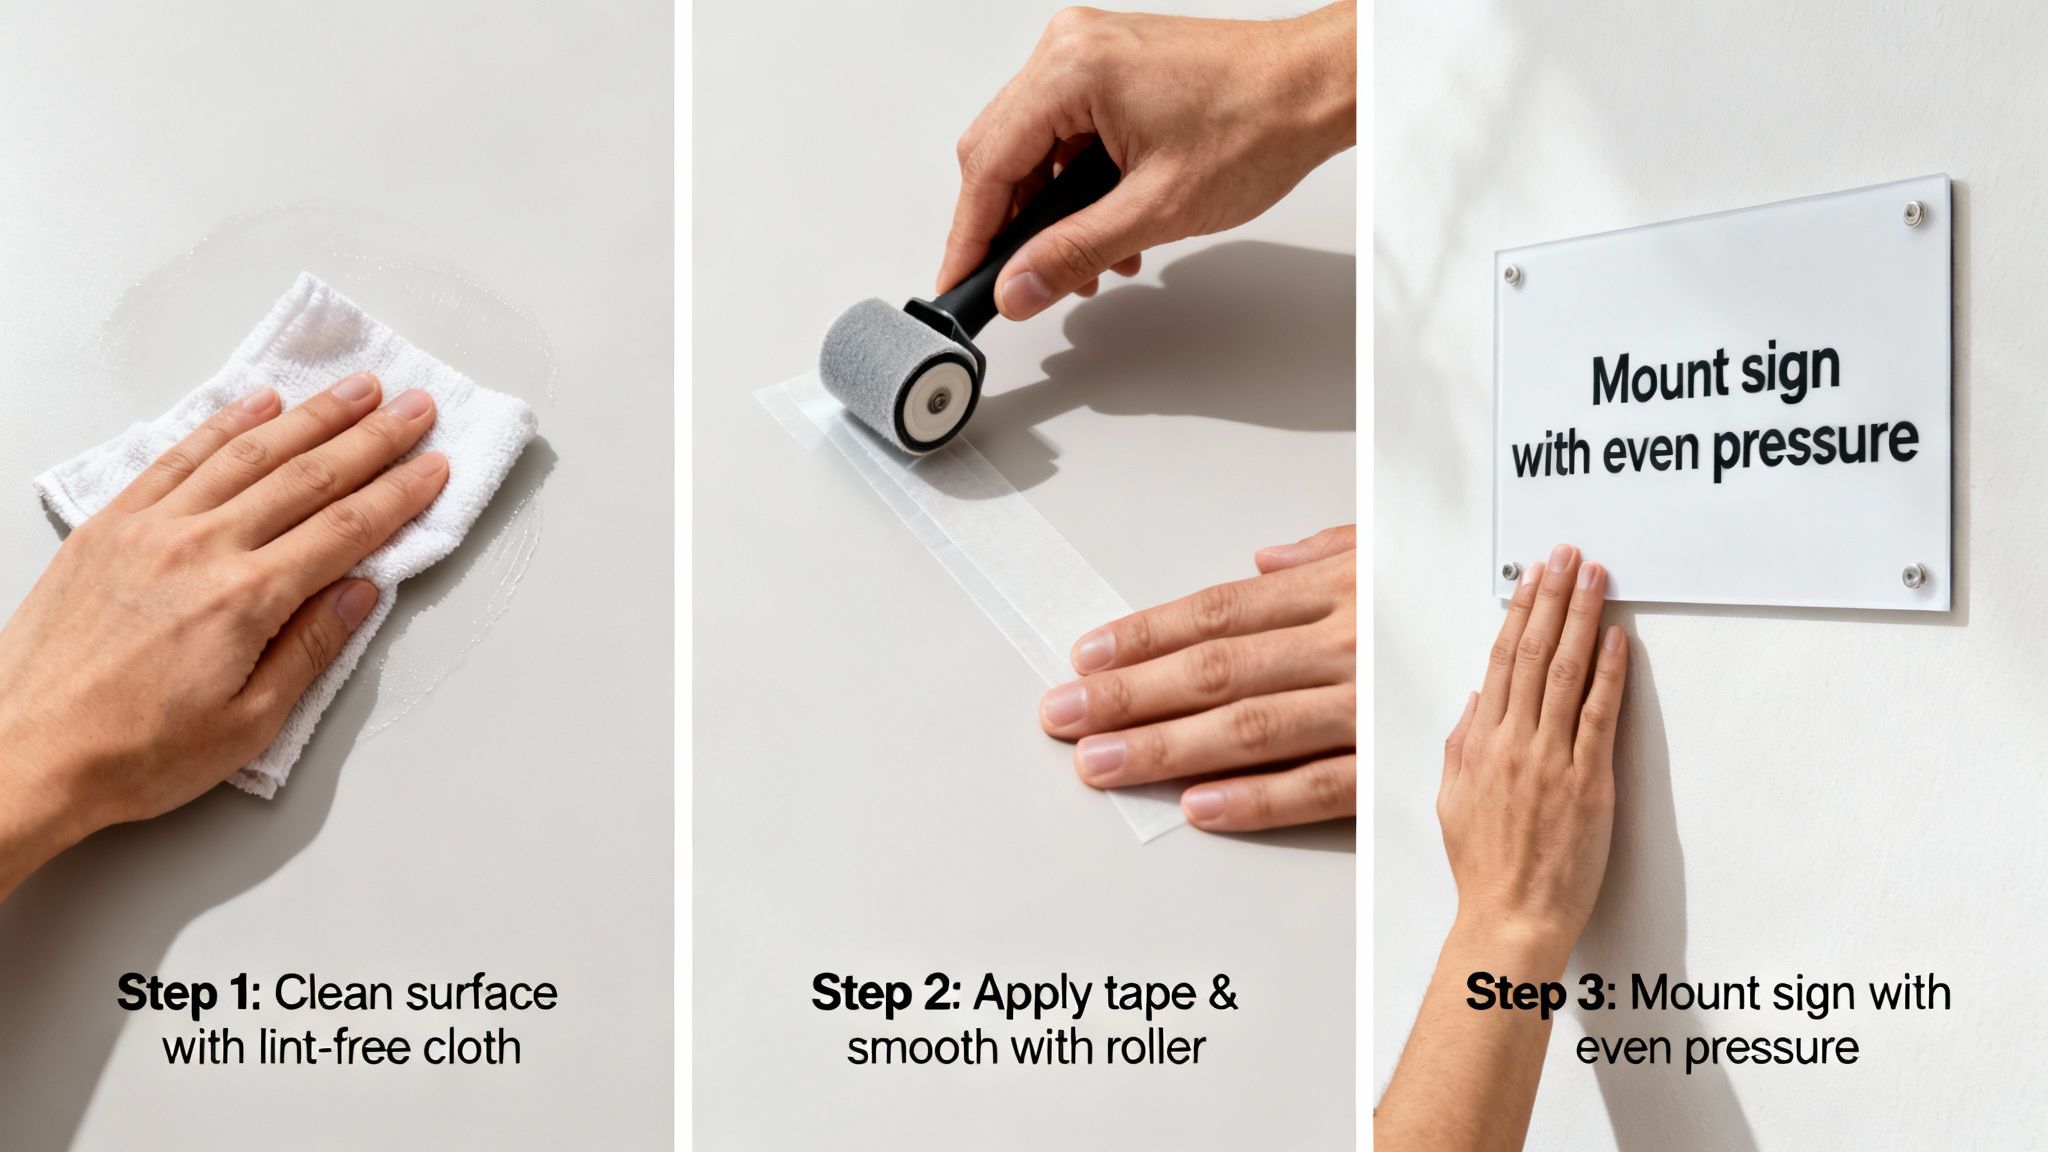
Step 1: Prepare Your Surfaces for a Perfect Grip
Honestly, this is the most critical stage and where most applications go wrong. An adhesive can only stick to the surface it touches. If that surface is covered in dust, grease, or moisture, you’re just bonding the tape to the dirt, not the wall itself.
Start by giving both surfaces a thorough clean. The industry go-to is a 50/50 mix of isopropyl alcohol (IPA) and water. It cuts through oils and grime without leaving any film behind. Steer clear of household cleaners, as many contain silicones or soaps that will sabotage the adhesion.
Once clean, make sure both surfaces are completely dry. Any leftover moisture will stop the adhesive from getting a proper grip. Finally, aim for an application temperature between 21°C and 38°C. If you’re working in the cold, gently warming the surfaces with a heat gun or hairdryer can make a world of difference to the tape's initial grab.
Step 2: Apply the Tape with Firm, Even Pressure
With your surfaces clean, dry, and at a good temperature, it's time to apply the tape. A good pro-tip is to apply the foam tape to the item you’re mounting first (like the back of a sign), not the wall. It just gives you more control.
Cut your tape to size, but whatever you do, don't stretch it. Stretching the foam creates tension, which can slowly pull the bond apart over time.
The secret to a pressure-sensitive adhesive is, well, pressure. The bond truly forms when the adhesive flows into and "wets out" the surface. Applying firm, even pressure is what makes this happen, creating the strongest connection possible.
Use a small J-roller, a squeegee, or even your thumb to press down firmly across the entire length of the tape. You’re aiming for at least 1 kg per square centimetre of pressure. This simple action forces the adhesive into all the microscopic nooks and crannies of the surface, maximising contact. Only after you’ve done this should you peel off the protective liner on the other side.
Step 3: Let the Bond Cure and Build Strength
Many high-performance adhesives, especially the acrylic ones, need a bit of time to reach their full potential. The tape will feel sticky straight away, but the final, permanent bond develops as the adhesive settles and cures.
For most acrylic foam tapes, you can expect the bond to hit about 50% of its ultimate strength in 20 minutes, 90% after 24 hours, and 100% after a full 72 hours. It’s crucial to avoid putting any real stress or weight on the bond during this time. A little patience here pays off in a bond that lasts for years.
How to Remove Foam Tape Without Damaging Surfaces
If the time comes to remove the tape, the right method depends on the adhesive. For simpler rubber-based adhesives, you can often just gently peel the tape back on itself at a sharp angle.
For those tough, permanent acrylic adhesives, just yanking it off is a recipe for damaged paint and plaster. Instead, grab a hairdryer and use some gentle heat to soften the adhesive first. Then, you can use a plastic scraper or even slide a piece of dental floss behind it to slowly work the tape free. Any sticky residue left behind can usually be cleaned up with a citrus-based cleaner or a bit more IPA. This careful approach will help keep your walls and objects looking pristine.
Getting to the Bottom of Foam Tape Troubles
Even with the best prep work, sometimes a mounting project just doesn't go to plan. When your double-sided foam tape isn't holding up, it’s rarely the tape itself that’s to blame. More often than not, it comes down to one of a few common issues that are surprisingly easy to fix.
Getting to the root cause is the first step. Once you know what you're dealing with, you can find a straightforward solution and get your project looking professional and secure.
Why Isn't My Foam Tape Sticking?
This is the big one—the problem we all dread. You’ve applied the tape, but it feels weak right from the start or gives way almost instantly. Before you start questioning the product, let's run through the usual suspects.
-
Sneaky Surface Contaminants: A surface might look perfectly clean to the naked eye, but it could be hiding a micro-thin layer of dust, oil, or even residue from a cleaning spray. This invisible barrier stops the adhesive from getting a proper grip. The industry-standard solution is a quick, thorough wipe-down with a 50/50 mix of isopropyl alcohol and water.
-
Tricky Low-Energy Plastics: If you're trying to stick something to a slick, smooth plastic like polyethylene or polypropylene, a standard tape will struggle. These are known as Low Surface Energy (LSE) materials, and they need a special kind of love. You'll need to find a foam tape with an adhesive specifically designed to bond with these surfaces.
-
Not Enough Elbow Grease: These are pressure-sensitive adhesives for a reason—they need a good, firm press to work their magic. This initial pressure forces the adhesive to flow into the microscopic peaks and valleys of the surface, a process called "wetting out." Use a J-roller or just firm thumb pressure across the entire length of the tape to activate the bond properly.
The demand for high-performance bonding solutions is only getting bigger. The global market for double-coated foam tape, currently valued at USD 11.9 billion, is expected to nearly double, reaching USD 22.1 billion by 2034. This boom means more specialised tapes are hitting the market every day, so there's a solution for almost any challenge. You can dig into more details about this expanding market on Fact.MR.
What Makes a Good Bond Fail Later On?
This one can be even more frustrating. The bond seems rock-solid for days, weeks, or even months, and then one day, it just lets go. This kind of delayed failure usually points to an ongoing stressor, either from the environment or a simple application oversight.
A bond that fails over time is often a sign of ongoing stress on the adhesive. This could be environmental, like extreme temperature swings, or mechanical, like constant vibration or an improperly matched tape for the weight of the object.
Here’s what to look for:
-
Temperature Trouble: Was the tape applied when it was too cold or hot? Most adhesives perform best when applied in a specific temperature range, usually somewhere between 21°C and 38°C. Applying tape outside this sweet spot can stop the bond from ever reaching its full potential.
-
The Wrong Tape for the Job: It might sound obvious, but using an indoor tape for an outdoor sign is a classic mistake. Constant exposure to UV light, moisture, and big temperature swings will break down the adhesive over time. Always double-check that the tape’s specs match the environment it will live in.
-
Bearing Too Much Weight: Every tape is rated to hold a certain amount of weight. If your object is heavier than the tape can handle, gravity will eventually win the battle. When you’re not sure, it’s always safer to be generous and add a bit more tape than you think you need. Spreading the load is key.
Got Questions About Foam Tape? We've Got Answers
When you're in the middle of a project, the last thing you want is for your adhesive to let you down. It’s natural to have questions, so we’ve put together some straight answers to the most common queries we hear about double-sided foam tape.
Can I Stick Foam Tape on Wallpaper or a Freshly Painted Wall?
Putting foam tape on wallpaper is almost always a bad idea. The adhesive is designed to grab on tight, which means when it comes time for removal, it will likely take a chunk of your wallpaper with it. It’s a recipe for a repair job you didn't plan on.
As for newly painted walls, the single most important word is patience. Paint needs time to fully cure—not just dry to the touch. This can take anywhere from a few days to several weeks. If you apply tape too soon, you're sticking it to a soft layer of paint, not the solid wall beneath. The tape will almost certainly peel the paint right off when you try to move it.
How Much Weight Can This Stuff Actually Hold?
This is a "how long is a piece of string" kind of question because the answer varies wildly. It all comes down to the type of tape, its thickness, and how much of it you use. High-performance acrylic foam tapes are the heavy lifters of the group, sometimes rated to hold several kilograms per square centimetre.
But remember, those ratings are based on perfect lab conditions—think ultra-clean, smooth, non-porous surfaces. Always check the product's technical data sheet for the official numbers. For anything heavy or precious, like a big sign or a mirror, our advice is to over-engineer it. Use more tape than you think you need. It’s a simple way to build in a safety margin and give yourself peace of mind.
The key difference lies in the foam's internal structure. For nearly all mounting, sealing, or gasketing jobs, especially those exposed to the elements, closed-cell foam is the superior and more reliable option.
What’s the Difference Between Open-Cell and Closed-Cell Foam Tape?
Getting your head around this is vital for picking the right tape for the job.
- Open-Cell Foam: Picture a kitchen sponge. Its cells are all connected, so air and water can pass right through. This makes it really soft and compressible, but it also means it will soak up moisture. That's why it's a poor choice for anything outdoors or in damp spots like a bathroom.
- Closed-Cell Foam: Now, imagine a collection of tiny, sealed balloons all packed together. That's closed-cell foam. Each cell is a self-contained unit, making the structure resistant to water, air, and dust. It creates a fantastic environmental seal, which is why polyethylene and PVC foams are the go-to for most mounting and gasketing work.
Ready to tackle your next project with confidence? SONI DESIGN offers a wide range of high-quality adhesive solutions perfect for bringing your vision to life. Explore our products today!
Leave a Comment
Stay home & get your daily
needs from our shop
Start You'r Daily Shopping with Nest Mart