
Your cart is currently empty.

When you search for "document printing near me," it's easy to get lost in the options. But finding a great local partner is worth the effort. Think of it like this: you could go to a big chain coffee shop, or you could go to the local spot where they know your name and exactly how you like your flat white. That’s the difference a local printer makes—you get faster service, expert advice, and a personal touch that makes sure your project is in safe hands.
How to Find the Right Local Printer for Your Needs
Picking a local print shop isn’t just about proximity; it’s about finding a true partner who gets what you’re trying to achieve. Maybe you’re a real estate agent who needs stunning, glossy brochures, or a café owner dreaming up a new menu. The right printer can turn your simple documents into something special—a real marketing tool. It’s about looking beyond the price tag.
Evaluate Their Portfolio and Expertise
The first thing you should do is check out their previous work. A solid portfolio is more than just a gallery; it’s their resume. You can instantly see the quality of their printing and finishing.
Does their style match what you have in mind? A printer who excels at massive banners and outdoor signage might not be the best choice for delicate, intricate wedding invitations. Look for someone whose expertise aligns with your industry. For instance, businesses in hospitality and entertainment really benefit from a printer with local knowledge. As of February 2025, New Zealand has a fantastic network of printing businesses, meaning local companies can easily find an expert right around the corner to bring their ideas to life.
Check Their Online Presence and Reviews
Customer reviews are your best friend during this search. When you're looking up a local printer, how easily you find them often comes down to how well they optimize their Google Business Profile to connect with their community. Look for consistent, positive feedback on Google, Facebook, and other local directories.
Reviews are goldmines for finding out the important stuff:
- Customer Service: Were they friendly, quick to respond, and generally easy to deal with?
- Print Quality: Did the final product look as good as promised, or even better?
- Turnaround Times: Did they hit their deadlines without any drama?
A printer with a strong online presence and glowing reviews is a pretty good sign you're dealing with a professional, reliable business. Think of it as the modern-day word-of-mouth referral.
By taking the time to look at their work, read what other customers are saying, and understand what they offer, you're laying the groundwork for a great partnership. This is how you find a local expert like SONI DESIGN who will handle your project with the precision and care it deserves.
Understanding Your Printing Technology Options
When you start searching for "document printing near me," you’ll quickly realise not all printers are the same. The technology behind the scenes plays a huge role in your project's cost, turnaround time, and the final look and feel of the finished product. To get it right, you really need to understand the two main options on the table: digital and offset printing.
Think of digital printing as your high-powered, professional-grade desktop printer. It takes a digital file—like a PDF—and prints it directly onto paper. It’s incredibly fast and flexible, especially for smaller jobs.
On the other hand, offset printing is the traditional workhorse of the printing world. This method involves transferring ink from custom-made metal plates to a rubber roller, which then presses the image onto the paper. The setup is a bit more involved, but for large runs, it’s an absolute machine of efficiency.
Digital Printing for Speed and Flexibility
If you need something done fast or want to personalise each copy, digital is almost always the answer. There are no plates to make, so the setup is practically non-existent. This makes it perfect for those last-minute projects or when you only need a handful of prints.
One of its biggest strengths is variable data printing. Let's say you're printing 200 invitations, and each one needs a different guest's name. With digital, that’s easy and affordable to do. Trying that with offset would be a nightmare.
- Best for: Small quantities, like 50 custom event posters or 100 menus for a local cafe.
- Key Feature: Perfect for anything needing personalisation, such as direct mail campaigns or individually named certificates.
- Turnaround: Way faster than offset. We’re often talking same-day or next-day service.
Offset Printing for Volume and Value
When you’re printing in bulk and need every single piece to be flawlessly consistent, offset printing is your go-to. Yes, the initial setup costs more because of the plate-making process, but your price per print drops significantly as you increase the quantity.
This is how you get that razor-sharp quality and perfect colour consistency across thousands of copies. It’s the undisputed champ for big marketing campaigns, company catalogues, and any publication where your brand’s reputation is on the line.
For example, if you’re printing 10,000 corporate brochures for a nationwide launch, offset ensures the first one off the press looks identical to the last. That level of consistency is non-negotiable for professional branding.
Choosing Between Digital and Offset Printing
To make it even clearer, here’s a quick comparison to help you decide which printing method is best for your specific document needs.
| Feature | Digital Printing | Offset Printing |
|---|---|---|
| Best for | Small to medium quantities | Large quantities |
| Cost | Lower setup cost, higher per-unit cost | Higher setup cost, lower per-unit cost |
| Turnaround | Fast (often same-day) | Slower (requires plate production) |
| Personalisation | Excellent (variable data) | Not practical |
| Colour | Good consistency | Superior consistency and accuracy |
| Paper Stock | Wide variety, some limitations | Widest range of papers and finishes |
Ultimately, digital is your sprinter—fast and agile for short distances. Offset is your marathon runner—built for endurance and consistency over the long haul.
This flowchart can also help you visualise the key steps in picking the right local printing partner based on what your project actually needs.
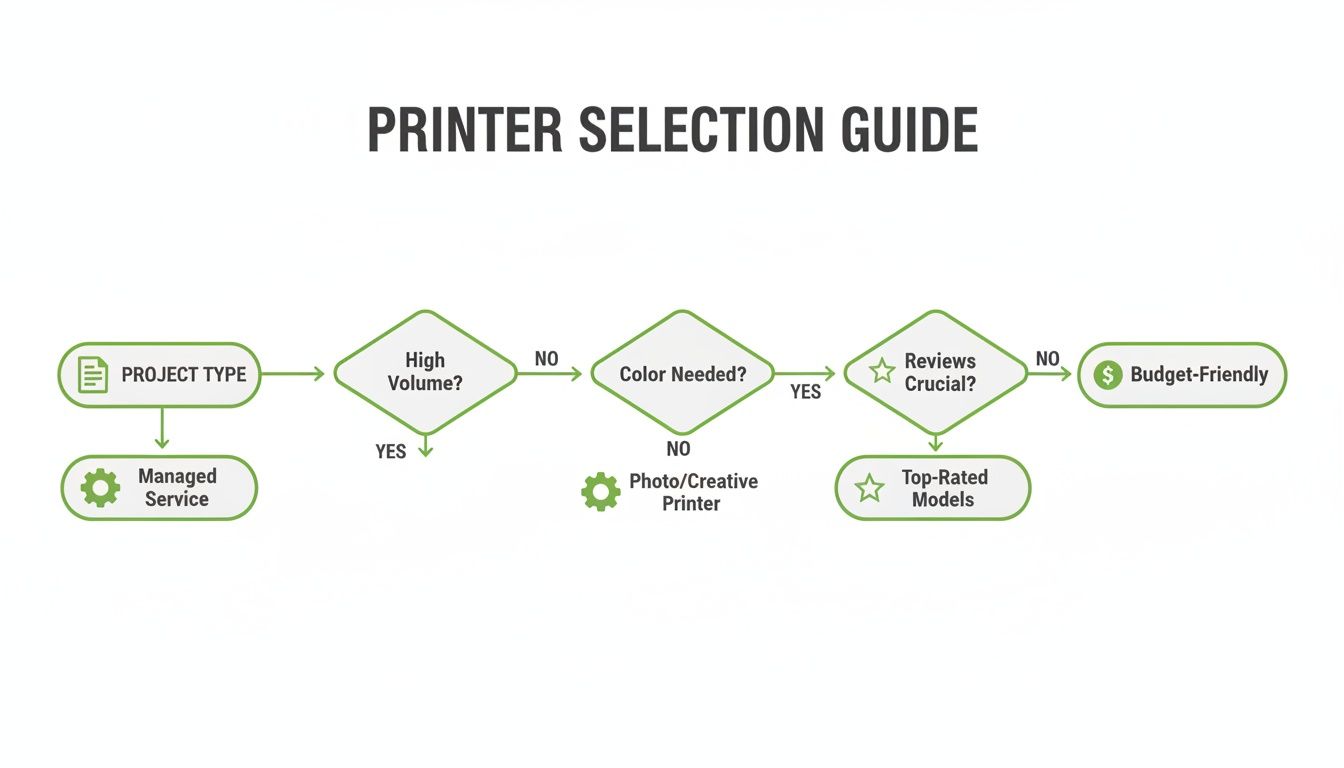
As you can see, it all starts with defining your project. From there, you can explore the services offered by different printers and, finally, check their reputation and reviews to make sure they’re the right fit.
Getting Your Files Ready for a Flawless Print

Handing over a print-ready file is the best thing you can do to make sure your project turns out exactly as you envisioned. Think of it like giving a builder a detailed blueprint instead of a quick sketch on a napkin. The clearer your instructions, the better the final result.
Getting this right saves everyone time, money, and potential headaches. While some of the terms might sound a bit technical, they're really just the industry standards for getting great quality. Let's walk through the big three you need to know: resolution, colour mode, and bleed.
Resolution: The Key to Crisp, Sharp Images
Resolution is all about the clarity of your images. We measure it in DPI, which stands for Dots Per Inch. For something you see on a screen, 72 DPI is perfectly fine, but when it comes to professional printing, 300 DPI is the gold standard.
Here’s a simple way to picture it. Imagine you're making a mosaic. A 72 DPI image is like using big, chunky tiles – it looks okay from far away, but up close, it’s blocky and you can see all the jagged edges. A 300 DPI image, on the other hand, uses tiny, tightly packed tiles to create a smooth, high-definition picture that looks sharp even when you’re holding it.
One crucial tip: always start your design at 300 DPI. You can't magically add detail that was never there in the first place, so trying to enlarge a low-resolution image will just make it blurry. A high-quality file from the get-go is the best insurance against a fuzzy final print.
Colour Mode: Making Sure Screen Colours Match Paper
Ever printed something and found the colours looked a bit... off? That's usually down to the colour mode. Your computer screen creates colours using RGB (Red, Green, Blue) light, but printers use CMYK (Cyan, Magenta, Yellow, Black) ink to mix colours on paper.
The range of colours that RGB light can produce is much wider than what CMYK inks can replicate, especially with super-bright, vibrant shades. To avoid any nasty surprises, it's best to design and save your files in CMYK mode right from the start. This gives you a much more accurate preview of how the colours will actually look when they’re printed.
Bleed: The Secret to Professional Edge-to-Edge Colour
If your design has colour or images that run right to the edge of the page, you absolutely need to include a bleed. A bleed is simply a small extra margin of your design—usually 3mm on each side—that extends beyond where the paper will be trimmed.
Why is this so important?
- It stops ugly white borders. Paper can shift a tiny fraction of a millimetre during the high-speed trimming process.
- It gives a polished, professional finish. That extra 3mm gives the printer a small margin for error, ensuring the ink goes right to the very edge without any slivers of unprinted paper showing.
Forgetting to add a bleed is a common mistake that can leave your finished product with thin, unprofessional-looking white lines around the edges. When you're finalising your files, you’ll also want to look into other details like image format considerations for print, as file types can also affect the final quality.
Nail these three things—resolution, colour, and bleed—and you'll be giving us the perfect recipe for a stunning print job every single time.
Breaking Down Printing Costs and Timelines
Figuring out how much a print job will cost and how long it will take can feel a bit like a guessing game. But it’s really more like ordering a custom-built table – the final price tag and delivery date all come down to the materials you pick, how complex the design is, and how many you need. Printing works on the exact same logic.
A few key things will always shape the quote you get. The biggest one? Quantity. Printing is all about economies of scale. Getting the press set up and ready to go is the most involved part of the process. Once it’s running, the cost for each individual item plummets. That’s why printing 1,000 brochures is so much cheaper per piece than printing just 100.
What Really Affects Your Final Price
Beyond just the number of copies, a few other choices you make will have a big impact on the final bill. Every decision adds another step to the production line, and that's reflected in the cost. It pays to think about these things when you're planning your project.
- Paper Choice: Your standard office paper is the budget-friendly option. But if you want to make an impression with a thick, glossy cardstock or a fancy textured paper, that's going to add to the cost. The paper's weight (we measure it in GSM) and its finish—like matte, silk, or gloss—are the main drivers here.
- Colour vs. Black and White: This one’s pretty straightforward. A full-colour print job uses four different inks (CMYK) and is naturally more expensive than a black and white one, which only needs one.
- Finishing Touches: Anything we do after the printing is done adds to the job. Think laminating, binding, folding, or cutting unique shapes. Each of these requires extra time, materials, and machinery.
- How Fast You Need It: If you need something done yesterday, we can often make it happen, but it will usually come with a rush fee. The best way to keep costs down is to plan ahead and allow for a standard turnaround time.
When you understand these factors, you’re in the driver’s seat. You can make smart trade-offs between your vision and your budget. For instance, you might decide a heavier, more premium paper stock will give you more bang for your buck than a complicated, custom fold.
Planning for a Realistic Timeline
Just like the cost, the time it takes to get your job done can vary wildly. A quick run of black-and-white flyers might be ready for you in a day. On the other hand, a big order of perfect-bound books could easily take a week or more, simply because there are so many steps involved – printing, letting the ink dry properly, and then the actual binding process.
It’s also helpful to know what’s happening in the wider industry. The New Zealand printing sector has seen some shifts, with a projected market size of $1.4 billion in 2025 after a recent dip. In this kind of climate, it’s more important than ever to work with a printer who is both reliable and efficient, like us here at SONI DESIGN. We’ve focused our business on modern, cost-effective digital and offset printing methods to give our clients the best value. You can read a bit more about the trends in the NZ printing market if you're interested.
Whenever you search for "document printing near me" and ask for a quote, make sure you also ask for an estimated timeline. Any good printer will give you a clear schedule so you can plan your marketing launch or event prep without any last-minute panic. If you're upfront about your deadline from the get-go, we can make sure we hit it, every single time.
Elevating Your Project with Binding and Finishing
The final touches are what transform a simple stack of printed pages into something professional, polished, and ready for action. Binding and finishing aren't just afterthoughts; they’re essential for adding durability, making your document easy to use, and showing your audience you care about quality.
Think of it like this: the printing itself is the main meal, but the finishing is the presentation that makes it truly impressive. These details are often what people notice first, and they can completely change how your document feels in their hands.
Choosing the Right Binding Method
How you bind your document all comes down to what it’s for. Each style has a different look, feel, and sturdiness, so it’s important to pick the one that fits your project. A great local printer can walk you through the options, but here’s a quick rundown.
- Saddle-Stitching: This is a straightforward method where staples are placed along the spine, just like in a magazine. It’s perfect for smaller documents like booklets, event programmes, and catalogues because it lies flat and is very cost-effective.
- Spiral Binding (Coil Binding): A durable plastic coil is wound through a series of punched holes, allowing the document to lay completely flat or even fold back on itself. This makes it a fantastic choice for training manuals, notebooks, and presentations that will be used over and over.
- Perfect Binding: This technique uses a strong but flexible adhesive to glue the pages to the spine, creating a clean, squared-off look like a paperback book. It offers a premium, professional finish that’s ideal for annual reports, portfolios, and high-end lookbooks.
Picking the right binding isn't just about looks—it's about function. It directly influences how your audience will interact with your material. A well-bound manual is a breeze to use, while a perfectly bound report projects authority before anyone even reads the first page.
Adding Polish with Finishing Techniques
Finishing techniques are where you can really add that "wow" factor. They not only add visual flair but also protect your documents, making them more engaging and able to withstand wear and tear.
For instance, lamination adds a protective plastic film, which is a lifesaver for items that get handled a lot, like restaurant menus or price lists. It makes them spill-resistant and easy to wipe clean.
Another great option is a UV coating. You can apply it across the whole surface for a high-gloss shine or use a spot UV to make specific elements—like your logo or a key headline—pop. The contrast between a matte finish and a glossy accent creates a fantastic tactile and visual effect. And for something truly unique, die-cutting lets you create custom shapes for business cards or brochures that are impossible to ignore.
Why Partner with SONI DESIGN for Your Printing?
Choosing a printer isn’t just about getting the best price. It’s about finding a partner who is just as invested in your project’s success as you are. Here at SONI DESIGN, we don’t just put ink on paper; we’re a passionate, family-run team dedicated to bringing your vision to life with real care and creativity.
Our whole approach is built on understanding what you’re trying to achieve. We take the time to learn about your story, your goals, and who you’re trying to reach. This lets us work right alongside you, making sure the finished product isn't just correct, but truly exceptional. For us, every project is a chance to build a genuine connection.
A Partnership Built on Passion and Precision
Whether you’re after eye-catching signage, vibrant marketing materials, or some unique promotional items, we are meticulous about the details. We’ll guide you through the entire process, from picking the perfect paper stock to choosing those final finishing touches that will make your brand pop. It’s this hands-on, collaborative way of working that guarantees a result you’ll be proud of.
When you look for "document printing near me," you deserve more than a faceless service. You deserve a local expert who treats your project with the same passion you do. That’s the SONI DESIGN difference.
Find out what it’s like to work with a team that truly loves print. Let’s create something extraordinary together and make sure your materials leave a lasting impact.
Have Questions About Document Printing? We've Got Answers.
When you're looking for document printing, a few questions always seem to come up. To make sure you're feeling confident and ready, we’ve tackled the queries we hear the most. Think of this as your cheat sheet to getting a brilliant print job every single time.
Getting these final details sorted can be the difference between a project that’s just 'good' and one that’s truly great.
What's the Smallest Order I Can Place?
This all comes down to the technology we use for your specific job. For most projects, we use digital printing. The setup for this is super quick, meaning we can print as little as a single copy if that's all you need. It's the perfect solution for one-off prototypes, personalised gifts, or small batches of documents.
Then you have offset printing, which is a different beast altogether. It involves a more complex setup with custom-made plates, making it much more economical for big runs—think hundreds or thousands of copies. Don't worry about figuring this out yourself; we'll always look at your project and steer you toward the most cost-effective option for the quantity you need.
Can I See a Sample Before You Print Everything?
Absolutely. In fact, we wouldn't have it any other way. A proof is your final chance to spot any sneaky typos or check that everything looks just right before we hit 'go' on the full print run. It’s a crucial quality check that guarantees you'll love the finished product.
We offer two types of proofs:
- A digital proof (PDF): We'll email this over so you can quickly check the layout, text, and where your images sit.
- A physical proof: For many jobs, we can also print a hard copy for you. This is fantastic because you get to see the real-life colours on your chosen paper and feel the final product in your hands.
This is one of the best parts about working with a local printer who genuinely cares about getting your project perfect.
Seeing a proof isn't just a formality; it's your peace of mind. It confirms that the vibrant colours and sharp text you approved on screen will translate perfectly to paper, eliminating any guesswork.
How on Earth Do I Pick the Right Paper?
The paper you choose completely changes the look and feel of your document. A thick, glossy paper might be brilliant for a marketing flyer that needs to pop, while a subtle, textured, uncoated paper could be the ideal choice for classy wedding invitations or professional letterhead.
You don't need to get bogged down in technical terms like 'GSM' or 'coating.' We’ve got a massive range of paper samples right here in our shop. Just pop in, and we can walk you through the options, explain why you might choose one over the other, and help you find the perfect match for your project, brand, and budget.
Why Do the Colours Look Different on Paper Than on My Screen?
Ah, the classic question! This happens because your screen and a printer create colours in fundamentally different ways. Your monitor uses RGB (Red, Green, Blue) light to display images, which gives you a huge, bright range of colours. But a printer uses CMYK (Cyan, Magenta, Yellow, Black) ink to put colour onto paper, which works a little differently.
To get your brand colours looking sharp and consistent, your files need to be set up in CMYK colour mode before printing. This is a simple but vital step, and it's something we can easily help you with to ensure the final product looks exactly as you imagined.
Ready to bring your project to life without any of the hassle? The team at SONI DESIGN is here to guide you through every step, from preparing your files to adding those perfect finishing touches. Let's create something fantastic together. Get in touch with us today!
Leave a Comment
Stay home & get your daily
needs from our shop
Start You'r Daily Shopping with Nest Mart