
Your cart is currently empty.

A custom mug is so much more than just a cup. Think of it as a personal statement, a memorable gift, or a powerful branding tool for your Kiwi business. This guide is your go-to resource for everything involved in creating a custom mug in NZ, from that first spark of an idea to holding the finished product in your hands.
Why Custom Mugs Are More Popular Than Ever
A simple coffee mug holds a lot more than your morning flat white; it can hold a memory, a cheeky inside joke, or your company's identity. It’s a small canvas that makes a big impact, whether it's sitting on a desk in an Auckland office or in a cosy bach down in the Catlins. It’s that personal connection that has seen the demand for custom mugs really take off.
Their appeal is all in their versatility. A personalised mug can be a heartfelt gift for a mate, a clever promotional item for your business, or a unique piece of merchandise that shows off your art. They’re practical, affordable, and leave a lasting impression that a business card or flyer just can't match.
A Growing Trend in New Zealand
This isn't just a local feeling, either. It's part of a huge global shift towards personalised gear. The worldwide market for custom mugs was valued at a massive USD 28.09 billion in 2024 and is tipped to nearly double by 2032.
This trend is especially strong right here in New Zealand. Kiwis have always appreciated unique, personal products that stand out from the crowd, and a custom mug fits the bill perfectly. If you're curious, you can explore more insights into this growing market trend.
We've put this guide together to walk you through everything you need to know, breaking it down into a few key areas:
- Choosing the Right Mug: We’ll look at the pros and cons of materials like ceramic, porcelain, and stainless steel.
- Mastering Your Design: You’ll get simple, practical tips for creating print-ready artwork that looks fantastic.
- Understanding Printing Methods: We’ll explain the difference between techniques like dye-sublimation and screen printing in plain English.
- Finding a Reliable Supplier: We'll give you some solid advice on how to pick a great local NZ printer for your project.
By the time you're done with this guide, you’ll have all the confidence and know-how to turn your creative vision into a top-quality, professional mug that you’ll be proud to use, gift, or sell.
Choosing the Right Canvas for Your Design
Before you even think about colours or logos, the first big decision is the mug itself. Think of it as the canvas for your art. The material you pick will completely change the final look, feel, and lifespan of your design. Getting this base right is the most important step in creating a custom mug in NZ that people will genuinely want to use again and again.
Each material has its own personality, from how it feels in your hands to how it makes your artwork pop. Are you making a bright, cheerful photo gift? Or a tough, branded travel mug for your team on the go? The answer will point you to the perfect material.
Classic Ceramic: The Popular All-Rounder
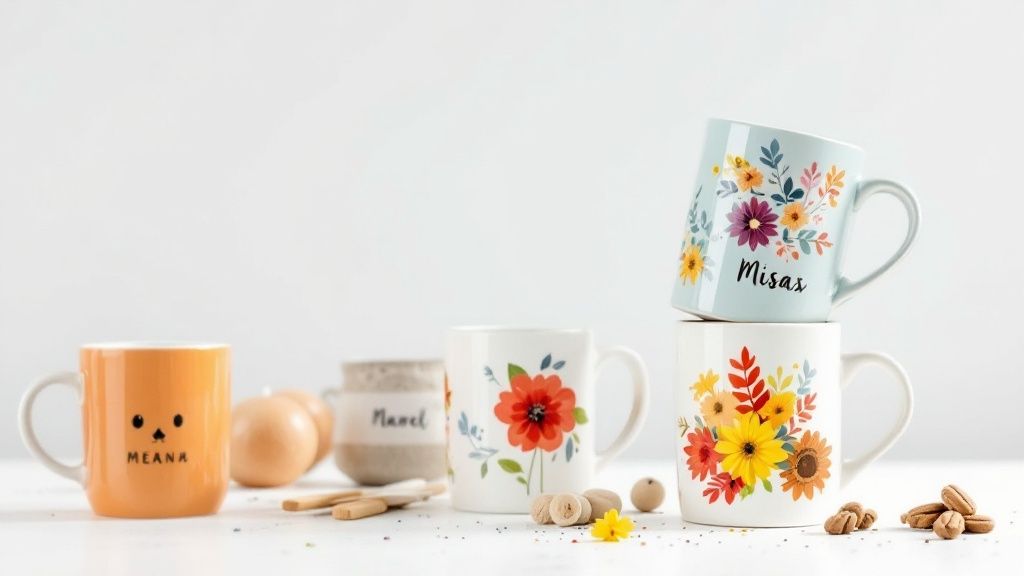
When you picture a classic coffee mug, you’re almost certainly thinking of ceramic. It’s the go-to choice for custom mugs, and for a very good reason. Ceramic is a brilliant all-rounder—it's affordable, versatile, and gives you a fantastic surface for just about any design, especially those with bright, bold colours.
Its smooth, glossy finish is perfect for dye-sublimation printing, a process where the ink is fused right into the coating. This creates a really sharp, vibrant image that’s both dishwasher and microwave safe. For photo mugs, detailed logos, or full-wrap patterns, a quality ceramic mug is almost always the best place to start.
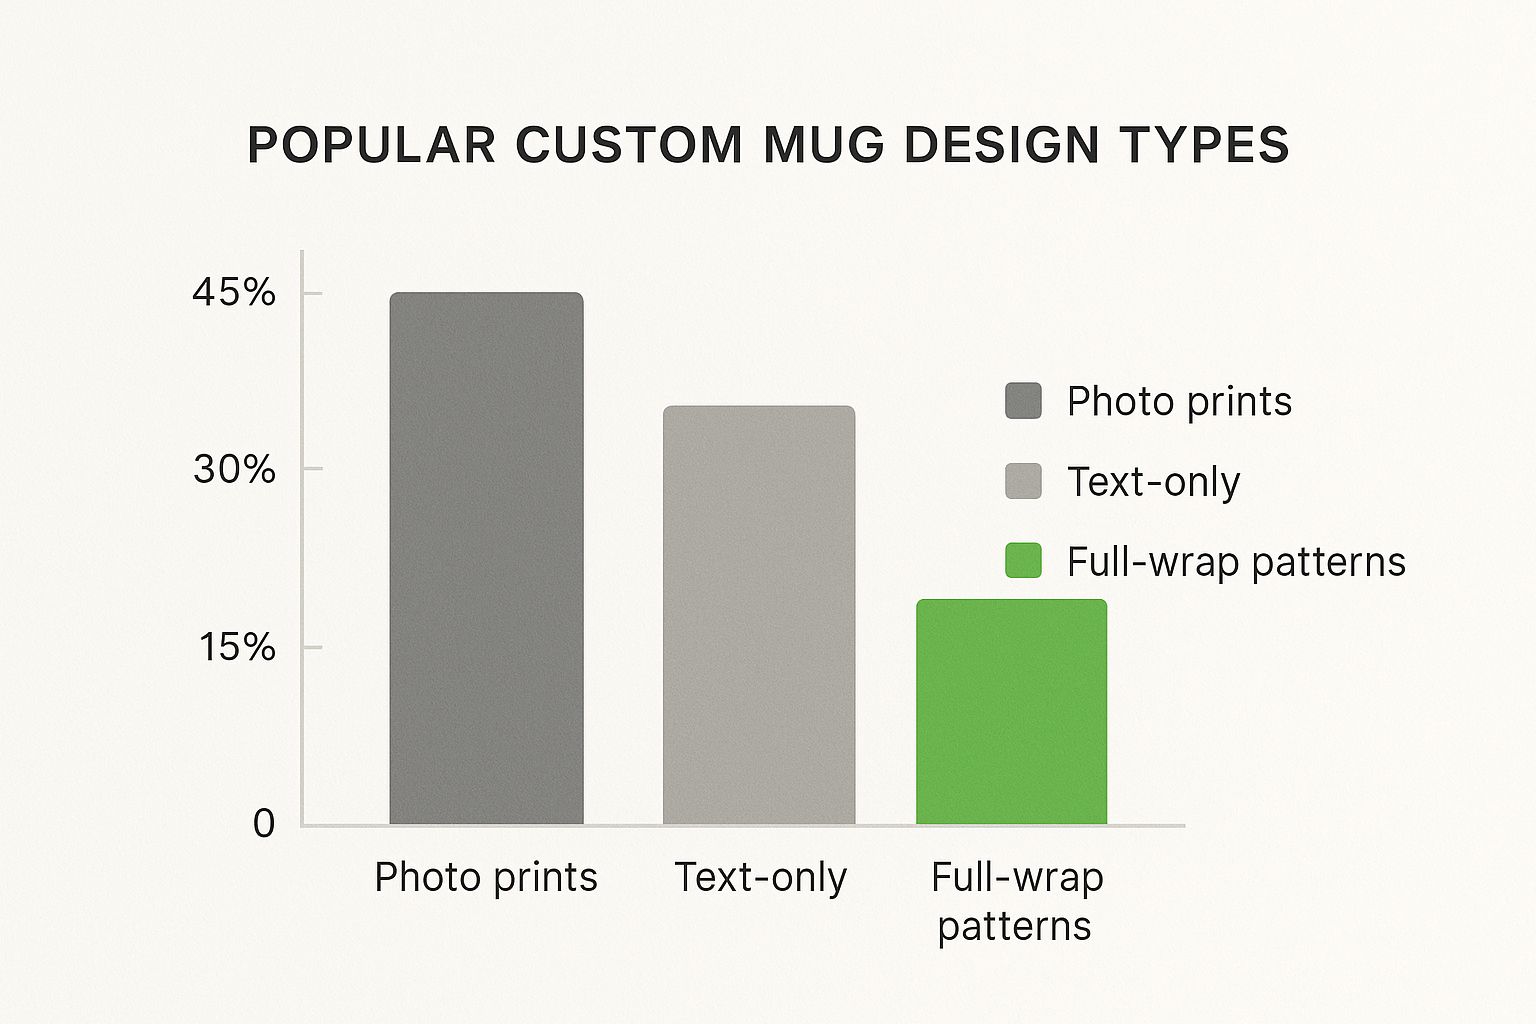
The data speaks for itself: Kiwis love personal designs like photos, which account for a massive 45% of custom mug orders. This makes ceramic’s excellent print quality a huge advantage.
Elegant Porcelain: For a Premium Touch
If you’re after something a little more refined, porcelain is a fantastic choice. It's fired at a much higher temperature than standard ceramic, which makes it thinner, lighter, and surprisingly more durable. It has this delicate, almost translucent quality that brings a premium feel to any design.
That touch of elegance makes porcelain a great fit for high-end corporate gifts, special occasions like weddings, or for brands that want to signal quality and sophistication. It might cost a little more, but the polished finish and superior feel of porcelain can make a massive impression.
Quick Tip: Think of ceramic as your reliable, everyday workhorse—perfect for most jobs. Porcelain is your special-occasion choice, offering a touch of class that really elevates the final product.
Sturdy Stainless Steel: For Life on the Go
For a mug that needs to handle the daily commute, a busy worksite, or outdoor adventures, stainless steel is the undisputed champion. These travel mugs are incredibly tough, shrug off drops and dents, and often come with double-walled insulation to keep drinks hot or cold for hours.
Stainless steel is the perfect canvas for laser engraving, which etches your design directly onto the metal for a sleek, permanent finish. It's the go-to for corporate branding, promotional giveaways, and any business with staff on the move. A branded stainless steel travel mug isn't just a gift; it's a practical tool that gets your brand seen everywhere.
Modern Glass and Enamel Options
Beyond the big three, a couple of other materials offer their own unique style. Glass mugs, for example, have a clean, modern look that’s perfect for cafes, restaurants, or anyone wanting a contemporary vibe. Designs are usually printed or etched onto the surface, creating a subtle, frosted effect that looks brilliant with minimalist logos.
Then you have enamel mugs, which have that rustic, retro charm that’s become hugely popular. These are lightweight metal mugs coated in enamel—ideal for camping, tramping, or creating a nostalgic feel. Their classic look is a perfect match for outdoor brands, quirky cafes, or anyone wanting to add a bit of vintage flair to their project.
To make things simpler, here’s a quick comparison to help you choose the right material for your project.
Mug Type Comparison for Your Custom Project
| Mug Type | Best For | Durability | Printing Suitability | Price Point |
|---|---|---|---|---|
| Ceramic | Everyday use, photo gifts, promotional items | Good | Excellent for full-colour printing (sublimation) | $ |
| Porcelain | Corporate gifts, special occasions, premium branding | Very Good | Excellent for sharp, detailed prints | $$ |
| Stainless Steel | Travel, outdoor use, corporate branding | Excellent | Best for laser engraving; printing also possible | $$$ |
| Glass | Cafes, modern branding, minimalist designs | Moderate | Good for single-colour prints and etching | $$ |
| Enamel | Camping, retro themes, outdoor brands | Very Good | Good for simple, bold designs; not suitable for photos | $$ |
Ultimately, each material brings a different personality to your design. By matching the mug to its purpose, you’re well on your way to creating something truly memorable.
Designing a Mug That Truly Stands Out
This is where the magic really happens—turning your idea into a physical design. But creating a great design for a custom mug in NZ is about more than just slapping a logo on a white background. It's about thinking through a few simple principles to make sure the final product looks sharp and professional.
And don't worry, you absolutely don't need to be a graphic designer for this.
We'll walk through the essentials in plain English, skipping the confusing jargon. The goal is to give you the confidence to whip up a print-ready file that looks just as good in your hand as it does on your screen.
Getting the Technical Details Right
Before diving into the creative stuff, let’s quickly cover two technical points that make a world of difference to the print quality. Nail these from the get-go, and you’ll save yourself a lot of potential headaches.
First up is print resolution, measured in DPI (Dots Per Inch). Think of DPI like the focus on a camera. An image with low DPI will look blurry and pixelated when printed—a bit like an out-of-focus photo. For a crisp, clean print on a mug, you always want to aim for 300 DPI.
Second is the colour mode. Your computer screen uses the RGB (Red, Green, Blue) model to create colours with light. Printers, on the other hand, use ink: CMYK (Cyan, Magenta, Yellow, Black). To make sure the colours on your finished mug actually match what you designed on screen, your final file needs to be saved in CMYK mode.
Mastering the Curved Canvas
Designing for a flat bit of paper is one thing, but a mug is a curved, 3D object. This shape presents a unique challenge: where do you actually put your design so it looks good and is easy to see?
The best bit of real estate on a mug is the area facing directly away from the person holding it. That’s the prime spot for your company logo, a key message, or the main part of a photo. For a right-handed person, the next best spot is the area to the right of the handle, facing outwards.
A classic mistake is putting important things too close to the handle, where they just get lost. Always leave a bit of a "safe zone" around the handle, top, and bottom edges so your design doesn't get cut off or look squished.
Key Takeaway: Always consider the mug's curve. A great tip is to print your design on a piece of paper, cut it out, and wrap it around a regular mug at home. This simple test gives you a real-world feel for how the spacing and placement will look.
Choosing Fonts and Colours That Work
Readability is everything. A font that looks amazing on your big computer screen can quickly turn into an unreadable smudge when it's shrunk down and printed on a curve.
Here are a few tips for picking the right typography:
- Keep it Simple: Clean, clear sans-serif fonts (like Arial or Helvetica) or classic serifs (like Times New Roman) are usually your safest bet.
- Avoid Thin Scripts: Delicate or overly complex script fonts can break up during printing and become completely illegible.
- Mind Your Size: Make sure your text is large enough to be read from a short distance. What looks big on screen can seem tiny on the final product.
When it comes to colour, contrast is your best friend. Dark text on a light background or light text on a dark one will always be easier to read. Steer clear of combinations like yellow text on a white mug—it’s practically invisible. High contrast makes your message pop.
Proven Design Ideas for Any Occasion
Feeling a bit stuck for ideas? The best designs are always the ones that perfectly fit the purpose. Whether you're creating a promotional item or a personal gift, the style should match the occasion.
Here are a few popular approaches for a custom mug in NZ:
- For Corporate Branding: Minimalist is often best. Pop your logo prominently on one side and maybe your website or tagline on the other. Sticking to your brand’s colours keeps it looking clean and professional.
- For Personal Gifts: You can't go wrong with a full-wrap photo collage for birthdays, anniversaries, or family keepsakes. It’s a great way to tell a story with multiple images, creating something deeply personal.
- For Promotional Events: Go for something bold and eye-catching. A clever quote, a funny illustration, or a striking graphic related to your event can make your mug a memorable giveaway that people actually want to use.
- For Artists and Creatives: A full-wrap design is a fantastic way to turn your artwork into merchandise. Just make sure your art extends all the way to the bleed lines your printer provides for a seamless, edge-to-edge finish.
By keeping these simple principles in mind, you can go beyond just putting a picture on a mug. You can create a thoughtful, well-composed, and professional-looking piece that genuinely stands out.
How Your Design Gets onto the Mug
Alright, you’ve picked your mug and the design is sorted. So, what's next? The magic happens in the printing, and knowing a little about how your digital file becomes a permanent part of a physical mug will help you make a great choice for your custom mug in NZ.
This isn't about becoming a printing guru. It's just about understanding the basics so you can have a confident chat with your supplier. In New Zealand, most custom mugs are created using one of two main techniques: dye-sublimation or screen printing. Each has its own superpowers, and the best one for you really boils down to your design and how many mugs you need.
Dye-Sublimation: For Photos and Full-Colour Brilliance
Think of dye-sublimation as a tattoo for your mug. Instead of just slapping ink on top, this clever process uses heat and pressure to turn solid ink into a gas. This gas then sinks into the mug's special coating, becoming a permanent part of the surface.
What you get is a stunningly bright, full-colour print that’s completely smooth to the touch. Because the design is literally in the mug, it won’t crack, peel, or fade away. It’s also totally dishwasher and microwave safe, making it the champion for mugs that will be used every day.
This method is perfect for:
- Photographic Prints: It handles detail and a massive range of colours beautifully, which is why it's the go-to for photo mugs.
- Complex Graphics: Got gradients, intricate patterns, or heaps of colours? Dye-sublimation will make them look sharp and vibrant.
- Small Orders: The setup is pretty straightforward, so it’s cost-effective for one-off gifts or a small batch for the office.
For most modern, personalised mug printers here in New Zealand, dye-sublimation is the go-to. It's the best way to get amazing, long-lasting, full-colour designs.
Screen Printing: The Classic for Bold Logos and Big Orders
If dye-sublimation is a tattoo, then screen printing is more like a high-quality, durable paint job. It’s a classic technique where ink is pushed through a custom-made mesh screen (like a stencil) directly onto the mug. You need a separate screen for every colour in your design, which are then applied one after another.
Since the ink sits on top of the surface, it creates a slightly raised, tactile finish you can feel. It’s brilliant for simple, bold designs with just a few colours—think of a crisp, solid-colour company logo or a punchy line of text.
This method really comes into its own when you're ordering a lot of mugs. The initial setup for the screens costs a bit more in time and money, but once you're rolling, the price per mug plummets. This makes it the clear economic choice for big corporate orders, event giveaways, or stocking up on merchandise.
Screen printing is your best bet for:
- Simple, Bold Designs: It’s fantastic for printing one or two solid colours with super clean lines.
- Large Quantities: It’s the most affordable option for orders of 100 mugs or more.
- Specific Colour Matching: It allows for precise Pantone colour matching, which is vital for keeping your brand looking consistent.
The demand for high-quality, personalised products is booming. The global coffee mugs market was valued at around USD 7.4 billion in 2024 and is expected to climb to USD 10.77 billion by 2031. We’re seeing that same trend here in New Zealand, as more and more Kiwis want custom designs. You can explore detailed insights on the coffee mugs market to see the full picture.
So, Which Method is Right for You?
It really comes down to three things: your design's complexity, your order size, and your budget.
Making a single photo mug for your mum’s birthday? Dye-sublimation is the obvious choice. Ordering 500 branded mugs for a conference? Screen printing is almost certainly your best friend here.
The principles behind printing on mugs are similar to other custom products. If you want to dive a bit deeper into the technical side of things, this complete guide to custom printing methods, costs, and quality offers some great comparisons that can help you understand what to expect. Knowing these basics helps you make a smarter choice and get a final custom mug you’ll be proud of.
How to Find a Great NZ Custom Mug Supplier
Alright, you've got your design sorted and you know what kind of mug you want. Now for the most important part: finding the right people to bring it to life. Choosing a supplier is the final, crucial step, and a great one does more than just print your logo on a mug—they'll offer advice, guarantee quality, and make the whole thing a breeze.
Think of it like hiring a builder for a reno. You wouldn't just go with the first name you find online. You'd check their past work, get a feel for their process, and make sure they’re good to deal with. The same logic applies here. Let’s break down what to look for in a Kiwi supplier.
Start with Their Technical Capabilities
First things first, what can they actually do? A good supplier will be upfront about the printing methods they use and can tell you which one is right for your project. Are they experts in dye-sublimation, perfect for those vibrant, full-colour photo mugs? Or is their specialty screen printing, which is ideal for bigger corporate orders with simpler designs?
This is also the time to talk numbers. Ask about their minimum order quantities (MOQs). Some businesses are set up to handle one-off personalised gifts, while others are geared for bulk orders and might have a minimum of 50 or 100 units. Knowing this from the get-go saves everyone a lot of time.
Dig into Reviews and Past Work
In this day and age, a company's reputation is everything. Before you even think about getting a quote, do a bit of sleuthing. Jump onto Google, their website, or their social media pages and see what past customers are saying.
You're looking for feedback on a few key things:
- Print Quality: Are people raving about the sharp details and rich colours?
- Customer Service: Do reviews mention them being helpful, friendly, and quick to respond?
- Turnaround Times: Did they deliver on time, or were there unexpected delays?
A supplier's portfolio is another goldmine. Flicking through photos of their previous jobs gives you a real feel for their quality and style. If their gallery is packed with examples of the exact kind of high-quality custom mug nz you're after, that’s a fantastic sign.
Pro Tip: Don't just scan the 5-star reviews. The 3 and 4-star ones often have the most balanced feedback. They can highlight minor issues that might be a big deal for your specific project.
Ask for a Sample
Never, ever underestimate the power of holding a physical product in your hands. If you’re ordering more than a handful of mugs, asking for a printed sample is non-negotiable. What looks perfect on a screen can look surprisingly different in real life.
A sample is your best quality check. It lets you inspect the colour accuracy, the sharpness of the print, and the overall feel of the mug. Yes, there might be a small cost for a one-off sample, but it’s a tiny price to pay to avoid a massive disappointment—and a much bigger bill—later on.
Clarify Costs and Timelines
A trustworthy supplier is always transparent about pricing. Ask for a detailed quote that breaks everything down: the price per mug, any setup fees (especially for screen printing), and the shipping costs. You want to be sure there are no nasty surprises waiting for you on the final invoice.
Just as important is getting a clear handle on the timeline. Ask what their standard turnaround time is from the moment you sign off on the design to when the mugs are shipped out. If you've got a hard deadline for an event or marketing campaign, make that crystal clear from your very first conversation.
Here in New Zealand, mugs have always been more than just something to drink out of; they're a huge part of our gifting culture for birthdays, anniversaries, and corporate thank-yous. This love for thoughtful, personalised gifts has really shaped the local market, driving demand for unique, Kiwi-made custom mugs that carry a personal touch. You can learn more about the cultural significance of mugs in the market. Choosing a local supplier means you're not only getting faster shipping and easier communication but also working with a partner who truly gets it.
Your Step-by-Step Custom Mug Checklist
Okay, let's pull all the threads together. We've looked at materials, unpacked design principles, and explored how the printing actually happens. Now it’s time to put that knowledge to work with a straightforward checklist for your custom mug NZ project.
Think of this as your roadmap. Following these steps will help you navigate the process smoothly, from that first spark of an idea to holding a fantastic, finished mug. It's the best way to sidestep common headaches and ensure you get a result you'll be genuinely proud of.
Phase 1: Define Your Project
Before you even think about opening a design app or emailing a supplier, you need a clear plan. The most successful projects start with a solid foundation, and getting this right first will save you a world of trouble later on.
- Nail Down the Purpose: What’s this mug for? Is it a one-off personal gift, a promotional giveaway for your business, or merch to sell? Your answer will shape every other choice you make, from the style of mug to the detail in your design.
- Pick Your Mug Type: With your purpose in mind, you can choose the right canvas. Is a classic ceramic mug the go-to, or do you need something more robust, like a stainless steel travel mug for people on the move? Flick back to our material comparison if you're unsure.
- Set Your Budget and Quantity: You need to know two things: how many mugs you need and how much you can spend on each one. This is key, as it’ll guide you towards the most cost-effective printing method—like dye-sublimation for a small batch or screen printing for a massive order.
Phase 2: Create Your Design
With a solid plan, you can now get into the fun part: bringing your vision to life. This is where you translate your idea into a digital file that's ready for printing and looks amazing wrapped around a mug.
- Prep Your Artwork: Make sure any images or logos you use are high-resolution. You're aiming for at least 300 DPI. And don't forget to set your file's colour mode to CMYK to ensure the colours on the screen match the final printed product.
- Think About Placement: The most important parts of your design should be front and centre, where they'll be seen. Be careful to avoid placing key elements too close to the handle, where they can get lost.
- Keep It Readable: Simple, clear fonts and colours that contrast well are your best friends. The last thing you want is for your brilliant message to be hard to read.
Here’s a great little trick I always use: print your design out on a piece of paper and wrap it around a mug you have at home. It’s a low-tech way to get a surprisingly good feel for how the final product will look and how the design flows.
Phase 3: Select Your Supplier
The final piece of the puzzle is finding the right local partner to turn your design into a real, physical product.
- Research NZ Suppliers: Start by looking for local Kiwi printers. Check out their online reviews and have a good look through their portfolio to see if their work lines up with the quality you’re after.
- Get a Quote and a Sample: Ask for a detailed quote that breaks down all the costs—no one likes hidden fees. If you're placing a decent-sized order, always ask for a physical sample to approve. It's the only way to be 100% sure before you commit.
- Confirm Your Timelines: Be upfront about your deadline. A good supplier will give you a firm delivery date you can count on.
Got a Few More Questions?
When you’re about to place an order, a few last-minute questions always seem to pop up. It's completely normal. To help you cross the finish line with confidence, here are some straight answers to the things we get asked most often about ordering custom mugs in New Zealand.
Think of this as your final check-in before you hit "approve," making sure everything's crystal clear.
How Long Until I’m Holding My Mugs?
This is usually the first question on everyone's mind, especially when there's a deadline looming. For most local Kiwi suppliers, you can expect a turnaround of about 5 to 10 working days for dye-sublimated mugs once you've given the final design your seal of approval. Of course, this can shift a bit depending on how busy they are or how complex your order is.
If you’re going big with a screen-printed order, you might need to plan for a slightly longer wait. The setup is more involved, so it's often closer to 10 to 15 working days. It’s always a smart move to confirm the estimated delivery date directly with your supplier before locking anything in.
Can I Chuck Them in the Dishwasher and Microwave?
Great question! The short answer is: it depends on how they were printed.
- Dye-Sublimation: You bet. These mugs are tough. The design is baked right into the ceramic coating, so it’s not going anywhere. They're completely safe for both the dishwasher (top rack is always best) and the microwave.
- Screen Printing: Usually, yes, but it pays to double-check. Most modern screen-printed mugs are fired in a kiln, which cures the ink and makes it pretty durable. Just be careful with any designs that have metallic inks, as those are a definite no-go for the microwave.
Our Pro Tip: If you know these mugs are going to be someone's daily go-to for their flat white, dye-sublimation is the way to go. It offers the most bulletproof, long-lasting finish.
What’s the Smallest Order I Can Place?
The minimum order quantity (or MOQ) really comes down to the supplier and the printing technique they use.
If you're after a single personalised gift or a very small run, you’ll want to find a printer who uses dye-sublimation. Plenty of local NZ businesses are set up to handle orders for just one mug. On the other hand, companies that specialise in screen printing are set up for volume. Their minimum orders typically start somewhere between 24 to 100 mugs because the setup costs only make sense for larger batches.
Ready to turn your idea into a high-quality custom mug you can actually hold? At SONI DESIGN, we specialise in creating beautifully crafted promotional products and personalised gifts, right here in New Zealand. Let's make something brilliant together. Start your custom mug project with us today!
Leave a Comment
Stay home & get your daily
needs from our shop
Start You'r Daily Shopping with Nest Mart