
Your cart is currently empty.

When it comes to making a real-world impact, great banners and printing are hard to beat. They’re powerful, tangible tools that can stop people in their tracks, advertise an event, or simply build awareness for your brand. But a truly effective banner is more than just a logo slapped on a piece of vinyl; it’s a carefully planned asset where the design, material, and finish all work together to create something professional and memorable.
Why Banners Are More Than Just Signs
In a world saturated with digital ads, a physical banner provides a welcome break from the screen. It becomes your silent salesperson on the street, a helpful guide at an event, or a bold announcement for a grand opening, working around the clock to get your message seen by the right people. Think of it as a physical piece of your brand’s story, placed exactly where your audience will be.
Getting from that initial idea to a finished, high-impact banner involves a few key decisions. Every choice you make—from the type of material to the finishing touches—will shape how your banner looks, how long it lasts, and ultimately, how well it does its job. Nailing these details is what separates a professional-looking banner from one that gets ignored.
Key Considerations for Your Banner Project
Before you get lost in the technical jargon, it's good to have a handle on the main things that will define your project. These are the fundamental questions that will steer your conversation with any printing expert and make sure the end result is exactly what you envisioned.
Here’s a quick rundown of what you need to think about:
- Purpose and Location: Where is this banner going to live? Is it for a one-off indoor conference or a long-term outdoor display? The answer changes everything. A banner destined for a windy Wellington street needs to be far tougher than one hanging inside an Auckland convention centre.
- Material Selection: The material is the very foundation of your banner. Options like vinyl, mesh, and fabric each have their own strengths, making them suitable for different settings and desired looks.
- Printing Method: How the ink gets onto the material makes a huge difference to the final colour vibrancy, sharpness, and durability of your design.
- Design and Artwork: A good banner design is simple, bold, and easy to read from a distance. It’s not just about the information you include, but how you present it to catch someone's eye.
A well-designed banner doesn't just inform; it engages. It’s a physical touchpoint that can capture a potential customer's attention in the crucial first three seconds.
Getting your head around these core elements is the first step. From here, you’ll be able to make smart, informed choices for your next banner project, ensuring it not only looks fantastic but also hits your goals.
Choosing the Right Banner Material
Picking the right material for your banner is a bit like choosing the right tyres for your car. You wouldn't put racing slicks on a 4x4 for an off-road adventure, and in the same way, a delicate indoor fabric just won't cut it for a sign that needs to survive a blustery Wellington winter.
The material is the very foundation of your banner. It dictates how it looks, how long it lasts, and ultimately, how well it does its job. Getting this choice right means your message stays vibrant and your investment pays off. Let's walk through the most common materials we use for banners and printing here in New Zealand, so you can pick the perfect one for your project.
Vinyl PVC: The All-Round Outdoor Champion
When you picture a classic outdoor banner, you’re almost certainly thinking of vinyl—specifically, PVC (polyvinyl chloride). This is the absolute workhorse of the banner world, and for good reason. It's tough, weather-resistant, and surprisingly affordable. Think of it as a trusty raincoat for your marketing message: durable, waterproof, and built to handle whatever the Kiwi weather throws at it.
Vinyl banners are a fantastic choice for:
- Outdoor Advertising: They're perfect for building sites, storefronts, and roadside promotions where they need to stand up to sun, wind, and rain.
- Sporting Events: Great for displaying team logos, sponsor details, and directional signs around fields and stadiums.
- Long-Term Signage: Its rugged nature makes it a solid option for signs that will be up for several months, or even years.
The smooth surface of vinyl allows for incredibly sharp, vivid printing, making sure your graphics and text are crisp and easy to read. One thing to keep in mind, though, is that its solid surface can act like a sail in really windy spots. That’s where its clever cousin, mesh, steps in.
Mesh Banners: Taming the Wind
Picture a standard vinyl banner, but with thousands of tiny, microscopic holes woven into the fabric. That’s a mesh banner. These little perforations are a game-changer because they let the wind pass straight through, dramatically reducing the strain on the banner and whatever it’s attached to.
This clever design makes mesh the undisputed champion for windy locations. It's the go-to solution for huge applications where wind load is a real safety concern, like scaffolding wraps on construction sites or big banners on exposed fences. While the holes mean the print is a touch less saturated than on solid vinyl, modern printing tech still ensures the final image is clear and powerful, especially from a distance.
Choosing mesh isn't a compromise on quality; it's a strategic decision for safety and longevity. By allowing air to flow through, you prevent your banner from tearing or becoming a hazard in gusty conditions.
So, the choice between vinyl and mesh often boils down to one simple question: how windy is the location? For a sheltered shop front, vinyl is perfect. For a fence line on an exposed coastal property, mesh is really the only sensible choice.
Fabric Banners: The Indoor Professional
If vinyl is the durable outdoor raincoat, then fabric is the impeccably tailored suit. Fabric banners, usually made from polyester, have a sophisticated, high-end look that’s ideal for indoor settings. They have a beautiful, soft, glare-free finish that just oozes quality and professionalism.
This infographic gives you a simple way to match your banner's goal with the right material.
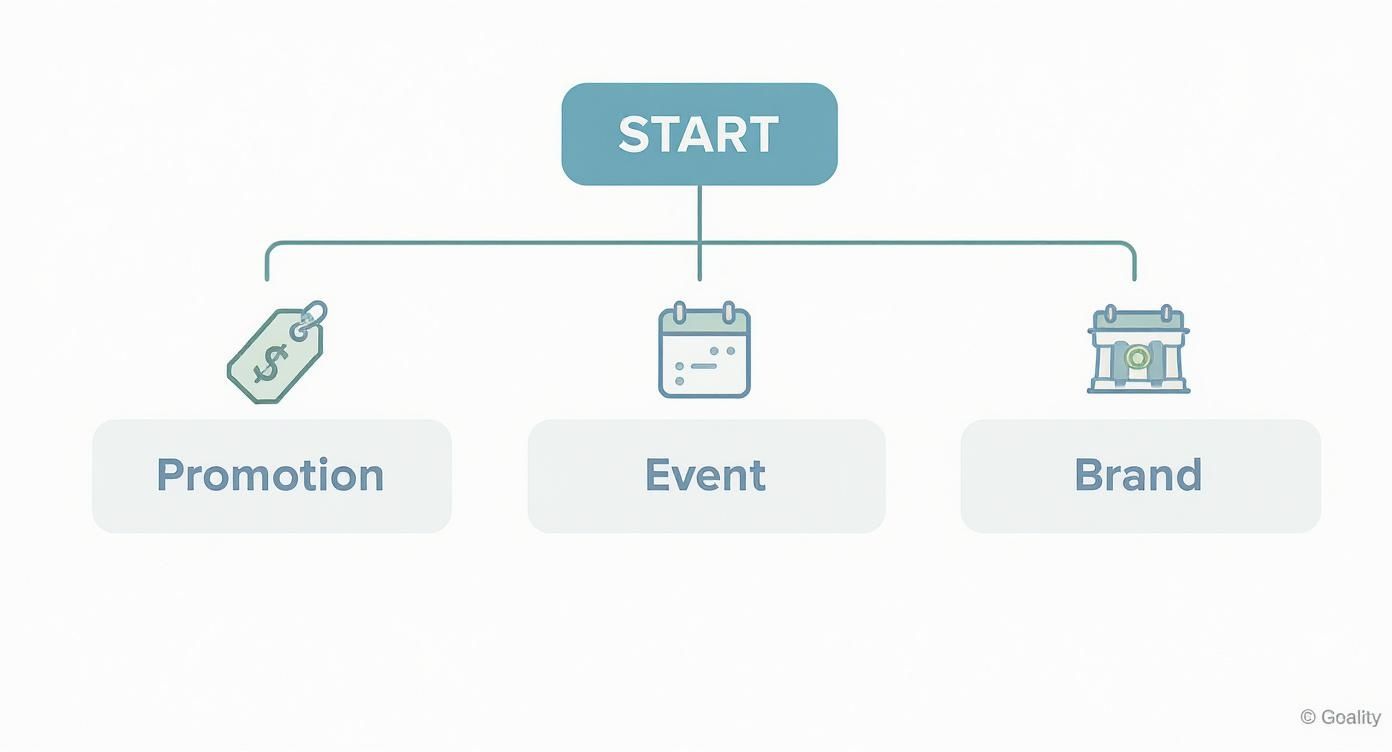
As you can see, your main objective—whether it's a hard-hitting promotion, a one-off event, or building a long-term brand presence—points you toward the most effective material.
Fabric is also incredibly lightweight, which makes it a breeze to transport, store, and set up. This is a huge plus for trade shows, conferences, and retail displays. The colours on fabric banners are often exceptionally rich and deep, thanks to a printing process called dye-sublimation, where the ink actually becomes part of the fabric. This creates a stunning, permanent image that will never crack or peel.
The growing demand for high-quality display materials is something we're seeing across the board. Between 2019 and 2022, the New Zealand printing industry's revenue grew to NZD 872 million. A big part of that growth came from the need for the kind of digital printing used for banners and other promotional signs. We've also seen a big shift towards on-demand printing for specific events, which is where premium materials like fabric really shine. You can find out more about NZ printing industry trends on this comprehensive listicle.
Comparing Common Banner Materials
To make things even clearer, here’s a quick table to help you compare the most popular materials at a glance. Use this to quickly see which one ticks all the boxes for your next project.
| Material Type | Best Use Case | Durability | Print Quality |
|---|---|---|---|
| Vinyl PVC | Outdoor signs, long-term promotions, events | Very High | Excellent, vibrant |
| Mesh Vinyl | Windy locations, fence wraps, large banners | High (wind-proof) | Good, slightly muted |
| Fabric | Indoor displays, trade shows, retail, photos | Moderate | Exceptional, rich |
Choosing between these options is all about matching the material's strengths to your specific needs. By thinking about location, longevity, and the look you’re after, you can be confident you’re making the right call.
How Your Banner Gets Its Look
Once you’ve nailed down the perfect material, it’s time for the fun part: bringing your design to life. The printing technique is where the magic happens, turning a digital file into a physical message that stops people in their tracks. This choice has a huge impact on the final product, affecting everything from colour pop and sharpness to how long your banner will last out in the elements.
Getting your head around the tech behind banners and printing means you can have a much better chat with your printer and make sure what you get back is exactly what you pictured. Let’s pull back the curtain on the two most popular and effective printing methods used today.
Digital Printing for Sharpness and Versatility
Imagine your office inkjet printer, but on a colossal scale. That’s essentially what large-format digital printing is. It uses incredibly advanced inkjet technology to spray ink directly onto the surface of materials like vinyl, mesh, and even some rigid boards. This method is pinpoint accurate, perfectly recreating complex graphics, high-resolution photos, and crisp text with amazing clarity.
Because the printer works straight from a digital file, it's the perfect solution for designs with lots of intricate detail or photorealistic images. It’s also incredibly efficient for smaller print runs, as there's almost no setup time compared to older, more traditional methods.
Digital printing is your best bet for:
- Detailed Graphics: If your design features photos, complex logos, or fine print, this method will keep every detail razor-sharp.
- Vinyl and Mesh Banners: It’s the go-to technique for most standard PVC and mesh banners, offering fantastic durability and weather resistance.
- Quick Turnaround Times: The direct-to-print process makes it a speedy and cost-effective option for one-off jobs or limited quantities.
This versatility makes it the true workhorse of the modern printing world, delivering dependable, top-quality results for a massive range of projects.
Dye-Sublimation for Unbeatable Vibrancy
If digital printing is like painting on a canvas, dye-sublimation is more like getting a tattoo on fabric. It’s an incredible process that doesn’t just lay ink on top of the material; it fuses the colour right into the fibres. It’s a two-step technique: first, the design is printed onto special transfer paper. Then, heat and pressure are applied, turning the ink into a gas that permanently bonds with the fabric.
The result is a continuous-tone image with seriously rich, deep colours that are literally part of the material. Since the ink is embedded within the fibres, the print is exceptionally durable. It won’t crack, peel, or fade, and you can even throw it in the washing machine—a massive plus for banners used at recurring events.
Dye-sublimation creates a premium, soft-to-the-touch finish with no change in the fabric's texture. This makes it the clear winner for high-end indoor displays, retail backdrops, and any time visual quality is the top priority.
This method is used exclusively on polyester-based fabrics, which is why it's the secret behind those stunning, photo-quality fabric banners you see at trade shows and in boutique retail stores.
Choosing the Right Print Method
So, how do you decide which technique is right for your banner? It really boils down to balancing three key things: your material, your budget, and the final look you're after.
Think about these points:
- Material: Your choice of material often makes the decision for you. If you need a tough outdoor vinyl or mesh banner, digital printing is the way to go. If you've chosen a sophisticated indoor fabric display, dye-sublimation will give you that premium finish.
- Colour Vibrancy: For the absolute richest, most brilliant colours on fabric, nothing beats dye-sublimation. For sharp, accurate colours on vinyl, digital printing is the champion.
- Durability: Both methods produce long-lasting results. A digitally printed vinyl banner is built tough for the outdoors, while a dye-sublimated fabric banner offers unmatched resistance to fading and washing.
Understanding these differences helps you pick the perfect combination of banners and printing techniques, ensuring your final product not only looks incredible but is also perfectly suited for its job.
Designing Banners for Maximum Impact
A brilliant banner has little to do with expensive materials and everything to do with smart design. What looks sharp and vibrant on your computer screen can easily turn into a blurry, unreadable mess when it’s blown up to full size. Nailing the design fundamentals is what separates a banner that turns heads from one that just fades into the background.
Think of this as your essential checklist for creating artwork that prints clean, reads well, and actually gets results. Getting these basics right ensures your investment pays off, helping you stand out where it matters most.
Setting Up Your File for Success
Before you even start picking fonts or colours, you need to get your file set up correctly. Messing this up at the start is a surefire way to cause headaches and disappointment down the line. The two most critical settings are resolution and colour mode.
Resolution is all about the sharpness of your image, measured in Dots Per Inch (DPI). A website graphic looks perfectly fine at 72 DPI, but at that resolution, a printed banner would look pixelated and fuzzy. For most banners that will be seen from a few metres away, 150 DPI at the final printed size is the sweet spot. It keeps everything crisp without creating a massive, unwieldy file.
Then there's the colour mode. Your screen creates images using light, operating in an RGB (Red, Green, Blue) model. Printers, on the other hand, mix physical inks to create colour, using a CMYK (Cyan, Magenta, Yellow, Key/Black) model. If you design in RGB, the colours will shift—often looking dull and muted—when they're printed.
Always start your design file in CMYK mode. This simple step ensures the colours you see on screen are a much more accurate preview of the final printed product, avoiding any nasty surprises.
Getting these two technical details right is the bedrock of any professional print job. It’s the behind-the-scenes work that makes all the visual magic possible.
Creating a Clear Visual Hierarchy
You’ve got about three to five seconds to grab someone's attention with a banner. That's it. This is why a strong visual hierarchy is non-negotiable. It’s simply the art of arranging your design to guide a person’s eye to the most important information first. Without it, your banner is just a confusing jumble of words and pictures.
Here’s how to build a hierarchy that works:
- Find Your One Key Message: What’s the single most important thing you need to communicate? A massive sale? Your grand opening? Your brand name? Make that the biggest, boldest thing on the banner.
- Add Supporting Details: Things like your website, phone number, or address are important, but they’re secondary. Make them smaller so they don’t fight for attention with your main message.
- Include a Clear Call to Action: Tell people what to do next. "Visit Our Website," "Call Today," or "Opening Soon" should be easy to spot.
It's like a newspaper headline. The big title grabs you, the smaller sub-heading gives you more context, and the fine print has the details. Your banner should follow that same logic, feeding information to the viewer in a way that makes instant sense.
Choosing Fonts and Colours Wisely
Your choice of fonts and colours can make or break your banner’s readability and the feeling it gives off.
When it comes to fonts, legibility is everything. That elegant, swirly script might look amazing up close, but from ten metres away, it’s just an unreadable smudge. Stick with clean, bold, and simple fonts—sans-serif options like Helvetica or Arial are almost always a safe bet.
Colour is your secret weapon for grabbing attention and setting a mood. High-contrast combinations are your best friend here, helping your banner pop against its surroundings. To truly make an impact, it pays to understand the psychology behind different hues; you can dive deeper by mastering color theory. This knowledge helps you choose a palette that not only looks great but also strengthens your message.
In New Zealand, making a physical impression is more crucial than ever. Forecasts for 2025 show that print advertising spend in NZ is expected to hit around US$84.97 million, while digital ad spend is predicted to reach US$357.93 million. With online channels getting over four times the budget, a well-designed banner provides a vital physical touchpoint to cut through all that digital noise.
Getting the Finish Right: Essential Touches for Your Banner

A banner's journey doesn't stop once the ink is dry. The final touches, what we in the industry call 'finishing', are what turn a printed piece of material into a durable, ready-to-hang sign that looks professional and lasts. These aren't just fancy add-ons; they're absolutely vital for the banner's lifespan and how well it performs once it's up.
Think of it like framing a picture. The art might be beautiful, but the frame is what protects it, makes it look complete, and gives you a way to put it on the wall. In the same way, the right finishing protects your banner from the elements, stops it from fraying, and provides practical, secure ways to install it. Getting these details right from the start means your investment will look great for a whole lot longer.
Hemming: The Foundation of Strength
The most basic yet critical finishing option is hemming. This is simply the process of folding over the raw edges of the banner material and sealing them down, usually with heat-welding or stitching. This creates a tough, double-layered border around the entire banner, which massively boosts its strength and tear resistance.
Without a hem, a banner’s edges are its weakest point, especially outdoors where wind and rain can cause them to rip and fray. The hem acts like a reinforcing frame, spreading the tension evenly so that small nicks don't become huge, catastrophic tears. For any professional outdoor banner, this isn't just a recommendation; it's standard practice.
Eyelets: Your Go-To for Hanging
Once the banner is hemmed, you need a way to actually hang it up. That's where eyelets (often called grommets) come in. These are sturdy metal rings punched through the reinforced hem, creating secure points for you to run ropes, bungee cords, or zip ties through.
As a rule of thumb, we place eyelets in every corner and then every 500mm to 1000mm along the sides. This spacing is key to making sure the banner hangs flat without sagging and distributes the load evenly. For really big banners or those going up in a notoriously windy spot, adding more eyelets is cheap insurance against the material catching the wind and tearing itself apart.
Finishing isn't an afterthought; it's a critical part of banner engineering. Options like reinforced corners and proper eyelet placement can mean the difference between a banner that lasts for years and one that fails in the first storm.
Pole Pockets: For a Sleek, Taut Display
If you're after a cleaner look without any visible ropes or ties, pole pockets are the perfect solution. A pole pocket is exactly what it sounds like: a sleeve created by folding over a generous section of the banner material and sealing it. This creates a channel for a pole or dowel to slide right through.
This method is brilliant for a few common scenarios:
- Parade Banners: Makes it easy for two people to hold the banner straight and taut.
- Indoor Displays: Perfect for hanging from ceiling mounts or using with special banner stands for a polished, high-end look.
- Scaffolding Banners: Poles can be fed through pockets at the top and bottom to pull the banner perfectly tight and flat against the structure.
Pole pockets give you a beautifully rigid and smooth finish, ideal for any situation where presentation is everything. Just remember to tell your printer the diameter of the poles you plan to use so they can make the pockets the right size—not too tight, not too loose.
Your Step-by-Step Banner Ordering Guide
Getting a banner made, from the first spark of an idea to the finished product hanging in place, might seem like a lot to juggle. But really, it’s a pretty smooth ride when you know what to expect. Think of it like a collaboration – good prep and clear communication with your printer are the secret ingredients.
Let's walk through the whole process, so you know exactly what’s needed at each stage to get the perfect banner for your project.
Preparing Your Quote Request
Before you even pick up the phone or type out an email, a little bit of prep work goes a long way. Getting your details sorted first is the quickest path to an accurate price and a realistic timeline. While it's easier than ever to get an instant print quote online, the same basic info is still required.
Have these details ready to go:
- Banner Dimensions: The exact width and height you need.
- Material Choice: Do you need vinyl, mesh, or fabric?
- Finishing Options: Let them know if you need hemming, eyelets, or pole pockets.
- Artwork Files: Make sure your print-ready design file is on hand.
Think of this as the blueprint for your banner. The more specific you are from the start, the fewer back-and-forth emails you'll have, which means you get your banner in your hands much faster.
Reviewing the Proof and Production Times
After you’ve sent everything over, your printer will send back a digital proof. This is a critical step. It’s your last chance to catch any mistakes before it's too late. Check it with a fine-tooth comb – look for spelling errors, wrong phone numbers, or any colours that look off. It's infinitely easier and cheaper to fix a typo on a digital file than on a freshly printed banner.
Once you give the green light, your banner heads into production. In New Zealand, a standard banner is usually ready within 3-5 working days. Of course, this can vary a bit depending on how complex the job is and how busy the print shop is at the time.
It’s worth noting that the local printing industry is changing. The New Zealand printing market actually shrank by -7.8% in 2024, as some businesses shift budgets to digital ads. This just means it's more important than ever to run a well-planned print project to get the best value for your money. You can dive deeper into these industry shifts in New Zealand on ibisworld.com.
Caring for Your Finished Banner
Your new banner is an asset, and looking after it properly will keep it looking great for ages.
- Storage: Always roll your banner up, never fold it. Make sure the printed side is facing outwards as you roll. Folding creates permanent creases that can crack and ruin the ink.
- Cleaning: For vinyl or mesh banners, a soft cloth with a bit of mild, soapy water is all you need. Gently wipe the surface down and stay away from harsh chemicals or abrasive sponges, which will scratch the print.
Follow these simple steps, and you’ll not only have a stress-free ordering experience but also a banner that stays vibrant and professional for years to come.
Your Banner & Printing Questions Answered
When you're diving into the world of banners, a few questions always seem to pop up. Getting straight answers from the get-go means you can plan your project without any guesswork or nasty surprises down the track.
We've put together this quick guide to tackle the most common queries we hear day in and day out. Think of it as a handy cheat sheet to clear up those last-minute details before you hit the "print" button.
So, How Much Does a Banner Actually Cost?
There’s no simple price tag for a banner, as the final cost really comes down to the ingredients you choose. The decisions you make at the start will directly shape your quote.
Here’s a breakdown of what moves the needle on price:
- Size: It's simple, really. A bigger banner needs more material and ink, so the cost goes up.
- Material: A premium fabric for an indoor display will naturally be a bit more of an investment than a standard, workhorse outdoor vinyl.
- Finishing Options: Adding extras like reinforced corners to stand up to the wind or multiple pole pockets for specific setups will add to the total.
- Quantity: Good news for big orders! The price per banner almost always drops when you order in bulk.
As a ballpark, a standard outdoor PVC banner (say, around 2m x 1m) might land somewhere between $75 and $150. But remember, this can vary from one printer to the next. The best approach is always to ask for a detailed quote based on exactly what you need.
What Kind of File Do I Need to Send for Printing?
This one is crucial. To get that sharp, professional look you’re after, you have to start with the right file. Sending a low-quality image is the fastest route to a blurry, pixelated banner that just won't look good.
For large-format printing, your best friends are vector files or high-resolution raster files.
- Vector Files (The Gold Standard): If you have a .AI, .EPS, or .PDF file, you're in great shape. Vectors are built with mathematical paths, not pixels, which means they can be scaled up to the size of a building and will stay perfectly crisp.
- Raster Files (Can Work in a Pinch): These are your typical pixel-based images like .JPG, .TIFF, or .PNG. If this is all you have, it needs to be saved at a high resolution. We're talking at least 150 DPI at the final, full size of the banner to avoid it looking fuzzy from a distance.
A quick pro tip: Always check your file is set to the CMYK colour mode, not RGB. Screens use RGB (Red, Green, Blue) light, but printers use CMYK (Cyan, Magenta, Yellow, Black) ink. Setting it correctly ensures the colours you approved on screen look just as good in print.
How Long Will My Banner Last?
The lifespan of a banner really boils down to two key things: what it’s made of and where you put it. An indoor banner, safe from the sun and rain, can look great for years. An outdoor banner, on the other hand, has a much tougher life.
A well-made outdoor vinyl banner should give you a good 3-5 years of service before the sun starts to fade its vibrant colours. If your banner is going up in a particularly windy spot, choosing a mesh vinyl and making sure it's installed securely can make a huge difference to its longevity.
And don't forget the simple things – giving it a gentle clean now and then and storing it rolled (never folded!) will help you get the most out of your investment.
At SONI DESIGN, we're all about turning your vision into a high-impact banner that commands attention. Our team is here to walk you through every step of the process, making sure your project is brought to life with real quality and craftsmanship. Ready to get started? Let's create something brilliant together at https://www.sonidesign.co.nz.
Leave a Comment
Stay home & get your daily
needs from our shop
Start You'r Daily Shopping with Nest Mart