
Your cart is currently empty.

Ever wondered how professionals get that perfectly smooth, bubble-free finish on mounted prints or event signage? More often than not, the secret isn't some high-tech machine but a humble can of adhesive glue spray. It's the unsung hero that holds countless creative and business projects together, delivering a flawless look every time.
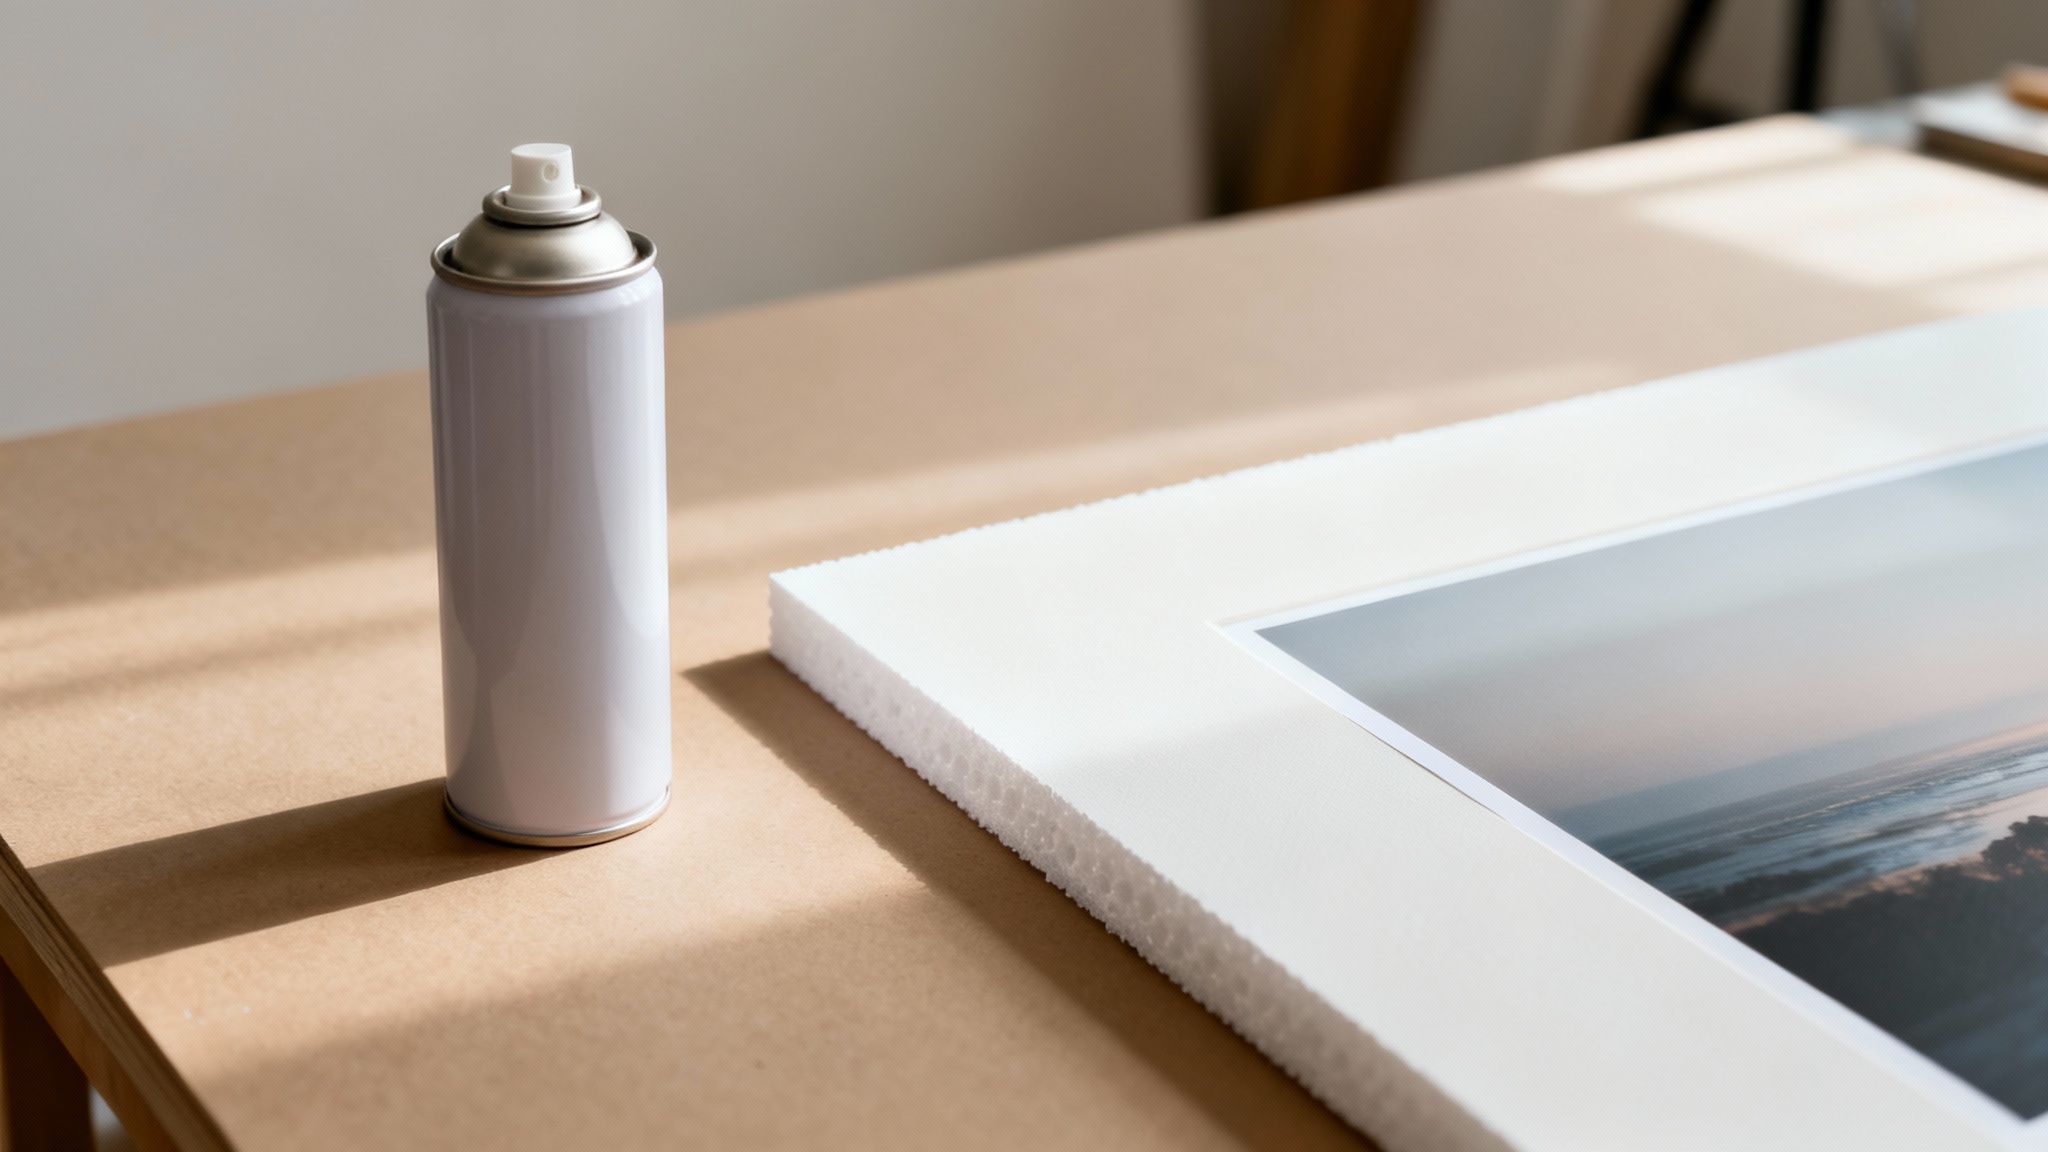
Think of it as a bonding solution in an aerosol can, designed for fast, even application over large areas. Unlike traditional liquid glues that you have to apply in beads or lines, an aerosol adhesive lays down a fine, uniform mist. This completely changes the game.
Why It's a Go-To for Pros
This misty application is the key to avoiding the lumps, bumps, and wrinkles that can easily ruin delicate materials like paper, thin vinyl, or fabric. For any business that needs to turn around high-quality work on a deadline, the ability to cover a big surface quickly makes it an absolute powerhouse.
For businesses in retail, events, or real estate, presentation is non-negotiable. A shoddily mounted sign or a peeling graphic can instantly damage your brand's credibility. Adhesive glue spray is the reliable fix for these all-too-common problems.
Here’s why it’s so effective:
- Speed and Efficiency: You can coat large surfaces like foamboard or posters in mere seconds. This dramatically cuts down assembly time compared to brushing or rolling on liquid glue.
- Even Coverage: The atomised spray ensures a thin, consistent layer of adhesive. This is crucial for avoiding imperfections and achieving a strong, complete bond across the entire surface.
- Versatility: With so many different formulas out there, you can find a spray designed for just about any material, from lightweight paper to heavier substrates like plastic and even metal.
The real magic of adhesive glue spray is its ability to create a strong, invisible bond without changing the texture of the material you’re working with. It makes assembled pieces look like they were always a single, seamless product.
This guide will walk you through everything you need to know to get the most out of this tool, from picking the right type for your job to mastering the application techniques. Let’s get stuck in.
Understanding the Different Types of Adhesive Glue Spray
Think of choosing the right adhesive glue spray like picking the right tool for a job. You wouldn't use a hammer to drive a screw, and the same logic applies here. Using the wrong spray can lead to a whole lot of frustration, not to mention a ruined project. Not all adhesive sprays are the same, and getting your head around the main differences is the first step to getting a professional, long-lasting finish on your signs and prints.
The world of spray adhesives really boils down to two main things: how strong the bond is and what it's made of. On one end of the spectrum, you have the heavy-duty options designed for maximum durability. On the other, you'll find more flexible sprays that let you make adjustments on the fly. Picking the right one means you won't have to deal with a permanent sign peeling off in the rain or a delicate poster tearing because the glue was just too aggressive.
Permanent vs Temporary Bonds
The first and most important question to ask is: how permanent do you need this to be? Every adhesive spray is engineered for a specific job, and understanding the difference between a permanent and temporary bond is key.
A permanent adhesive glue spray is exactly what it sounds like. It creates a bond that’s designed to last forever. Once you join the surfaces and the adhesive cures, they're not coming apart without a fight. This is your "weld in a can"—the one you grab when durability is the top priority.
- Best For: Outdoor signage, mounting permanent displays, bonding materials that will cop a bit of wear and tear, and creating long-lasting menu boards.
- Key Feature: High-strength, often weather-resistant, and creates a tough, enduring connection.
On the flip side, a temporary or repositionable adhesive spray is like a super-powered sticky note. It gives you the freedom to place, lift, and re-stick your materials multiple times without leaving a sticky mess or damaging the surface underneath. This stuff is an absolute lifesaver for projects that need perfect alignment before you commit.
- Best For: Making stencils, putting up temporary window displays, aligning graphics before the final mounting, and assembling multi-layered mock-ups.
- Key Feature: Low-tack adhesion that provides a light grip, allowing for easy removal and repositioning.
Choosing between permanent and temporary adhesive isn't just about strength; it's about control. A repositionable spray gives you the freedom to get your alignment perfect, while a permanent spray offers the peace of mind that your finished work will stay put.
Water-Based vs Solvent-Based Formulas
Beyond just how sticky it is, the chemical makeup of an adhesive spray plays a huge role in its performance, drying time, and safety. The two main families are water-based and solvent-based, and each has its own set of pros and cons. This is becoming a bigger deal as more businesses look for safer, more eco-friendly options.
In fact, you can see a clear shift happening in the industry. Water-based formulas, which use water to carry natural and synthetic polymers, now make up 43.4% of the global market. They're safer and have fewer fumes. In contrast, traditional solvent-based products, which often contain chemicals like polyurethane and acrylics, are becoming less popular due to their high volatile organic compound (VOC) content. You can learn more about these market trends and how they're shaping what's available.
To help you choose the right one for your workshop, we've put together this quick comparison table.
Adhesive Glue Spray Type Comparison
| Adhesive Type | Best For | Bond Strength | Key Feature | Cleanup |
|---|---|---|---|---|
| Permanent | Outdoor signs, long-term displays, high-traffic areas. | Very High | Creates an unbreakable, weather-resistant bond. | Mineral spirits or adhesive remover. |
| Repositionable | Stencils, mock-ups, temporary graphics, photo mounting. | Low to Medium | Allows for placement, removal, and re-sticking. | Most residues rub off; mild solvent if needed. |
| Water-Based | Indoor use, paper, fabric, foam, office or school projects. | Medium to High | Low odour, non-flammable, and low VOCs. | Warm, soapy water while wet. |
| Solvent-Based | Metal, plastic, wood, demanding industrial applications. | High to Very High | Fast-drying and creates a very strong, rigid bond. | Mineral spirits or a dedicated solvent cleaner. |
Getting a handle on these basic types—permanent, temporary, water-based, and solvent-based—is the first step to making a smart choice. It means you can confidently pick an adhesive glue spray that not only gives you the right bond but also suits your materials, your work environment, and your safety standards.
How to Match the Right Adhesive to Your Material
Picking the right adhesive spray is a bit like matchmaking. You have to find the perfect partner for your material, otherwise the relationship is doomed from the start. A bond’s success really does live and die by this compatibility, and understanding how an adhesive interacts with a specific surface is the key to creating a professional, long-lasting project.
Think of it this way: delicate watercolour paper has completely different needs than a rigid sheet of aluminium. One requires a gentle, acid-free touch, while the other demands a high-strength, industrial-grade grip. Using the wrong formula can lead to soaked-through paper, peeling vinyl, or plastics that just refuse to stick.
This section is your practical playbook for pairing the right adhesive with the right material, every single time.
Taming Porous Surfaces: Paper and Foamboard
Porous materials like paper, cardboard, and foamboard are thirsty. They have a tendency to drink up liquid adhesives, which can cause ugly staining, warping, or a weak, inconsistent bond. This is where a light-touch adhesive spray truly shines.
For these projects, you need a spray that sits on the surface rather than sinking in.
- For paper and photos: Always, always go for an acid-free, photo-safe adhesive. Standard glues contain acids that will cause paper and photos to yellow and turn brittle over time, completely ruining your work. A light, repositionable spray is often your best bet for getting the alignment just right.
- For foamboard and cardboard: A general-purpose craft adhesive usually does the trick. Just apply a light, even coat to stop it from getting oversaturated. If you need the bond to be permanent, a medium-strength permanent spray is a good choice, but avoid heavy, wet applications.
The goal here is simple: create a strong bond with minimal moisture. A fine mist ensures the adhesive sits on top of the fibres instead of soaking deep into them.
Bonding to Smooth, Non-Porous Surfaces
Non-porous surfaces like vinyl, plastics, and metals present the opposite challenge. They’re slick and offer very little for an adhesive to grip onto. The glue can’t soak in, so it has to form a powerful surface-level bond. This is where the high-tack, permanent adhesive sprays come into their own.
Vinyl Graphics and Signage
Vinyl is flexible and relatively smooth, so you need an adhesive specifically designed for plastics. A high-strength permanent spray is essential for mounting vinyl graphics onto substrates like corflute, PVC, or metal signs. This ensures the vinyl won't peel or lift at the edges, especially when temperatures fluctuate.
Plastics and Acrylics
Plastics can be a real headache because their surface energy varies so much. Some, like acrylic, bond fairly well, while others are notoriously difficult. For most plastics, a specialised plastic primer or a high-performance industrial spray adhesive is necessary to create a connection that actually lasts.
When working with non-porous materials, surface preparation is everything. Wiping the surface with isopropyl alcohol is a crucial step. It removes oils, dust, and residues that act as a barrier between the adhesive and the material, ensuring the strongest possible bond.
The principles here are directly related to those behind choosing the right sticker or label, as both involve matching an adhesive's properties to the intended surface for maximum performance.
Working with Fabrics and Textiles
When you’re bonding fabrics, the main goals are to prevent bleed-through and maintain flexibility. A heavy, wet adhesive will soak right through the weave, creating dark, stiff patches on the fabric—not a good look.
You’ll want to look for a specialty fabric adhesive spray. These are formulated to provide a strong bond without saturating the material. They are perfect for appliqué work, quilting, or just temporarily holding fabric in place for sewing. In fact, a temporary or repositionable fabric spray can be an invaluable tool for creating stencils or patterns directly on textiles.
Adhering to Metal and Other Demanding Materials
For light metals like aluminium, which are often used in professional signage, you need maximum strength and durability. An industrial-grade, high-strength permanent adhesive spray is the only reliable option here.
These formulas are designed for extreme adhesion and can often withstand weather and temperature changes, making them ideal for both indoor and outdoor applications. Just make sure the metal surface is impeccably clean, dry, and free of any grease or oils before you start. This prep work is non-negotiable if you want a bond that will last for years.
By carefully considering the properties of your material—whether it's porous, slick, flexible, or rigid—you can confidently select an adhesive spray that is perfectly suited for the task. This thoughtful approach eliminates guesswork and sets your project up for a flawless, professional finish.
Your Step-By-Step Guide to a Flawless Finish
Even the best spray adhesive on the market will let you down if your technique isn't right. That perfectly smooth, professional finish you see on high-end signage and displays? It’s not luck—it's all about a methodical process. Let's walk through the entire application, from prepping your workspace to locking in a perfect, lasting bond.
Getting these steps right means you can sidestep common headaches like bubbles, wrinkles, and weak adhesion. Think of it like painting a room: the prep work you do upfront directly impacts the final result. A few moments spent getting the surface ready will save you hours of frustration down the line.
Preparing Your Surface for Success
The journey to a flawless bond starts long before you even pick up the can. Any dust, grease, or lingering moisture on your surfaces will create a barrier, stopping the adhesive from grabbing hold properly. In my experience, a weak bond can almost always be traced back to poor preparation.
To give your project the best chance of success, run through this simple checklist:
- Clean Thoroughly: Grab a lint-free cloth and wipe down both surfaces. For non-porous materials like plastic or metal, a quick wipe with isopropyl alcohol works wonders to cut through oils and residues that kill adhesion.
- Make Sure It's Bone Dry: Adhesive needs a dry surface to cure correctly. Even a tiny bit of moisture can compromise the bond, so give any cleaning agents plenty of time to evaporate completely.
- Test in a Hidden Spot: If you’re trying a new material or adhesive, always do a small patch test first. This is your safety net—it confirms compatibility and lets you spot any weird reactions, like discolouration or warping, before you commit to the whole project.
This quick visual guide makes it easy to match your prep and adhesive choice to the material you're working with, whether it's porous paper or smooth metal.
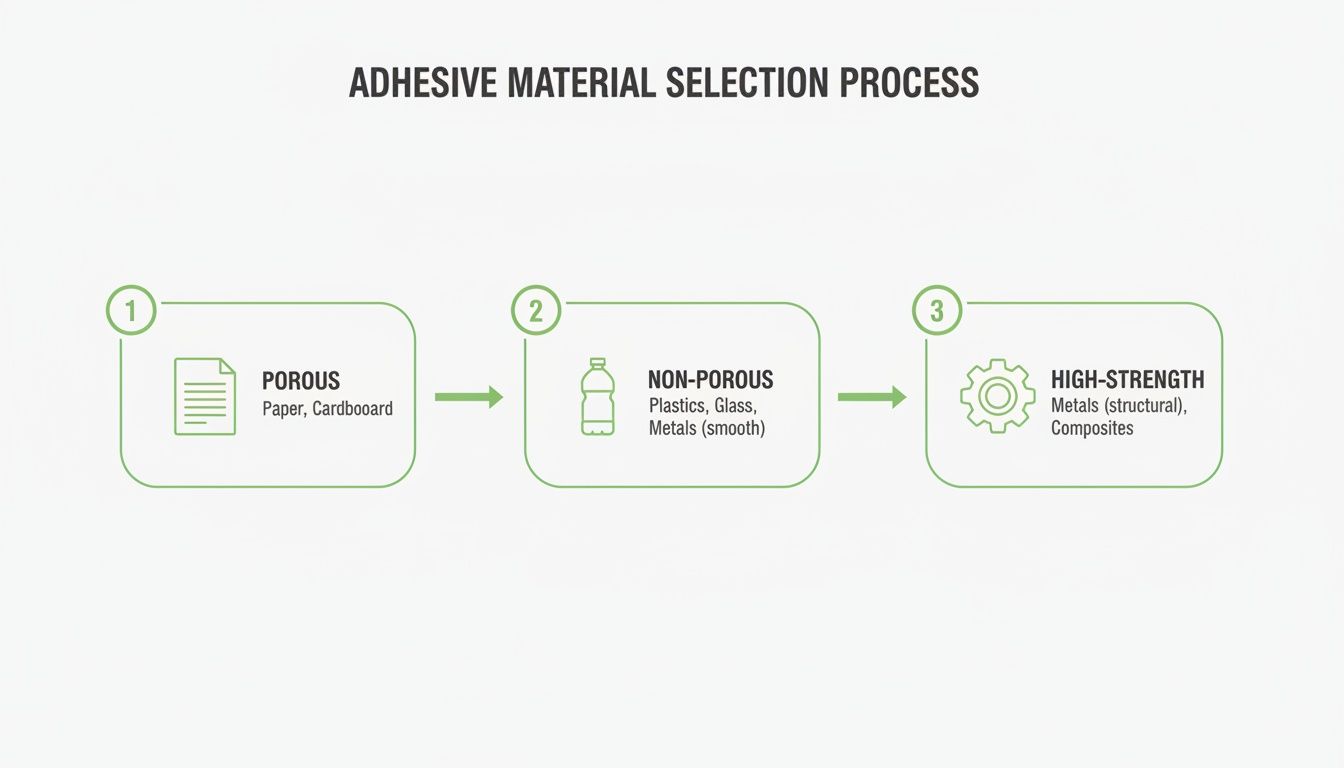
As the flowchart shows, the properties of your material really dictate your whole strategy. It’ll point you toward the right strength and type for a successful job.
Mastering the Spraying Technique
Okay, surfaces are prepped and ready. Now it's time to lay down the adhesive. The goal here is a thin, even, and consistent coat across the entire surface. This is where the real skill comes in.
First things first, shake the can like you mean it for at least a minute. This mixes the adhesive and propellant properly, preventing those annoying sputters and an uneven spray pattern. Hold the can 15-20 centimetres from the surface. Too close, and you’ll get a wet, goopy mess; too far, and the adhesive will start drying in mid-air before it even lands.
Pro Tip: Don’t start spraying directly on your material. Begin just off the edge, move across in one steady, sweeping motion, and release the nozzle just after you’ve passed the other side. This technique, called ‘banding’, stops thick, messy build-ups at the start and end of each pass.
For the strongest possible bond, you'll want to apply a coat to both surfaces you’re joining. Let the adhesive sit for a minute or so until it becomes tacky to the touch. Then, carefully bring the two surfaces together, applying firm, even pressure from the centre outwards to squeegee out any trapped air bubbles.
Common Mistakes to Avoid
Even those of us who’ve been doing this for years can slip up. Knowing what to watch out for will help you fix issues before they have a chance to ruin your project.
- Applying Way Too Much Adhesive: This is the number one mistake I see. A thick coat doesn't mean a stronger bond. It just takes an eternity to dry and can make materials like paper warp or get completely saturated. Less is more.
- Spraying in a Cold or Humid Environment: Temperature and humidity have a massive impact on drying times and bond strength. For best results, always work in a warm, dry, and well-ventilated space.
- Rushing the Cure Time: Adhesives need time to work their magic. While a bond might feel solid after a few minutes, most permanent sprays need a full 24 hours to cure completely. Don't put any stress on the bond during this critical period.
Getting that flawless finish often comes down to the little details with your equipment; for instance, something as simple as choosing the right tip size for your airless sprayer can make a huge difference in your application. Stick to these steps and keep these common pitfalls in mind, and you'll be able to get professional-quality results with your spray adhesive every time.
Essential Safety and Proper Storage Practices
Working safely with an adhesive glue spray isn't just a suggestion—it's non-negotiable. While these products are incredibly handy, they are aerosolised chemicals at the end of the day. Treating them with respect is the first rule for any professional, protecting you, your team, and keeping your workshop safe.
This goes well beyond just cracking a window open. Proper safety means knowing the risks, gearing up correctly, and handling storage and disposal like a pro.
Ventilation Is Your First Line of Defence
Good ventilation is the single most important thing to get right when using a spray adhesive, especially with the more potent solvent-based formulas. These products release fumes and volatile organic compounds (VOCs) into the air, which can be pretty nasty if you're breathing them in a confined space.
Think of the fumes like smoke. Your goal is to give that smoke a clear and immediate escape route out of your workspace, not let it hang around.
Good ventilation isn't passive; it's about creating active airflow. This might mean setting up fans to pull fumes away from you towards an open door, or even better, working in a dedicated spray booth with a proper exhaust system.
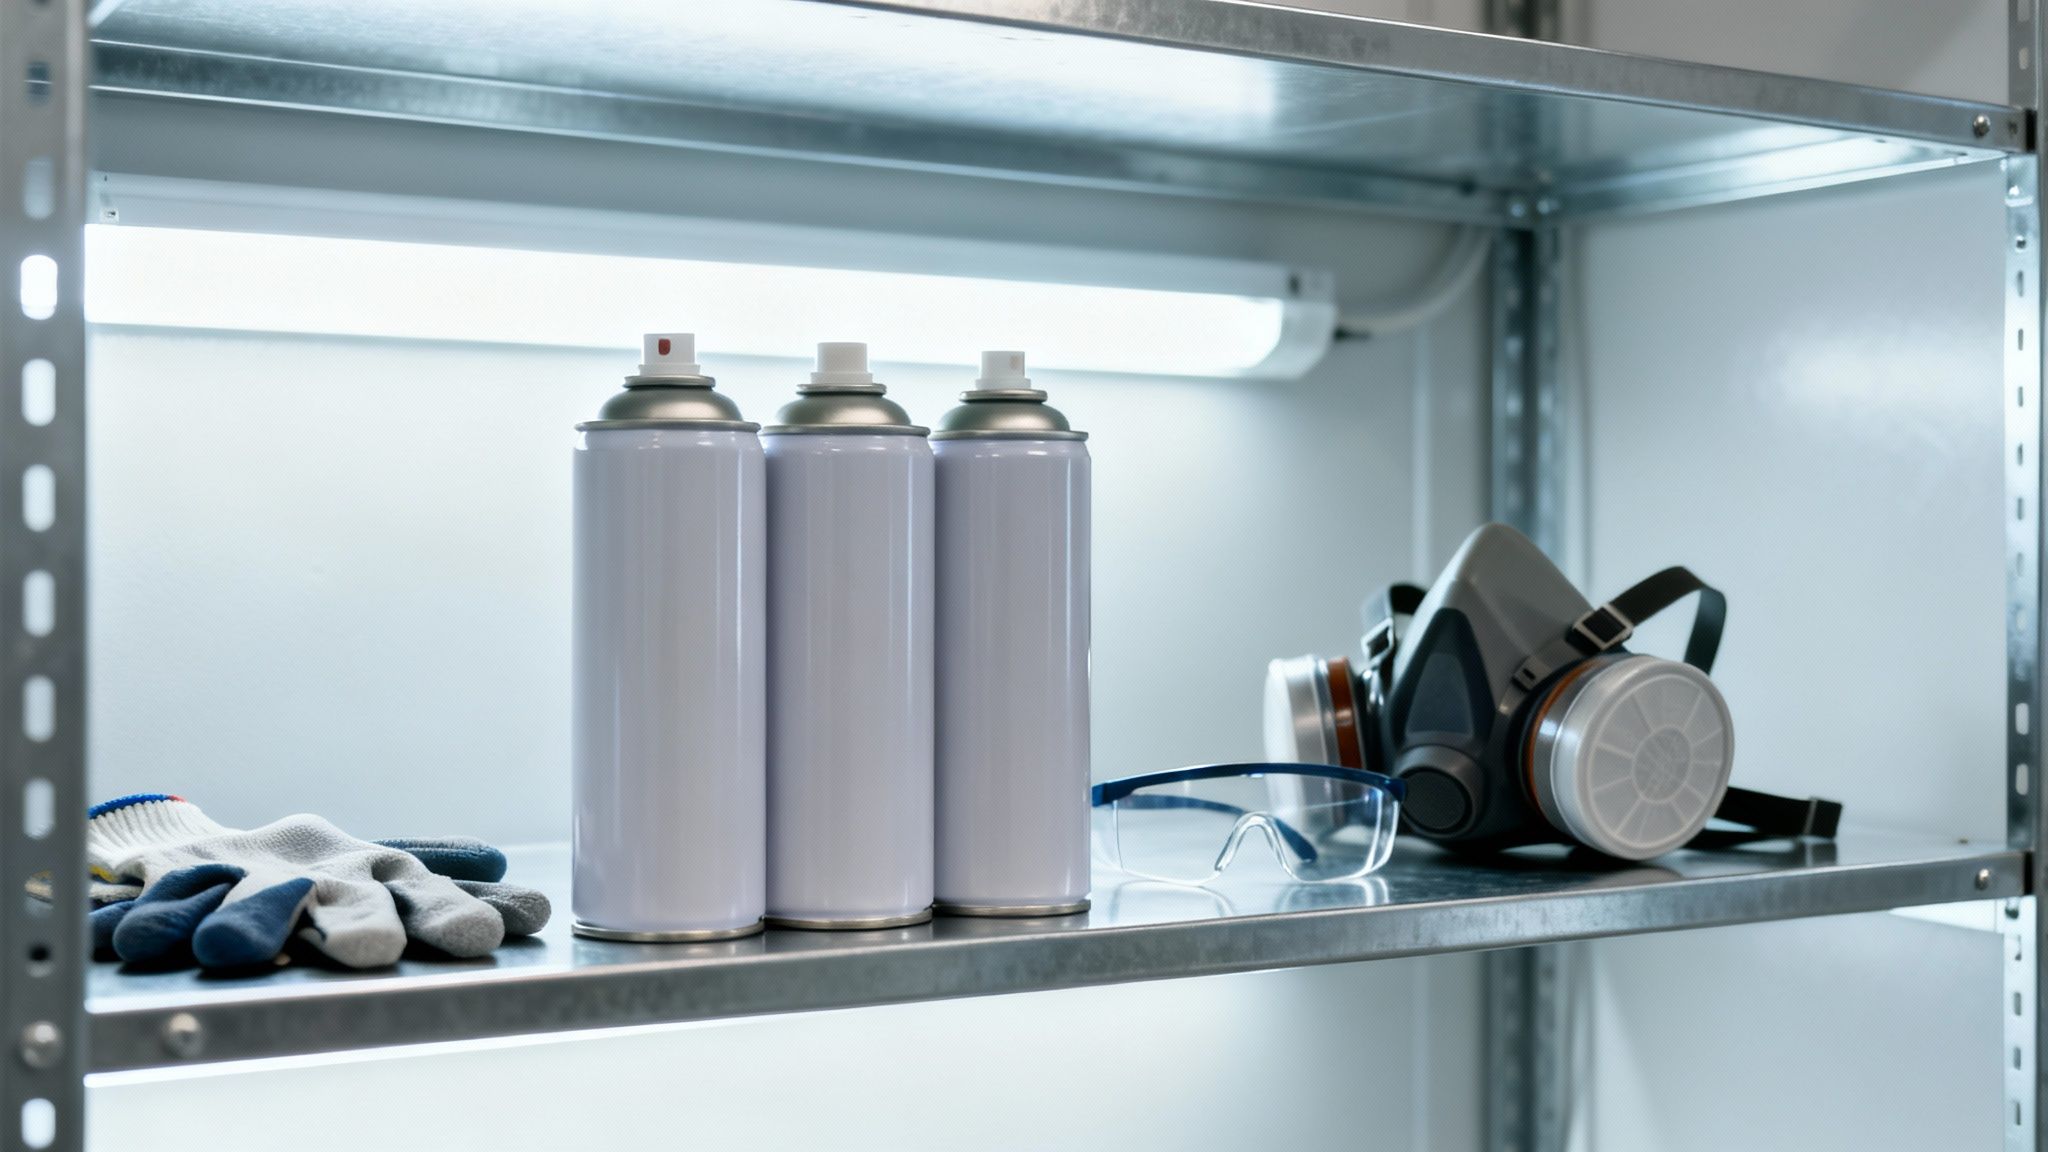
Personal Protective Equipment (PPE) is Not Optional
Your next layer of protection is your personal protective equipment, or PPE. This gear creates a physical barrier between you and any chemical exposure, protecting your eyes, lungs, and skin.
Here’s the essential kit you should have within arm's reach every time:
- Respirator: A simple dust mask is useless here. You need a proper respirator fitted with cartridges rated for organic vapours to effectively filter out the harmful stuff.
- Safety Glasses: You really don't want accidental overspray in your eyes. It can cause serious irritation. Goggles are even better, as they form a seal around the eye area.
- Gloves: Nitrile or other chemical-resistant gloves are a must to keep adhesive off your skin. It can be a real pain to remove and can easily cause irritation.
Safe Storage and Responsible Disposal
How you store your spray adhesive is just as important as how you use it. Aerosol cans are under pressure, and they need to be handled carefully to avoid any accidents. A few simple rules will keep them stable and safe.
Always store cans in a cool, dry place well away from any potential ignition sources. That includes sparks, open flames, or even just intense, direct sunlight, which can heat the can and cause the internal pressure to build to dangerous levels.
Disposing of them correctly is also critical. Never, ever puncture an aerosol can or chuck it into a fire. Check with your local council for their specific guidelines on hazardous material disposal, as many areas have designated drop-off points for aerosol products.
This focus on safety is part of a bigger picture. The global spray adhesives market is expected to grow from USD 9.5 billion in 2025 to USD 14.8 billion by 2035, with much of that growth driven by a major shift towards safer, more eco-friendly products. For businesses here in New Zealand, getting on board with this trend toward water-based and low-VOC adhesives is a smart move for both health and business. You can discover more insights about these global market trends on futuremarketinsights.com.
Choosing the Best Adhesive for Your Business Needs
Picking the right adhesive spray isn't just a minor detail—it's a decision that can make or break your project. Get it right, and your work looks sharp, holds up over time, and makes your business look good. Get it wrong, and you're dealing with peeling signs, ruined materials, and the frustrating cost of a do-over.
Think of it as a balancing act. You need to weigh a few key factors against the specific job you're doing. By getting this right, you can confidently choose a spray that gives you quality results every single time, which is especially important for local businesses where every investment in tools and materials counts.
Key Decision-Making Criteria
When you're staring at a shelf of adhesive sprays, it all boils down to four key questions. Answering these will point you straight to the right can for the job.
-
Bond Permanence: How long does this need to stick? If you're a real estate agent adding a "Sold" rider to a sign, you'll want a repositionable spray that peels off cleanly later. But if you're a café owner putting up a permanent menu board, you’ll need a high-strength permanent bond that can handle daily wear and tear.
-
Drying and Curing Time: How much working time do you have? A busy print shop mounting posters for a same-day event needs a quick-tack spray to keep the workflow moving. On the other hand, someone working on a detailed architectural model might prefer a slower-curing glue that allows for tiny adjustments before it sets for good.
-
Low-VOC and Safety: Where are you working, and who's breathing the fumes? For indoor jobs or workshops without perfect airflow, a low-VOC, water-based formula is a must for your team's health. It’s also a smart move that shows your customers you care about environmentally friendly practices.
-
Ease of Cleanup: What's the plan for overspray? A repositionable adhesive usually leaves minimal residue that you can just rub away. A heavy-duty, solvent-based spray is a different story—you'll likely need mineral spirits or a special cleaner, which adds another step and more chemicals to your process.
The smartest approach is to match the adhesive's features to the project's lifespan. Temporary jobs need flexibility and clean removal. Permanent installations demand pure strength and durability.
Aligning with Market Trends
It also pays to know what's happening in the wider market. For instance, the New Zealand adhesive import market grew steadily at a rate of 4.18% each year between 2020 and 2024, thanks to industries that depend on quality glues. This tells us that more businesses are focusing on getting their material choices right. You can read more about New Zealand adhesive market trends to see how things are developing.
By thinking through these factors—from permanence and dry time to safety and cleanup—you can choose an adhesive glue spray that does the job right while also supporting your workflow and brand reputation. It’s a thoughtful approach that helps make sure every project is a success.
Frequently Asked Questions About Adhesive Glue Spray
Even when you think you’ve got the hang of it, questions can pop up right in the middle of a project. Getting a quick, clear answer can be the difference between a great result and a costly do-over. Here are some of the most common things we get asked about using adhesive glue spray.
Can I Just Use One Type of Spray for Everything?
It would certainly be easier, wouldn't it? But trying to find one can to rule them all usually ends in disappointment. A 'one-size-fits-all' approach just doesn't work with adhesives.
Think about it: an industrial-strength spray meant for bonding metal will completely destroy a delicate paper sign, soaking right through and leaving a warped, ugly mess. On the flip side, a light-tack craft spray hasn't got a hope of holding up an outdoor sign against the elements. The real secret is matching the adhesive—permanent, repositionable, or a specialty formula—to the job at hand. That's how you get a professional bond that actually lasts.
How Do I Get Rid of That Sticky Residue?
Ah, the dreaded sticky patch. How you tackle it really depends on what kind of glue you used. For most temporary or repositionable sprays, something as simple as a citrus-based cleaner or a bit of isopropyl alcohol on a rag will do the trick.
But if you’re dealing with a fully cured, permanent adhesive, you'll need to bring in the heavy hitters. Look for a specialised adhesive remover that’s formulated to dissolve the bond without damaging the surface underneath.
Pro Tip: Always, always test your cleaning solution on a small, hidden spot first. The last thing you want is to find out it discolours or damages your material after you've already applied it somewhere obvious.
How Long Does an Unopened Can Last?
Most adhesive spray cans will be good for about one to two years from the date they were made, which you can usually find stamped on the bottom. But that shelf life depends entirely on how you store it.
To keep your adhesive ready for action, just follow these simple rules:
- Keep it cool and dry: A shelf in a temperature-controlled workshop is perfect. Avoid places like garages that get really hot or cold.
- Stay away from sunlight and heat: Heat builds up pressure inside the can, which is a serious safety risk.
- Clear the nozzle after every use: This is a simple but brilliant trick. Just turn the can upside down and give it a quick spray until only clear gas comes out. It stops dried glue from clogging the nozzle for next time.
If you grab a can and the spray is sputtering or the bond just feels weak, it's probably past its best. A fresh can is a much better bet than a failed project.
At Soni Design, we bring your vision to life with expert signage, printing, and promotional products. Let’s create something extraordinary together!
Leave a Comment
Stay home & get your daily
needs from our shop
Start You'r Daily Shopping with Nest Mart