
Your cart is currently empty.

When you're thinking about posters, the A2 poster size is often the perfect middle ground. Measuring 420 x 594 millimetres or 16.5 x 23.4 inches, it's a wonderfully versatile option. It’s big enough to make a real impact from across a room but still compact enough to fit comfortably in a wide range of indoor spaces. This balance makes it a go-to choice for all sorts of promotional materials.
Defining the A2 Poster Size
To really get a feel for the A2 size, it helps to understand where it comes from. It's part of the globally recognised ISO 216 paper standard, which is a brilliantly simple system. Think of the "A" series like a set of Russian nesting dolls. You start with the massive A0 sheet, and when you fold it in half, you get an A1. Fold that A1 in half, and—you guessed it—you get an A2.
This clever design means every paper size in the series keeps the exact same aspect ratio, which is incredibly handy for scaling designs up or down. Since New Zealand adopted this standard, the A2 has become a firm favourite for medium-sized displays. You can learn more about the most common paper sizes and their history to see how the whole system works.
This simple relationship makes the A2 a practical sweet spot for so many projects. It offers a generous canvas for your message without being overwhelmingly large. To give you a better idea, an A2 poster is exactly the same size as four standard A4 sheets of paper laid out in a grid.
A2 Poster Dimensions At a Glance
For those who just need the numbers, here’s a quick reference table breaking down the exact dimensions of an A2 poster.
| Unit | Width | Height |
|---|---|---|
| Millimetres (mm) | 420 mm | 594 mm |
| Centimetres (cm) | 42.0 cm | 59.4 cm |
| Inches (in) | 16.5 in | 23.4 in |
| Pixels (at 300 DPI) | 4961 px | 7016 px |
These are the core measurements you'll need, whether you're setting up a file in Adobe Illustrator or just trying to visualise the final print.
When you're working on the digital design, the pixel dimensions are tied to the resolution, which we measure in Dots Per Inch (DPI). This is a critical detail for getting a high-quality result.
Key Takeaway: For a professional, high-quality print, your A2 design file absolutely must be set to 300 DPI. This gives you a pixel count of 4961 x 7016 pixels, which is the magic number for ensuring your final poster is sharp, clear, and completely free of any blurriness or pixelation.
Getting these basics right is the first, most important step toward creating a poster that looks polished and professional.
How A2 Posters Make an Impact in New Zealand
The real magic of the A2 poster size isn’t just about its measurements; it’s about what you can do with it in the real world. Here in New Zealand, it’s the quiet workhorse of visual communication, striking that perfect balance between being seen and being practical. It’s the go-to for so many businesses and organisations that want to get a message across without completely taking over a space.
Think about it. From a busy shop on Queen Street to a quiet community hall in Dunedin, A2 posters are everywhere. They're just the right size for window displays, announcing everything from a seasonal sale to the arrival of new stock. Big enough to catch the eye of someone walking by, they're brilliant at turning pavement pounders into paying customers.
That adaptability is their secret weapon. An A2 poster looks just as at home showcasing a gourmet menu in a Ponsonby café as it does promoting a local theatre production in a Wellington foyer.
Driving Engagement in Key Kiwi Industries
You’ll find the A2 poster has become a staple in several key sectors across New Zealand, where it’s used to tackle very specific challenges.
-
Retail and Hospitality: Cafés, bars, and restaurants love them for displaying daily specials, happy hour deals, or upcoming events. In shops, they’re ideal for in-store promotions, giving a more professional and substantial feel than an A3 without the full-on commitment of a massive A1.
-
Events and Entertainment: Got a music festival in Hawke's Bay or a community market in Christchurch to promote? A2 posters are essential for creating that buzz. They fit perfectly on noticeboards, in shop windows, and at venue entrances, giving people all the key details in a format they can’t miss.
-
Real Estate: Agents often use A2 prints to feature stunning photos of properties in their office windows. The size is generous enough for impressive, detailed images that draw in potential buyers, showing off a home’s best features without needing a giant, costly display.
The A2 size is also deeply embedded in our education sector. Universities and design schools have pretty much standardised on these dimensions for student artwork, architectural plans, and technical presentations. In fact, industry data shows that A2 paper consumption in New Zealand has been growing by 6-8% each year since 2010, with printing spend topping NZ$45-50 million annually. That really speaks to how ingrained the format is in our commercial and institutional life.
A Strategic Marketing Asset
When you’re thinking about how an A2 poster can lift your brand’s visibility, it’s helpful to see it as one piece of a bigger puzzle. For small businesses trying to grow, developing a comprehensive content marketing strategy ensures that all your promotional tools, posters included, are pulling in the same direction.
An A2 poster is more than just printed paper; it’s a strategic touchpoint. It can inform, persuade, and inspire action, making it a cost-effective yet powerful component of any local marketing campaign in New Zealand.
At the end of the day, the A2 poster thrives because it just works. It delivers a solid visual punch in a package that’s manageable, affordable, and always looks professional. By seeing how it’s used in these familiar Kiwi contexts, you can start to get a clearer picture of how it could bring your own project to life.
Getting the Technical Details Right for a Flawless Print
You’ve got the A2 poster size down, but knowing the dimensions is only half the battle. The real magic happens in the technical details—things like resolution, bleed, and safe zones. Getting these right is what separates a professional, polished poster from one that just looks a bit… off. Think of it as the secret recipe for making what you see on screen match the final print from SONI DESIGN.
Why Resolution is King
Let’s talk about print resolution. Imagine it’s like the thread count in a set of luxury sheets. A low thread count feels rough and looks cheap, right? A high thread count gives you that smooth, premium finish. In the world of print, our "thread count" is measured in Dots Per Inch (DPI). This number tells you how many tiny dots of ink a printer will pack into every single inch of paper.
For a poster that people will see up close, a low DPI is a disaster. It leads to a blurry, pixelated image where you can almost count the dots. To avoid that amateur look, the gold standard in the industry is 300 DPI. This high resolution ensures your text is razor-sharp, your lines are clean, and your images look stunningly clear. It’s the key to a professional finish.
Setting Up Your File Like a Pro
To get that perfect edge-to-edge print, you need to master two critical concepts: bleed and the safe zone. These aren't optional extras; they're essential for avoiding common trimming mistakes that can spoil an otherwise brilliant design.
First up is bleed. This is simply a small extra margin you add around all sides of your artwork, typically between 3mm and 5mm. Why? Because trimming a massive stack of paper with absolute microscopic precision is impossible. The bleed area acts as a buffer. By extending your background colour or image into this zone, you ensure that when we trim the poster to its final A2 size, you won't be left with any ugly, accidental white slivers along the edges.
Pro Tip: Never, ever place important elements like your logo, contact details, or key text in the bleed area. This part of the design is meant to be chopped off.
Next is the safe zone. This is the opposite of bleed—it's an inner margin, also about 3mm to 5mm from the final trim line, where all your crucial content must live. Picture it as a protective bubble for your most important information. Keeping text, logos, and key visual elements inside this zone guarantees they won't get nicked by the trimmer.
This diagram shows how the A2 poster size is a workhorse across different sectors, from retail displays to real estate listings.
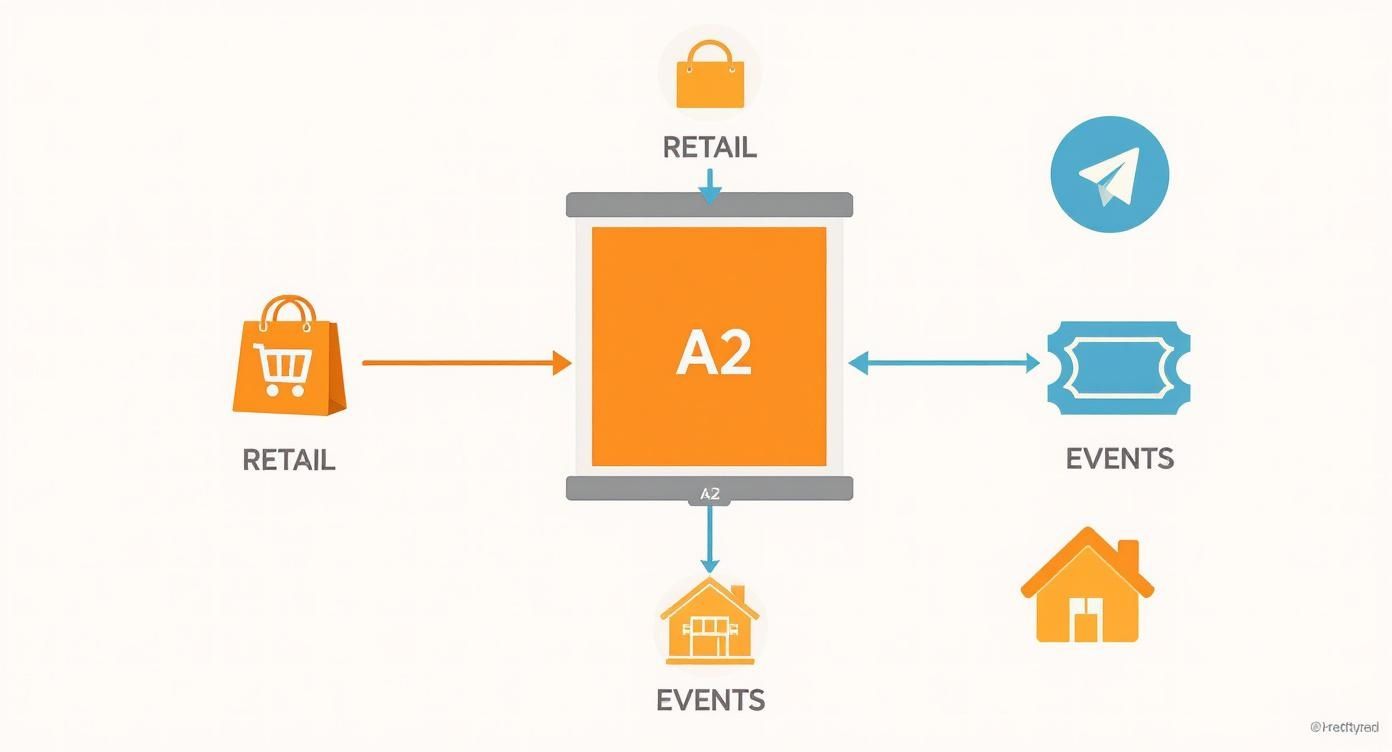
As you can see, the A2 format is a versatile communication hub for everything from event promotions to property showcases. By mastering these technical fundamentals—300 DPI for clarity, bleed for seamless edges, and a safe zone to protect your content—you’ll be delivering a print-ready file that produces perfect results, every single time.
Choosing the Right Paper for Your A2 Poster
Alright, so your design is locked in and looking brilliant on screen. The next step is just as critical: choosing the paper that will bring your vision into the real world. The paper stock, or substrate, you pick for your A2 poster is more than just a background—it completely changes the final look, feel, and even the lifespan of your print.
Think of it like this: the paper is the canvas for your art. The right choice makes your colours sing and gives your poster a sense of quality, while the wrong one can make even the best design fall flat. It all comes down to balancing two things: the paper’s finish (how it looks) and its weight (how it feels).
Understanding Paper Finish
The finish of your paper determines how it plays with light and how your colours are perceived. Here in New Zealand, you'll generally come across two main options, each with its own distinct character.
-
Gloss Finish: Want your poster to really pop? Gloss is your best friend. It has a shiny, reflective coating that makes colours look deeper and more vibrant, giving images an almost photographic sharpness. This makes it perfect for grabbing attention from a distance, like for concert posters, retail sale announcements, or anything that needs to make a big, bold statement. The only trade-off is that it can create a bit of glare under direct lights.
-
Matte Finish: For a more refined, elegant feel, you can’t go past a matte finish. Its non-reflective surface gives it a soft, smooth appearance that feels very premium to the touch. Because it eliminates glare, it’s ideal for art prints, informational charts, or any poster that will be viewed up close in a brightly lit space.
Our Tip: Choosing a finish is really about matching the paper’s personality to your design’s purpose. Gloss shouts for attention, while matte invites a closer, more thoughtful look.
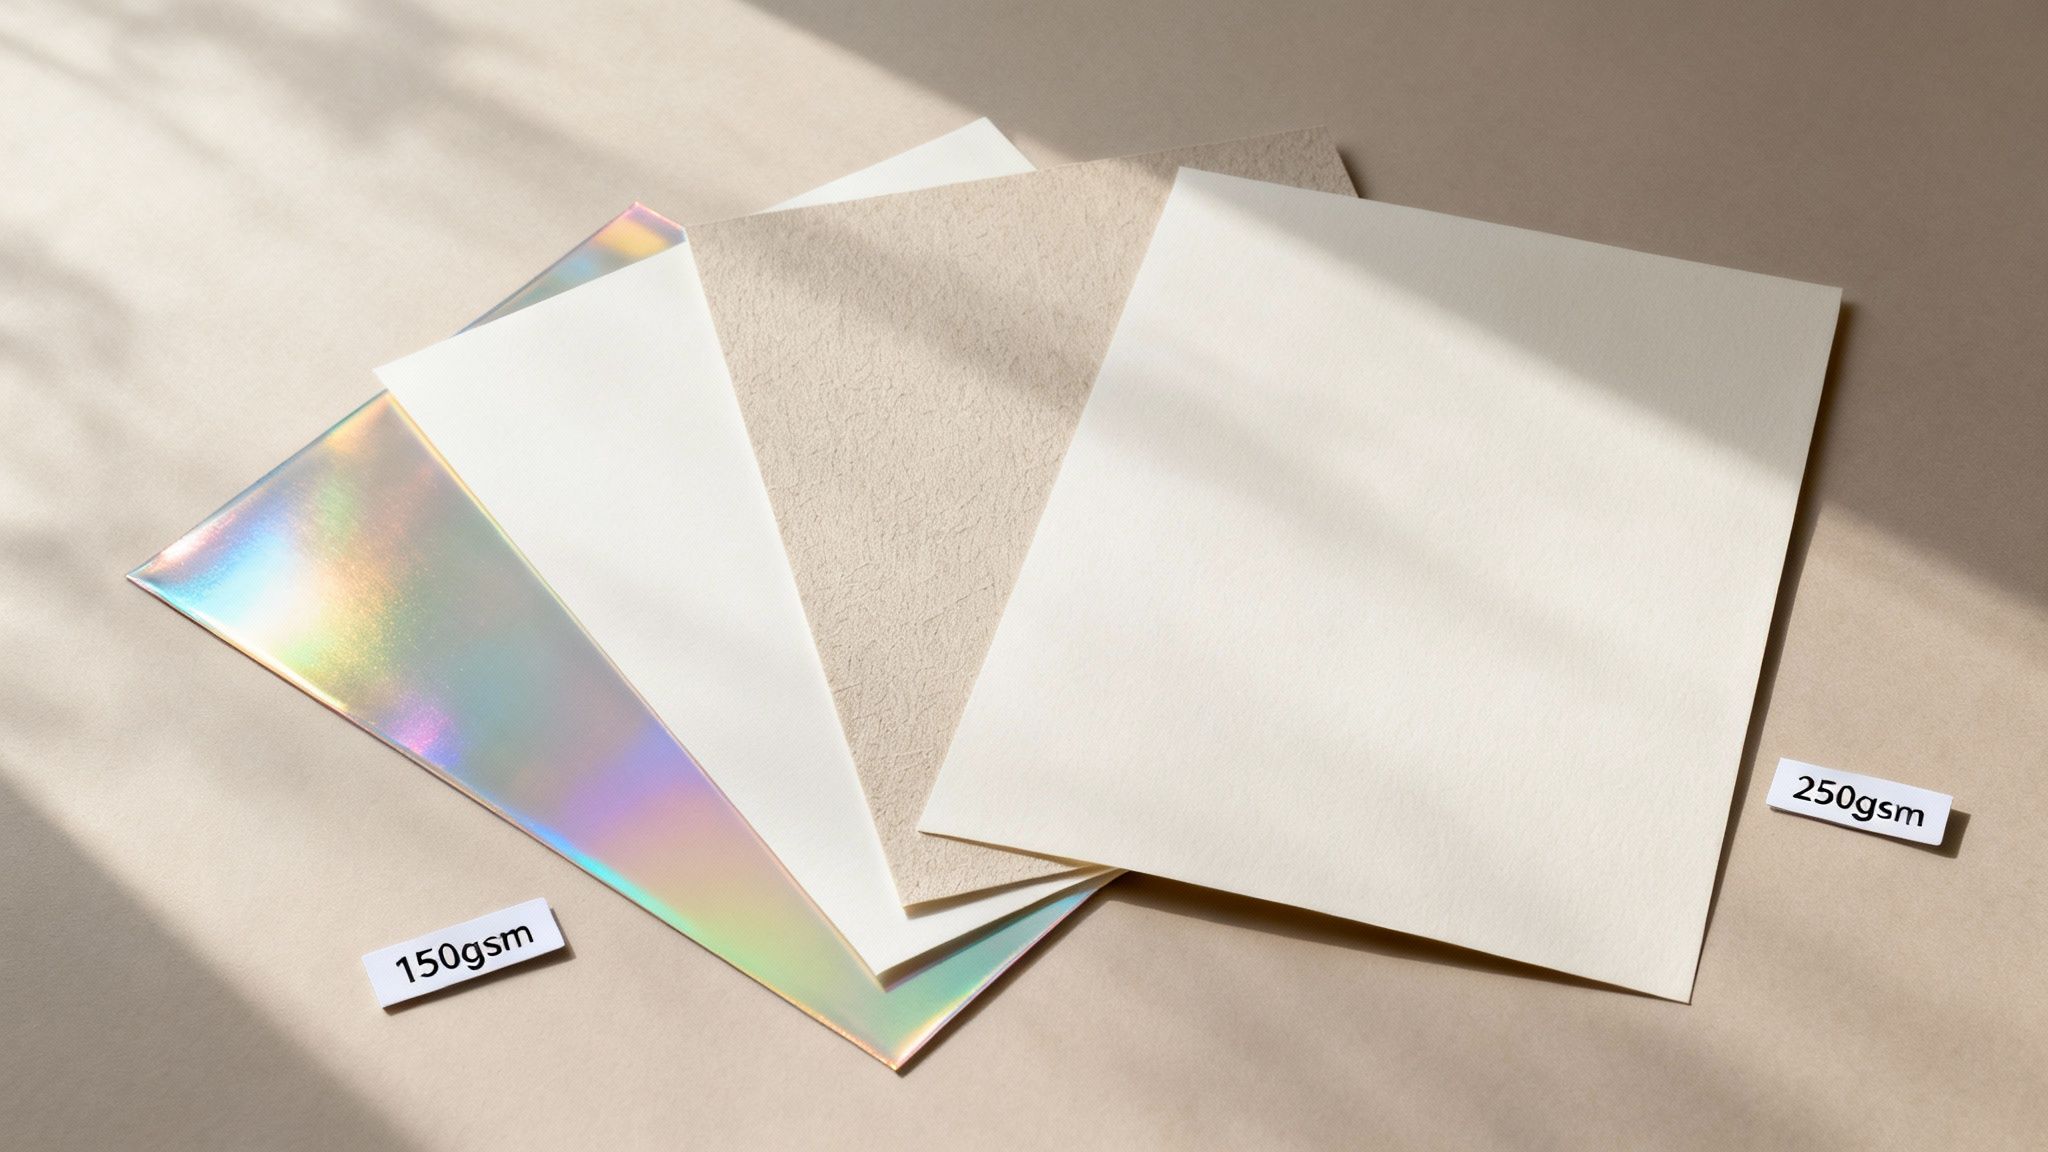
Decoding Paper Weight (GSM)
Now, let's talk about how the paper feels. This is determined by its weight, which we measure in Grams per Square Metre (GSM). It’s a simple concept: the higher the GSM number, the thicker and heavier the paper. A higher GSM generally means more durability and a more substantial feel.
For A2 posters, the GSM you choose should depend on how long you need the poster to last and where it's going to be displayed.
A common and budget-friendly choice is 150gsm. It’s a great all-rounder—light enough to be cost-effective but still sturdy enough for most short-term indoor uses. Think weekend market promos, special offers in a café, or event notices. It has a good feel without being too stiff.
If you need something more robust, stepping up to a 250gsm stock is a fantastic option. This heavier paper feels much more premium and stands up far better to handling and the test of time. It's the perfect choice for long-term displays like office art, detailed real estate plans, or high-end prints that need to look pristine for months or even years.
Getting Your A2 File Ready for a Professional Print Run
So, you've finalised your masterpiece and picked the perfect paper stock. The last hurdle is preparing a flawless file for printing. This 'pre-flight check' is arguably the most critical step; it's the final quality control that ensures the A2 poster you get back from SONI DESIGN looks just as brilliant as it does on your screen.
Think of your design file as a recipe you’re handing to our printers. If the instructions are vague or missing a few key ingredients, the final dish might not turn out as you hoped. Let’s make sure that recipe is crystal clear, starting with two of the most common culprits for print mishaps: fonts and colours.
Locking in Your Fonts and Colours
First up, let's talk fonts. Your computer has its own library of fonts that you’ve used in your design. The catch? Our printing systems might not have the exact same ones installed. When that happens, the system tries to help by swapping in a default font, which can completely throw off your carefully crafted layout and design.
To avoid this all-too-common disaster, you need to convert your text to outlines (sometimes called "create outlines"). This simple command essentially turns your editable text into fixed vector shapes. It locks your typography in place, guaranteeing it will look precisely the same on any computer, anywhere.
Next is the all-important colour profile. Your screen creates colour with light, using an RGB (Red, Green, Blue) profile. Professional printers, on the other hand, build colour with ink, using a CMYK (Cyan, Magenta, Yellow, Black) profile. They're two completely different languages.
Critical Step: Always convert your final design file to a CMYK colour profile before saving it. If you send us an RGB file, our printers have to guess how to translate those screen colours into ink. This often leads to disappointing colour shifts, making vibrant designs look unexpectedly dull.
Choosing the Right File Format
Finally, how you save your file makes a huge difference. Formats like JPG or PNG are fantastic for the web, but they aren't built for high-quality printing. For submitting print-ready artwork, the undisputed industry standard is a high-quality PDF.
For the best possible results, we recommend saving your file as a PDF/X-1a. This specific format was designed for "blind exchange," which is a fancy way of saying it packages everything—fonts, images, colour profiles, and bleed settings—into one self-contained, reliable file. It’s the safest way to ensure what you send is exactly what we print.
When you're getting your digital files ready, knowing how to check the technical details is a massive help. You can learn more about how to find metadata in photos, as this information often includes crucial details like resolution and colour profiles.
By following these final checks—outlining text, setting CMYK colour, and saving as a PDF/X-1a—you’re handing us a technically perfect file that's primed for an exceptional print run.
Got a Few Questions About A2 Posters?
Even after getting your head around all the technical specs, you might still have a few questions rattling around. That's completely normal. This section is designed to give you quick, clear answers to the most common queries we get here at SONI DESIGN.
Think of it as a final checklist before you hit "send" on your print file. We'll tackle how A2 stacks up against other sizes, give a final reminder on resolution, and offer some practical advice for framing your finished poster right here in New Zealand.
How Does A2 Compare to A1 and A3?
The A-series paper system is actually quite clever and easy to remember once you know the trick: it’s all about folding.
An A1 sheet is the next size up. If you fold it perfectly in half, you get an A2. So, an A2 is exactly half the size of an A1.
Going the other way, if you take that A2 sheet and fold it in half again, you’ve got yourself an A3. This means an A2 is double the size of an A3. This unique spot in the middle is what makes the A2 so useful for everything from cafe menus to art prints.
What’s the Best Resolution for an A2 Poster?
For a print that looks crisp, professional, and anything but blurry, you should always, always aim for 300 DPI (dots per inch). This is the gold standard in the print industry for anything that people will see up close.
To get that 300 DPI quality, your A2 design file needs to be 4961 x 7016 pixels. Setting up your document with these dimensions right from the start is the single best thing you can do to guarantee a sharp, beautiful print.
Can I Print a Standard Photo on A2 Paper?
You absolutely can, but there's a catch. The final quality hinges entirely on the resolution of your original photo. A picture from a modern DSLR camera or even a high-end smartphone will likely have more than enough pixels to look fantastic when blown up to A2 size.
A word of warning, though: be very careful with images you've pulled from the internet or social media. They are often heavily compressed to save space, which strips out a lot of detail. When you try to print them at a large size, they'll just look fuzzy and pixelated. Always start with the highest quality source file you can possibly find.
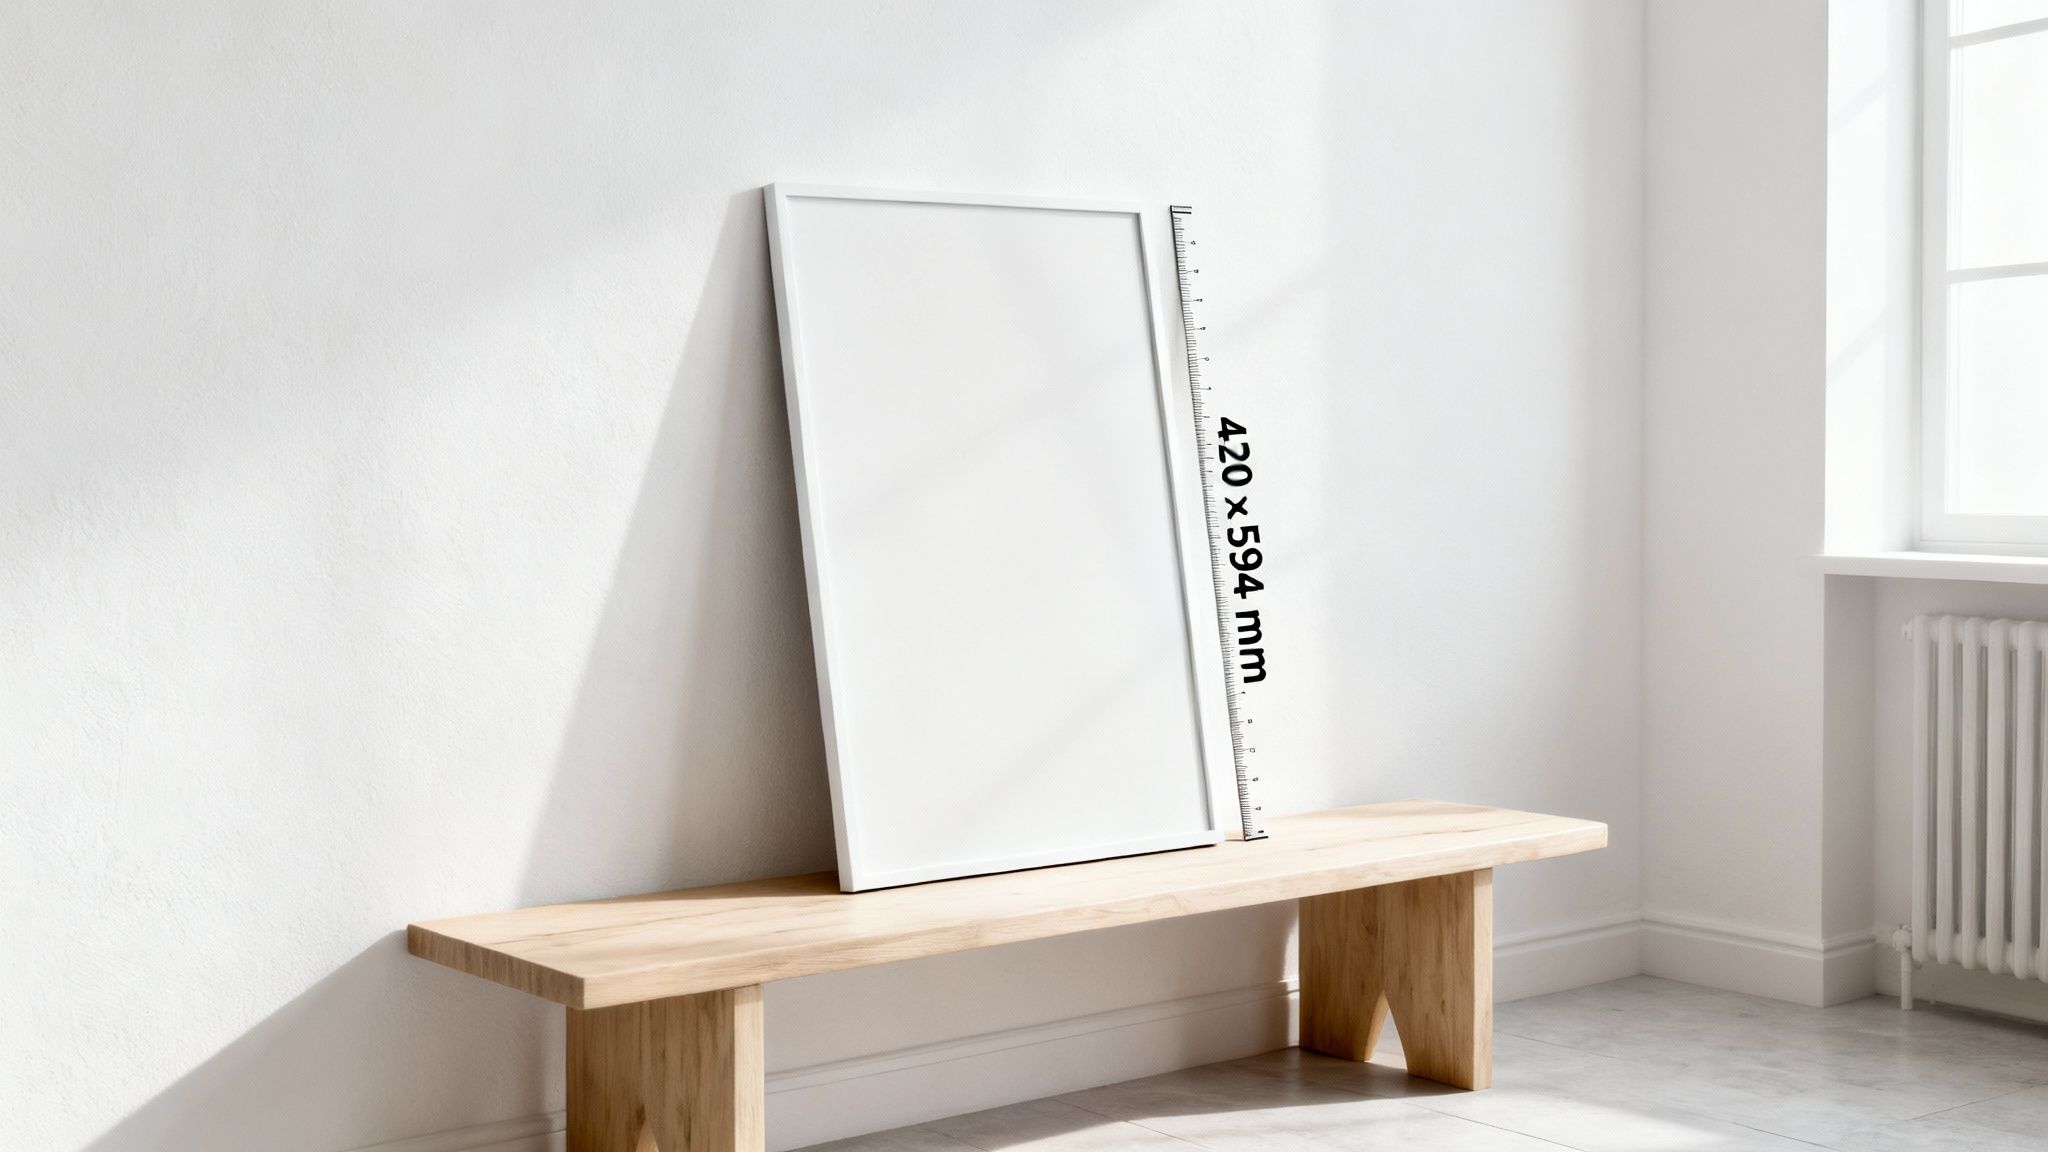
What’s a Common Frame Size for an A2 Poster?
One of the best things about using a standard size like A2 is how easy it is to frame. Here in New Zealand, finding an off-the-shelf frame is both simple and affordable.
The standard A2 frame size is 42 x 59.4 cm (or 420 x 594 mm). You’ll find frames in this exact size at major retailers all over the country, including:
- The Warehouse
- Kmart
- Briscoes
- Specialty framing shops
This easy availability means you can get your A2 poster on the wall looking great without forking out for a custom frame.
Ready to bring your vision to life on the perfect A2 poster? The team at SONI DESIGN is here to help with expert advice and high-quality printing services. Start your project with us today!
Leave a Comment
Stay home & get your daily
needs from our shop
Start You'r Daily Shopping with Nest Mart