
Your cart is currently empty.

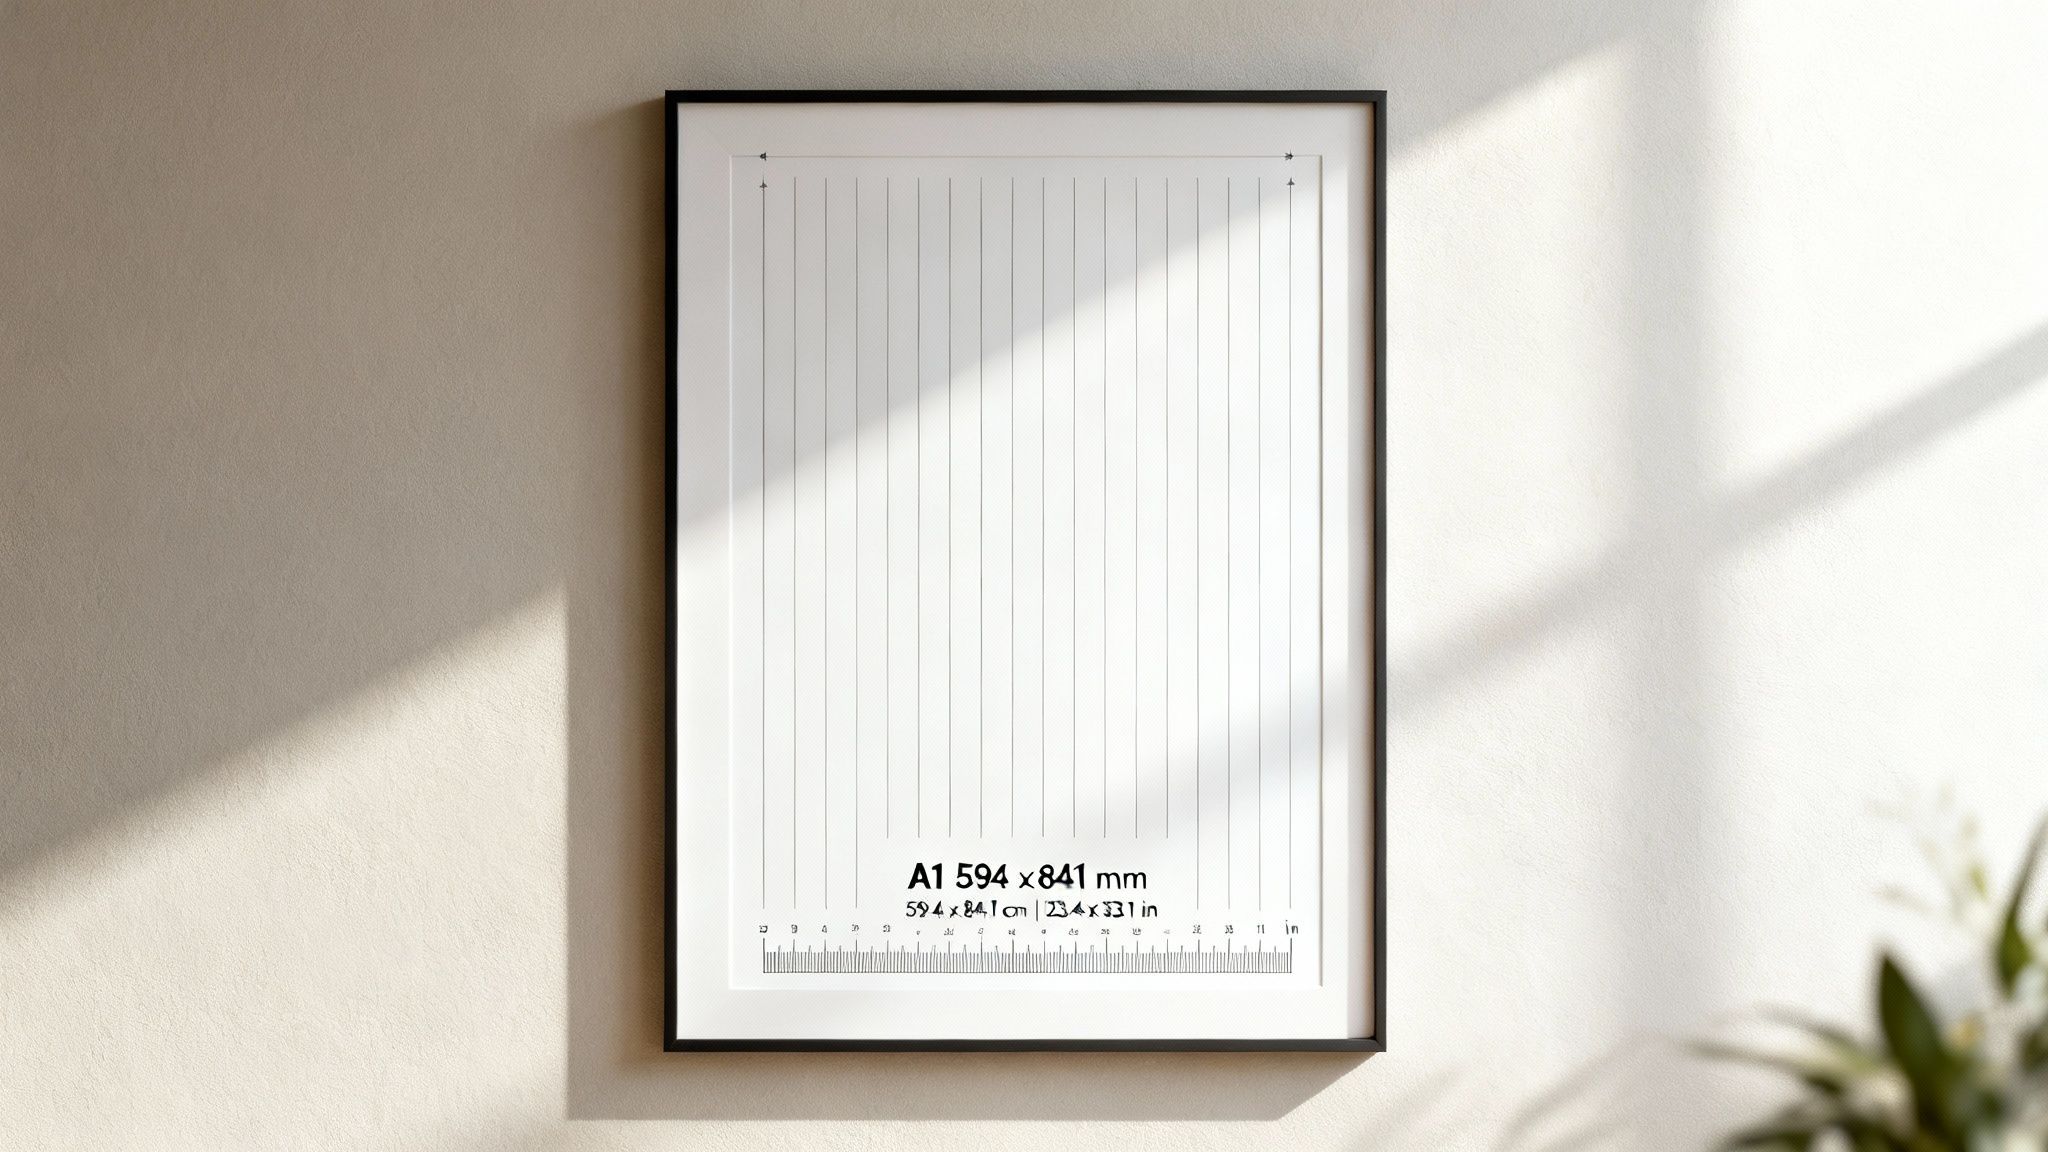
If you've ever wondered about the exact A1 poster measurements, the official size is 594 x 841 mm. These dimensions are set by the universally recognised ISO 216 standard, which guarantees your poster will be the same size whether it's printed in Auckland, Christchurch, or anywhere else in the world.
The Definitive Guide To A1 Poster Dimensions
Getting your poster dimensions right from the very beginning is the single most important step to getting a perfect print. The A1 size is a real workhorse in large-format printing. It gives you a generous canvas to work with, big enough to grab attention but not so large it becomes a hassle to display. It's that ideal sweet spot between visibility and practicality, which is why it's a firm favourite for businesses and creatives all over New Zealand.
Why Standardisation Matters
So, why are these measurements so consistent? It all comes down to the ISO 216 international paper standard. Think of it as a universal language for paper sizes. It ensures that an A1 design created in one part of the country will be identical to one printed in another.
The system itself is beautifully simple. Each paper size in the 'A' series is exactly half the size of the one before it. For example, if you fold an A0 sheet in half, you get two perfectly sized A1 sheets.
For designers and printers, this mathematical precision is a game-changer. It means:
- No Guesswork: You know exactly what you're getting every single time.
- Cost Savings: Printers can cut down standard-sized sheets with minimal paper waste.
- Easy Framing: Off-the-shelf frames and display units are made to fit A1 prints perfectly.
Ultimately, this standardisation is the reason you can order prints and buy frames with complete confidence, knowing everything will line up just right.
A Quick Conversion Chart
Most design software lets you switch between units, but it’s always handy to have the A1 poster measurements ready in millimetres, centimetres, and inches. Here’s a quick reference table to make it easy, covering both portrait (vertical) and landscape (horizontal) orientations.
By sticking to these official A1 poster measurements, you ensure your design fits standard frames and printers can produce it efficiently, saving you both time and money.
To make things even easier, here’s a quick reference guide converting A1 dimensions into the most common units.
A1 Poster Size Conversion Chart
| Unit | Portrait Dimensions | Landscape Dimensions |
|---|---|---|
| Millimetres (mm) | 594 x 841 mm | 841 x 594 mm |
| Centimetres (cm) | 59.4 x 84.1 cm | 84.1 x 59.4 cm |
| Inches (in) | 23.4 x 33.1 in | 33.1 x 23.4 in |
This table is your cheat sheet for ensuring your artwork is set up correctly, no matter what system you're using.
In New Zealand, the A1 poster size of 594 x 841 mm has been a staple for printing companies ever since the ISO 216 standard was adopted. Local printers will tell you that this dimension—59.4 x 84.1 cm—is perfectly suited to their digital presses, making it a reliable and cost-effective choice for high-quality prints. If you're curious, you can find out more about standard paper sizes and their applications.
Why A1 is the Go-To Poster Size in NZ
Take a walk down any high street in New Zealand, and you'll see them everywhere. From a cafe in Queenstown advertising its daily specials to a real estate agent in Christchurch showing off a new listing, the A1 poster has become the default choice for getting a message across.
But what makes this specific size so popular?
It really comes down to a perfect balance between making an impact and being practical. The standard 594 x 841 mm A1 measurements create a canvas that’s big enough to catch your eye from across the street, but it’s still small enough to fit nicely in a shop window, on a community notice board, or inside a local venue. It just hits that sweet spot of being visible without completely taking over the space.
This versatility makes it a super-effective tool for a massive range of uses. Whether it's for promoting a university event in Dunedin or displaying essential safety information on a construction site in Wellington, the A1 size gets the message across clearly and professionally.
The Sweet Spot for Kiwi Businesses
For businesses here in New Zealand, the A1 format offers a fantastic return on investment. It provides plenty of room for eye-catching graphics and easy-to-read text, letting you create designs that really show off your brand’s personality. The size ensures your message isn't just glanced at; it’s actually read and understood by people walking past.
Think about all the places you’ve probably seen one:
- Retail Promotions: Announcing a huge sale or a new product launch right in the shop window.
- Event Advertising: Getting the word out and building buzz for concerts, festivals, or farmers' markets.
- Informational Displays: Presenting maps, schedules, or educational content in places like libraries and visitor centres.
- Corporate Settings: Showcasing company values or important announcements in an office lobby.
This incredible adaptability has cemented its status as the undisputed champion of large-format printing. And it’s not just a feeling; the numbers from local suppliers back this up completely.
A1 posters aren't popular just by chance—they're a smart, strategic choice. Their dimensions are perfectly tuned for reaching people in all sorts of environments, from busy city centres to quiet community halls.
Data from Kiwi printing firms confirms the trend. Printers across New Zealand report that A1 posters make up a staggering 45% of all their large-format orders. That’s well ahead of A0 at 25% and A2 at 30%. With some printers shipping over 10,000 A1 units every month, it’s clear this size just works for the local market.
You can dive deeper into the numbers and explore more about NZ poster printing trends to see the data for yourself. Because they're so widely used, finding frames and display stands is also incredibly easy, making A1 a hassle-free option from the first design sketch to the final display.
Preparing Your Artwork For A1 Printing
Okay, so you've nailed your design and you know the exact A1 poster measurements. That's great, but now comes the most crucial part: getting that file ready for the printer. This is where a fantastic design can either shine or fall flat, and it all comes down to a few technical details. Getting this right ensures what you see on your screen is exactly what you get in your hands.
To make this dead simple, think of your poster design like a photo you're putting into a picture frame. This little analogy makes it easy to understand three key printing terms: the trim, the bleed, and the safe area.
-
Trim Line: This is the final edge of your poster once the printer cuts it down to the precise A1 size (594 x 841 mm). In our analogy, this is the visible edge of the photo sitting perfectly in the frame.
-
Bleed Area: This is a small, extra bit of your background image or colour that extends beyond the trim line. It's like the part of the photograph that gets tucked just behind the frame's edge, so you don't see any white gaps.
-
Safe Area: This is the core of your design, a space well inside the trim line. You'll want to keep all your important stuff—like text, logos, and key images—within this zone to make sure nothing gets accidentally chopped off during trimming.
This process shows just how versatile a well-prepared A1 poster can be across different Kiwi industries, from a local cafe to a university open day.
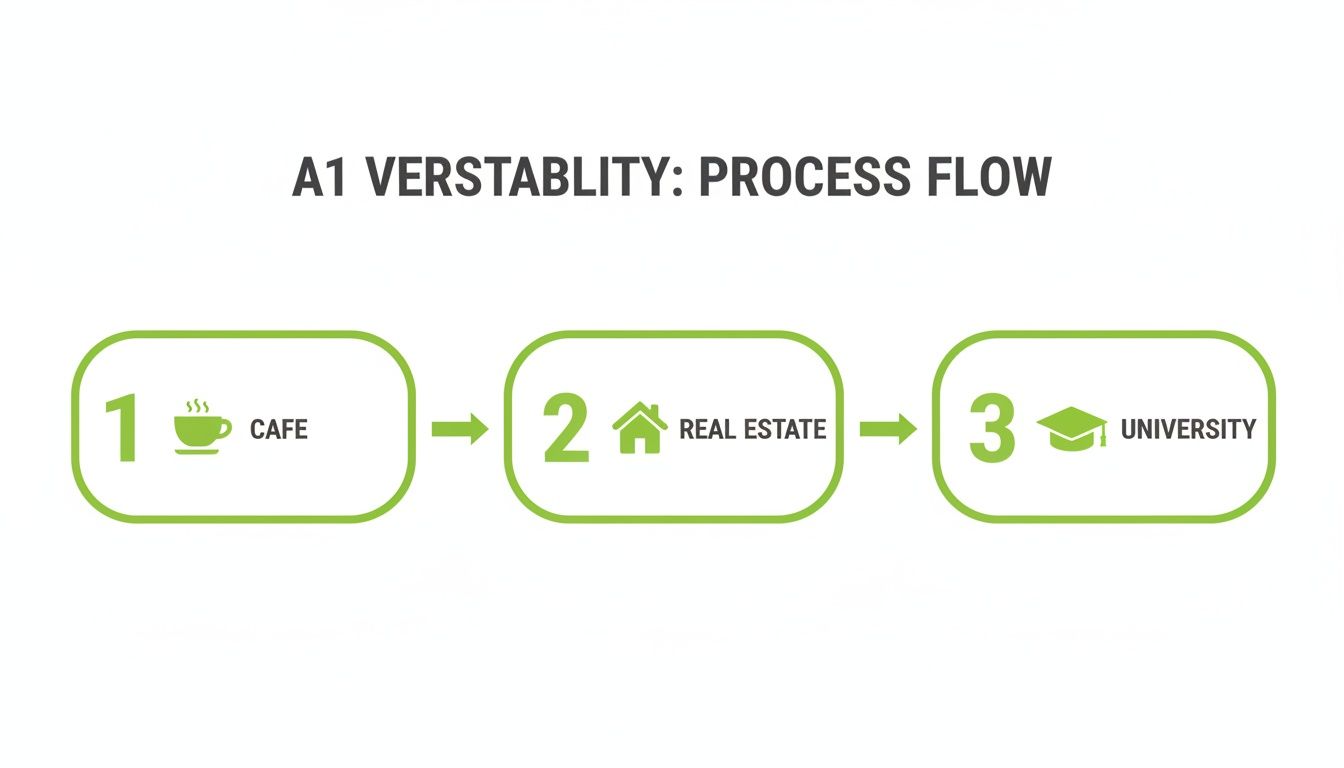
The real takeaway here is that one perfectly prepared A1 file can be a powerful tool for all sorts of business needs.
Setting Up Your File Correctly
Most printers here in New Zealand will ask you for a 3-5 mm bleed on all sides of your artwork. When you’re creating your design, you literally need to stretch your background out past the final trim dimensions by this amount. This little buffer is a lifesaver, preventing any unsightly white slivers from showing up if the guillotine is off by even a fraction of a millimetre.
Think of bleed as your design's safety net. It’s a simple setup step that makes the difference between a professional print and a costly mistake. Forgetting it is one of the most common errors in print design.
Next up, resolution. Your file absolutely must be set to 300 DPI (Dots Per Inch). This is the gold standard for high-quality printing. It ensures every image and letter comes out sharp and clear, not blurry or pixelated. A lower resolution might look okay on your monitor, but trust me, when it's blown up to A1 size, it will look fuzzy.
Finalising Your Print-Ready File
The last piece of the puzzle is saving your artwork in the right format and colour mode. You should always export your final design as a print-ready PDF. This format is brilliant because it locks in all your fonts and images, meaning it will look identical on the printer’s computer as it does on yours. No nasty surprises.
Just as important is the colour mode. Make sure your design is created and saved in CMYK (Cyan, Magenta, Yellow, Key/Black). This is the four-colour model that all professional printers use. If you accidentally design in RGB (Red, Green, Blue)—which is for screens—your colours will shift during the printing process and likely come out looking dull or just plain wrong.
With a high-resolution A1 file, the file size can get quite big. It’s handy to know how to compress a PDF without losing quality to make it easier to send to your printer. Stick to these steps, and you'll be set for a flawless print run every single time.
Choosing The Right Paper and Finish
So, you've nailed the design. Fantastic! But don't click "print" just yet. The paper and finish you choose are just as critical as the design itself—they dictate how your A1 poster looks, feels, and stands up to the elements. This isn't just about making it look pretty; it's about matching the physical poster to its job and its environment.
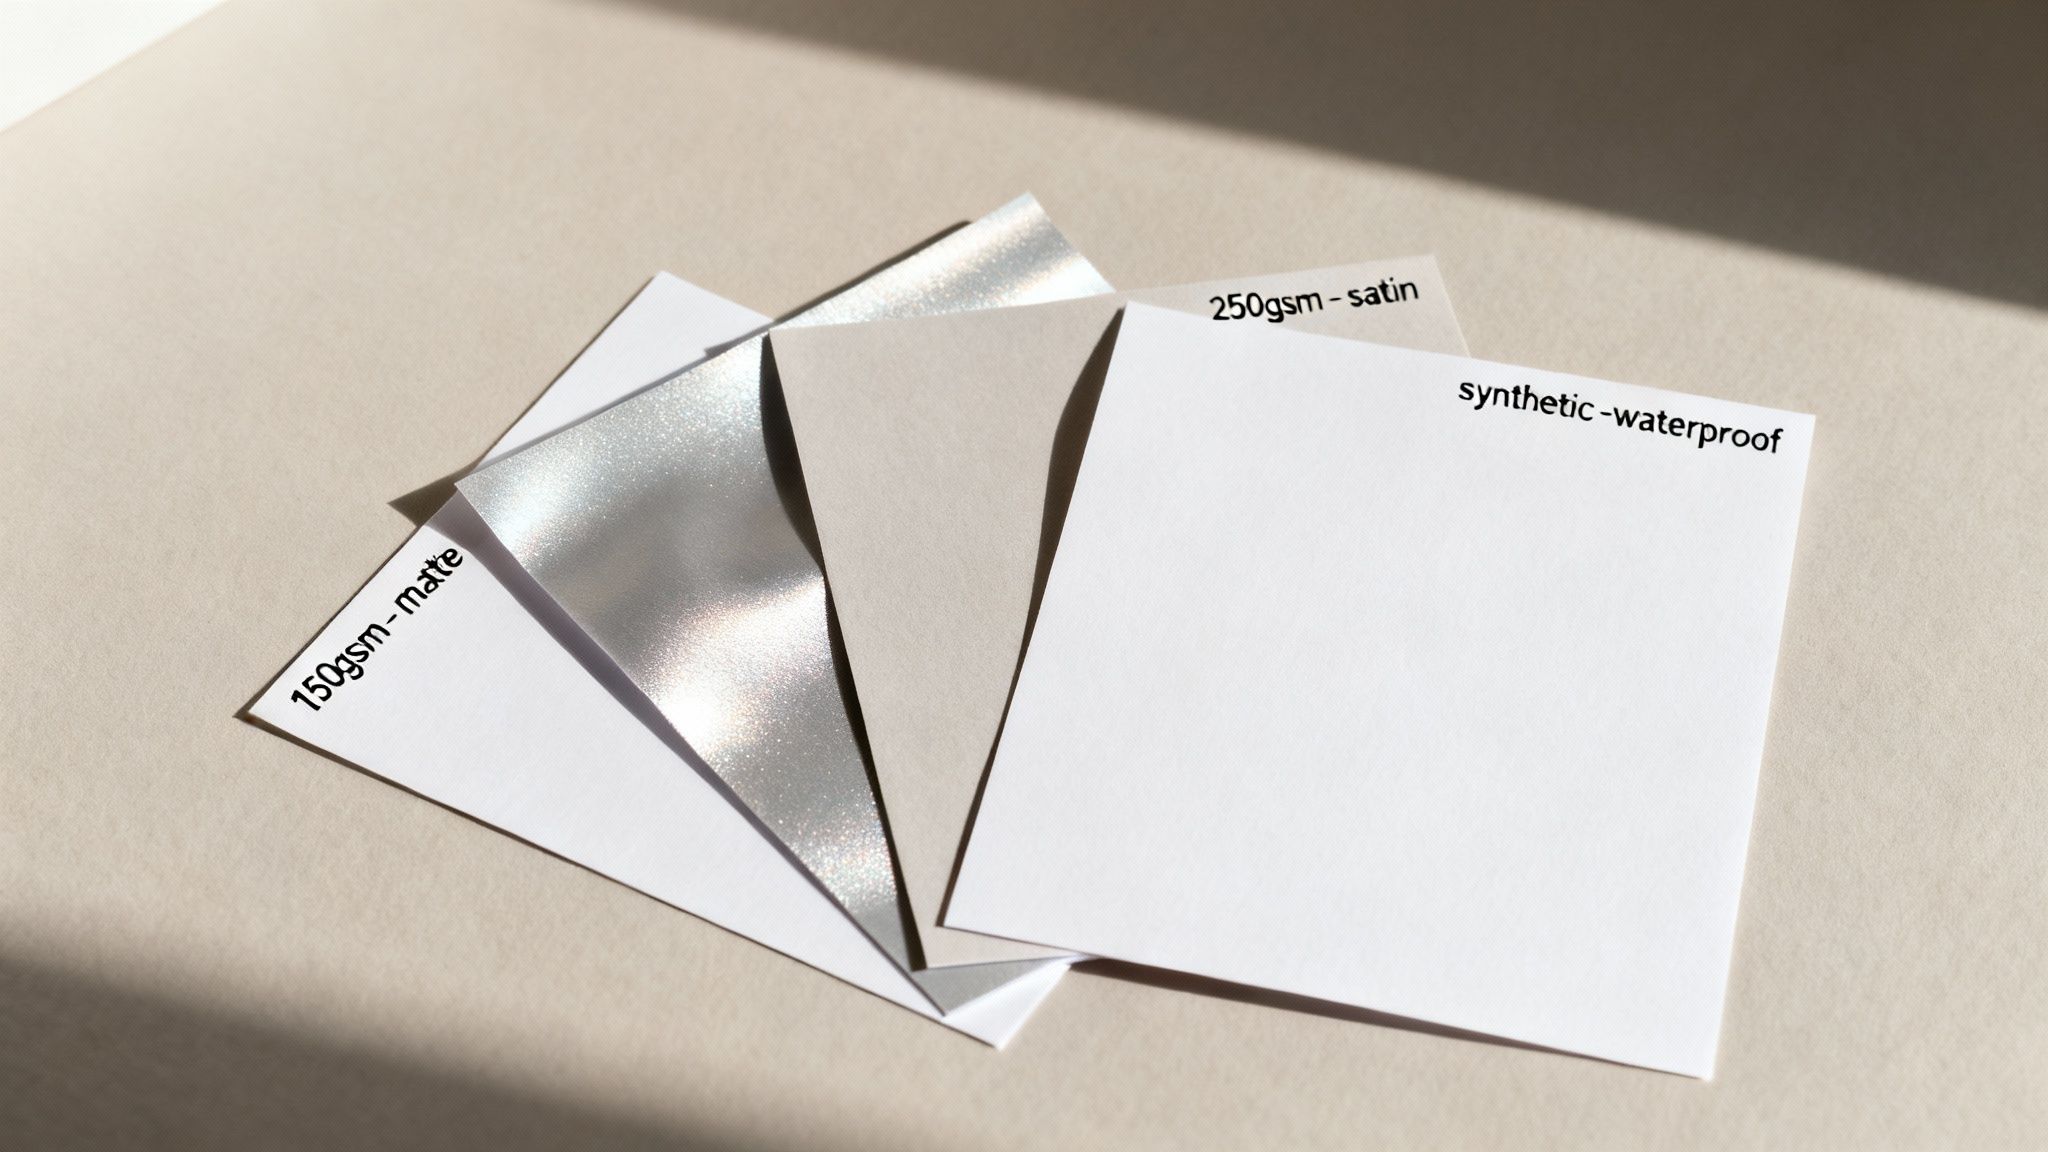
First up is paper weight, measured in GSM (Grams per Square Metre). Don't let the term intimidate you; it's simply a measure of thickness and durability. A lower GSM means a lighter, flimsier paper, while a higher GSM gives you a thicker, more robust poster that feels far more premium in your hands.
Understanding Paper Weights
For most indoor A1 posters, you'll likely be looking at two standard weights. Each has its own place, depending on your budget and how long you need the poster to last.
- 150gsm: This is a brilliant, budget-friendly option for short-term indoor displays. It’s lightweight and easy to handle, making it perfect for temporary promotions, event announcements, or any poster that gets switched out regularly.
- 250gsm: If you’re after something with a bit more heft and a professional edge, 250gsm is the way to go. Its heavier weight lends a quality feel, making it ideal for art prints, important informational posters, or any design you want to hang around for a while.
Ultimately, picking a paper weight is a balancing act between cost and purpose. For a quick, throw-away message, 150gsm does the job perfectly. For something that needs to make a lasting impression, the small investment in 250gsm is always worth it.
Selecting The Perfect Finish
Once you've settled on the weight, it's time to think about the finish. This choice affects everything from how vibrant your colours appear to whether people can actually read your poster under bright lights.
- Gloss: This finish is all about impact. It has a high-shine surface that makes colours really pop and gives your images a sharp, almost photographic quality. It's fantastic for designs loaded with bold graphics, but be warned—it can create a nasty glare under direct lighting.
- Matte: For a more understated, elegant look, you can't go past a matte finish. It has no sheen, which means zero glare and excellent readability from any angle. This makes it a great choice for text-heavy posters or artistic prints where you want a softer, more classic feel.
- Satin (or Silk): This is the happy medium. A satin finish has a subtle sheen that boosts colour vibrancy without the mirror-like reflection of a full gloss. It offers a beautiful, professional look that works for just about any A1 poster you can think of.
Of course, if your poster is headed outdoors—especially in New Zealand’s famously changeable weather—standard paper just won't do. For an A-frame sign sitting on a footpath in rainy Invercargill or windy Wellington, a synthetic waterproof paper is non-negotiable. In fact, research shows that waterproof materials can increase a poster's lifespan by up to 85% in wet climates. This ensures your message stays crisp and clear, no matter what the sky throws at it. To get a better sense of things, you can explore how different paper types suit various applications in NZ.
Common A1 Poster Design Mistakes To Avoid
Even when you’ve nailed the A1 poster measurements, a few simple design stumbles can trip you up at the last second. Think of this as the final pre-flight check before your design heads to the printers—avoiding these common pitfalls is what separates a professional poster from a printing disaster.
The number one issue we see? Low-resolution images. A photo might look perfectly sharp on your computer screen, but when it’s blown up to the full 594 x 841 mm of an A1 poster, it can quickly turn into a blurry, pixelated mess. Always, always start with high-quality source images and make sure your entire design file is set to 300 DPI for a crisp, professional finish.
Another classic mistake is forgetting to add bleed. Without that extra 3-5 mm of your background design extending beyond the trim edge, you’re gambling with unsightly white slivers appearing on your final print. This is because industrial trimming machines can shift ever so slightly, and bleed gives you that crucial margin for error.
Forgetting Critical Print Settings
Beyond images and bleed, a couple of technical settings are absolutely non-negotiable for professional printing. They’re simple to set up but can completely ruin a print job if you forget them.
-
Designing in RGB Instead of CMYK: This is a big one. Your monitor displays colours using the RGB (Red, Green, Blue) light spectrum, which is vibrant and bright. Professional printers, however, build colour using CMYK (Cyan, Magenta, Yellow, Key/Black) inks. If you design in RGB, you'll get a nasty surprise when your bright, electric blue turns into a dull, flat navy on paper. Always set your document’s colour mode to CMYK right from the start.
-
Ignoring the Safe Area: Pushing your logo or crucial text right up to the edge is a risky move. Just as bleed protects the outside of your design, the "safe area" protects the inside. We recommend keeping all vital information at least 5-10 mm away from the trim line. This guarantees nothing important gets accidentally chopped off during the finishing process.
A quick pre-flight check can save you from a costly reprint. Seriously, taking five minutes to double-check your resolution, bleed, colour mode, and safe area is the single best thing you can do to protect your investment and your brand’s reputation.
Finally, proofread your text. Then proofread it again. And then get someone else to do it. It’s astonishing how easily a tiny typo can slip past, and spotting it after you’ve printed 100 posters is a painful (and expensive) lesson to learn.
Before you send that file off, it pays to run through a final checklist. This simple step helps you catch any lingering issues and send your A1 poster design to print with complete confidence.
A1 Poster Pre-Print Checklist
| Check Item | Requirement | Why It's Important |
|---|---|---|
| Dimensions | 594 x 841 mm (plus bleed) | Ensures your artwork fits the standard A1 size without distortion or unwanted cropping. |
| Resolution | 300 DPI | Guarantees all images and text will be sharp and clear, not pixelated or blurry. |
| Colour Mode | CMYK (not RGB) | Prevents unexpected colour shifts, ensuring the printed colours match your on-screen design. |
| Bleed | Minimum 3 mm on all sides | Avoids thin white borders by giving the printer a margin of error during trimming. |
| Safe Area | Key content 5-10 mm inside trim | Protects important text, logos, and graphics from being accidentally cut off. |
| File Format | High-Quality PDF | This is the industry standard, embedding fonts and images to preserve your layout perfectly. |
| Proofreading | Checked by at least two people | Catches typos and grammatical errors before they become a permanent, printed mistake. |
Steering clear of these common mistakes ensures your meticulous attention to A1 poster measurements is matched by a flawless, print-ready design file. You'll be able to send your work off to the printer knowing the final result will be something you're proud to put on display.
How To Frame And Display Your A1 Poster
You’ve got your poster printed, and it looks fantastic. Now for the final touch: putting it on display. How you present your poster is just as important as the design itself—it protects the print and makes sure your message truly stands out.
For that classic, polished finish, you can't go wrong with a traditional frame. Standard A1 frames are easy to find at most New Zealand retailers like The Warehouse or Kmart, so you won’t have trouble tracking one down. Think about the style you're going for. A simple black or white frame can give your poster a clean, modern edge, while a natural wood frame adds a bit of warmth and a more organic feel.
Beyond The Traditional Frame
But a standard frame isn't your only choice. Sometimes, you need something a bit more practical or durable, especially if you plan on changing your poster often or displaying it outside.
Here are a few great alternatives:
- Snap Frames: These are a game-changer for retail stores, cafés, or any business that updates promotions regularly. The edges of the frame simply snap open from the front, letting you swap out posters in seconds without ever having to take the frame off the wall.
- A-Frame Signs: If you’re looking to catch the eye of people walking past, an A-frame sign is your best bet. Built to withstand the outdoors, these signs are weighted to keep them stable and protect your poster from a bit of weather. They’re perfect for footpath advertising.
- Foam Board Mounting: For a clean, minimalist look without any frame at all, mounting your poster on a rigid foam board is an excellent option. It creates a sturdy, professional display that’s light enough to hang anywhere. This is a popular choice for trade show displays, corporate presentations, and art exhibitions.
Getting the frame size right is crucial for a professional look. If you're still a bit unsure, this guide is a great resource to figure out exactly what size poster frame do I need.
Still Have Questions About A1 Posters?
Even after getting the specs down, a few questions always seem to come up just as you're getting ready to print. It’s completely normal. Nailing these final details is what separates a good poster from a great one, giving you the confidence that you've covered all your bases.
Let's walk through some of the most common queries we hear about A1 posters.
How Many A4 Pages Can I Fit on an A1 Poster?
You can fit exactly eight A4 pages onto an A1 sheet, with no awkward gaps or trimming needed. This is one of the best things about the international paper standard (the 'A' series) – it all scales perfectly.
The maths behind it is beautifully simple:
- An A1 is double the size of an A2.
- An A2 is double the size of an A3.
- An A3 is double the size of an A4.
This elegant system makes it incredibly easy to picture just how much space you have to work with on an A1 poster.
To put it another way: 2 x A2s = A1, 4 x A3s = A1, and 8 x A4s = A1. It's this clever, consistent scaling that makes life so much easier for designers and printers everywhere.
What's the Ideal Resolution for an A1 Design?
For a crisp, professional-looking A1 print, you should always aim for 300 DPI (dots per inch) at the final size. In the digital world, that works out to a canvas size of 7016 x 9933 pixels.
Sure, you might get away with 150 DPI if the poster will only ever be seen from across a room, but 300 DPI is the gold standard. It guarantees your print will look sharp and clear, even when people are standing right in front of it.
Can I Blow Up a Phone Photo to A1 Size?
Technically, yes, but it’s risky. While modern smartphone cameras are impressive, their photos are designed for screens and smaller prints. When you enlarge one to the size of an A1 poster, you often end up with a blurry, pixelated mess.
Before you even think about it, check your photo's dimensions. You’ll need a bare minimum of 4500 pixels along the longest edge for it to look even halfway decent. For a genuinely sharp print, you really want something closer to 9000 pixels. To avoid disappointment, it’s always a good idea to have your printer check the file quality first.
Ready to bring your A1 poster vision to life with vibrant colours and professional quality? At SONI DESIGN, we specialise in turning your ideas into impactful prints. Let's create something extraordinary together!
Leave a Comment
Stay home & get your daily
needs from our shop
Start You'r Daily Shopping with Nest Mart